Back to Portal Official School Portal Operations Guide
Jump to: Quick Start 1. Sign In 2. School Admin 3. Teachers 4. Students 5. Add-Ons 6. FAQ / Fixes 7. Offline Lab Node
Logo
Official Operations Manual • ZBSK Customized Edition

ZBSK INTERNATIONAL

Knowledge, Faith and Integrity • ZBK Educational Complex, Kaduna, Nigeria

Portal Link: zbsk.zabibschools.com.ng
Active Term Context: 2025/2026 (1st Term)
Assessment Policy: 50% CA / 50% Exam • ID Prefix: ZBSK
Resumption Date: 9th September, 2024
Enabled Campus Modules: CBT Exams Results & Broadsheets Staff Recruitment & HR Offline Lab Node & Sync
Tailored for ZBSK INTERNATIONAL: Settings, grading split (50% CA / 50% Exam), student ID format (ZBSK/SS1/001), and enabled sections reflect your campus configuration. Illustrated screenshots use clean sandbox demonstration data (ShemAcad) to protect student privacy across every school.
Who Uses Which Login?
Role What They Use to Sign In Main Tasks
School Admin Admin Email + Password Sessions, classes, staff, students, broadsheets & settings
Teacher Teacher Email + Password My Class, CBT quizzes, CA/Exam scores & comments
Student Reg. No. (ZBSK/SS1/001) + Password View Form Teacher, take timed CBT tests, view test history
Golden Setup Order for Every New Term or New School
Before teachers enter scores or students take tests, the School Administrator should always follow this simple 5-step order: (1) Set Active Session & Term → (2) Verify Classes, Sub-Arms & Subject Allocations → (3) Confirm Teachers Are Assigned to Their Classes & Subjects → (4) Confirm Student Rosters → (5) Check Result Settings (Readiness 100%).
Section 1 • Everyone

Accessing Your School Portal & Signing In

Start from your school's Digital Portal Gateway page to choose the right door for your account.

Step 1.1

Opening the School Portal Gateway

All Users

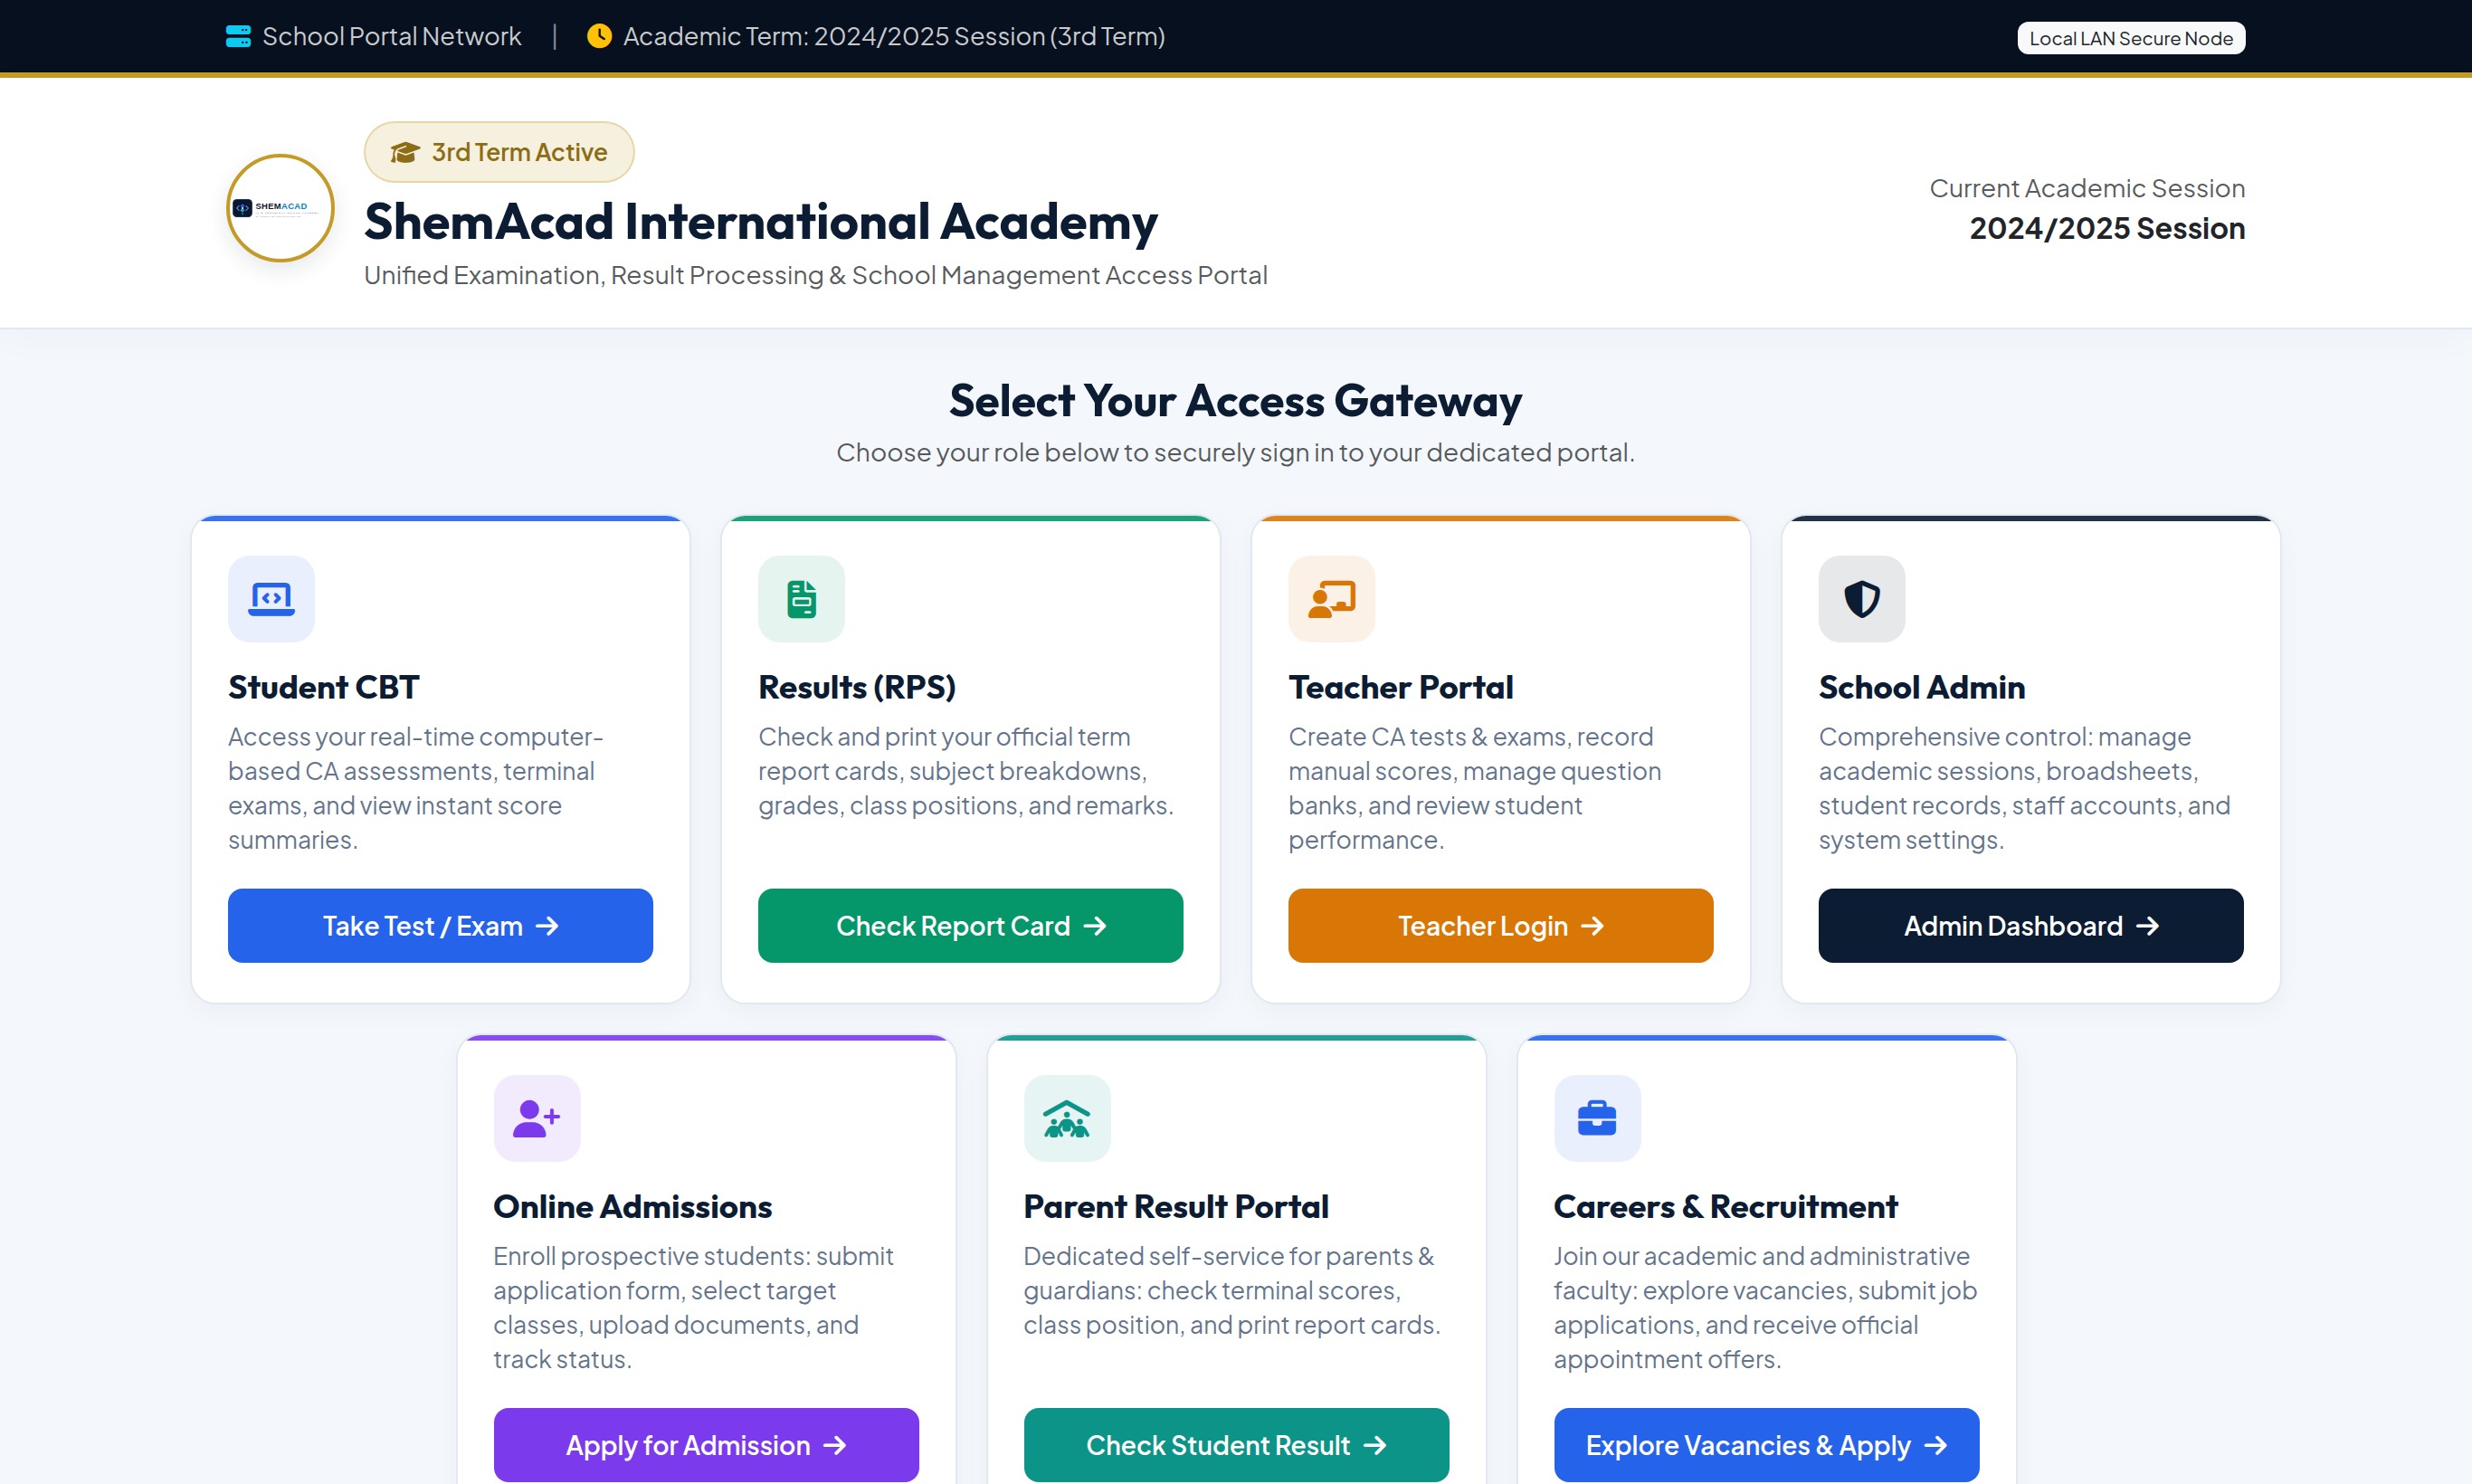
When you visit your school's portal address in Chrome, Edge, or your phone browser, you arrive at the Access Gateway. At the top banner you can always see the active academic session and current term.

  1. Look at the role cards in the center of the screen.
  2. Click Take Test / Exam if you are a Student.
  3. Click Teacher Login if you are a Subject Teacher or Form Teacher.
  4. Click Admin Dashboard if you are the Principal, Exam Officer, or School Admin.
  5. Click Check Student Result on Parent Result Portal (or Check Report Card where shown) to check term report cards.
Helpful Tip
Ask your School Administrator to bookmark your school portal link on all school lab computers and share it on parent WhatsApp groups.
Opening the School Portal Gateway
School Digital Portal Gateway showing all access cards and active term banner.
Step 1.2

Signing In With the Right Credentials

All Roles

Each portal asks for a slightly different username so student, teacher, and administrator accounts stay strictly separated.

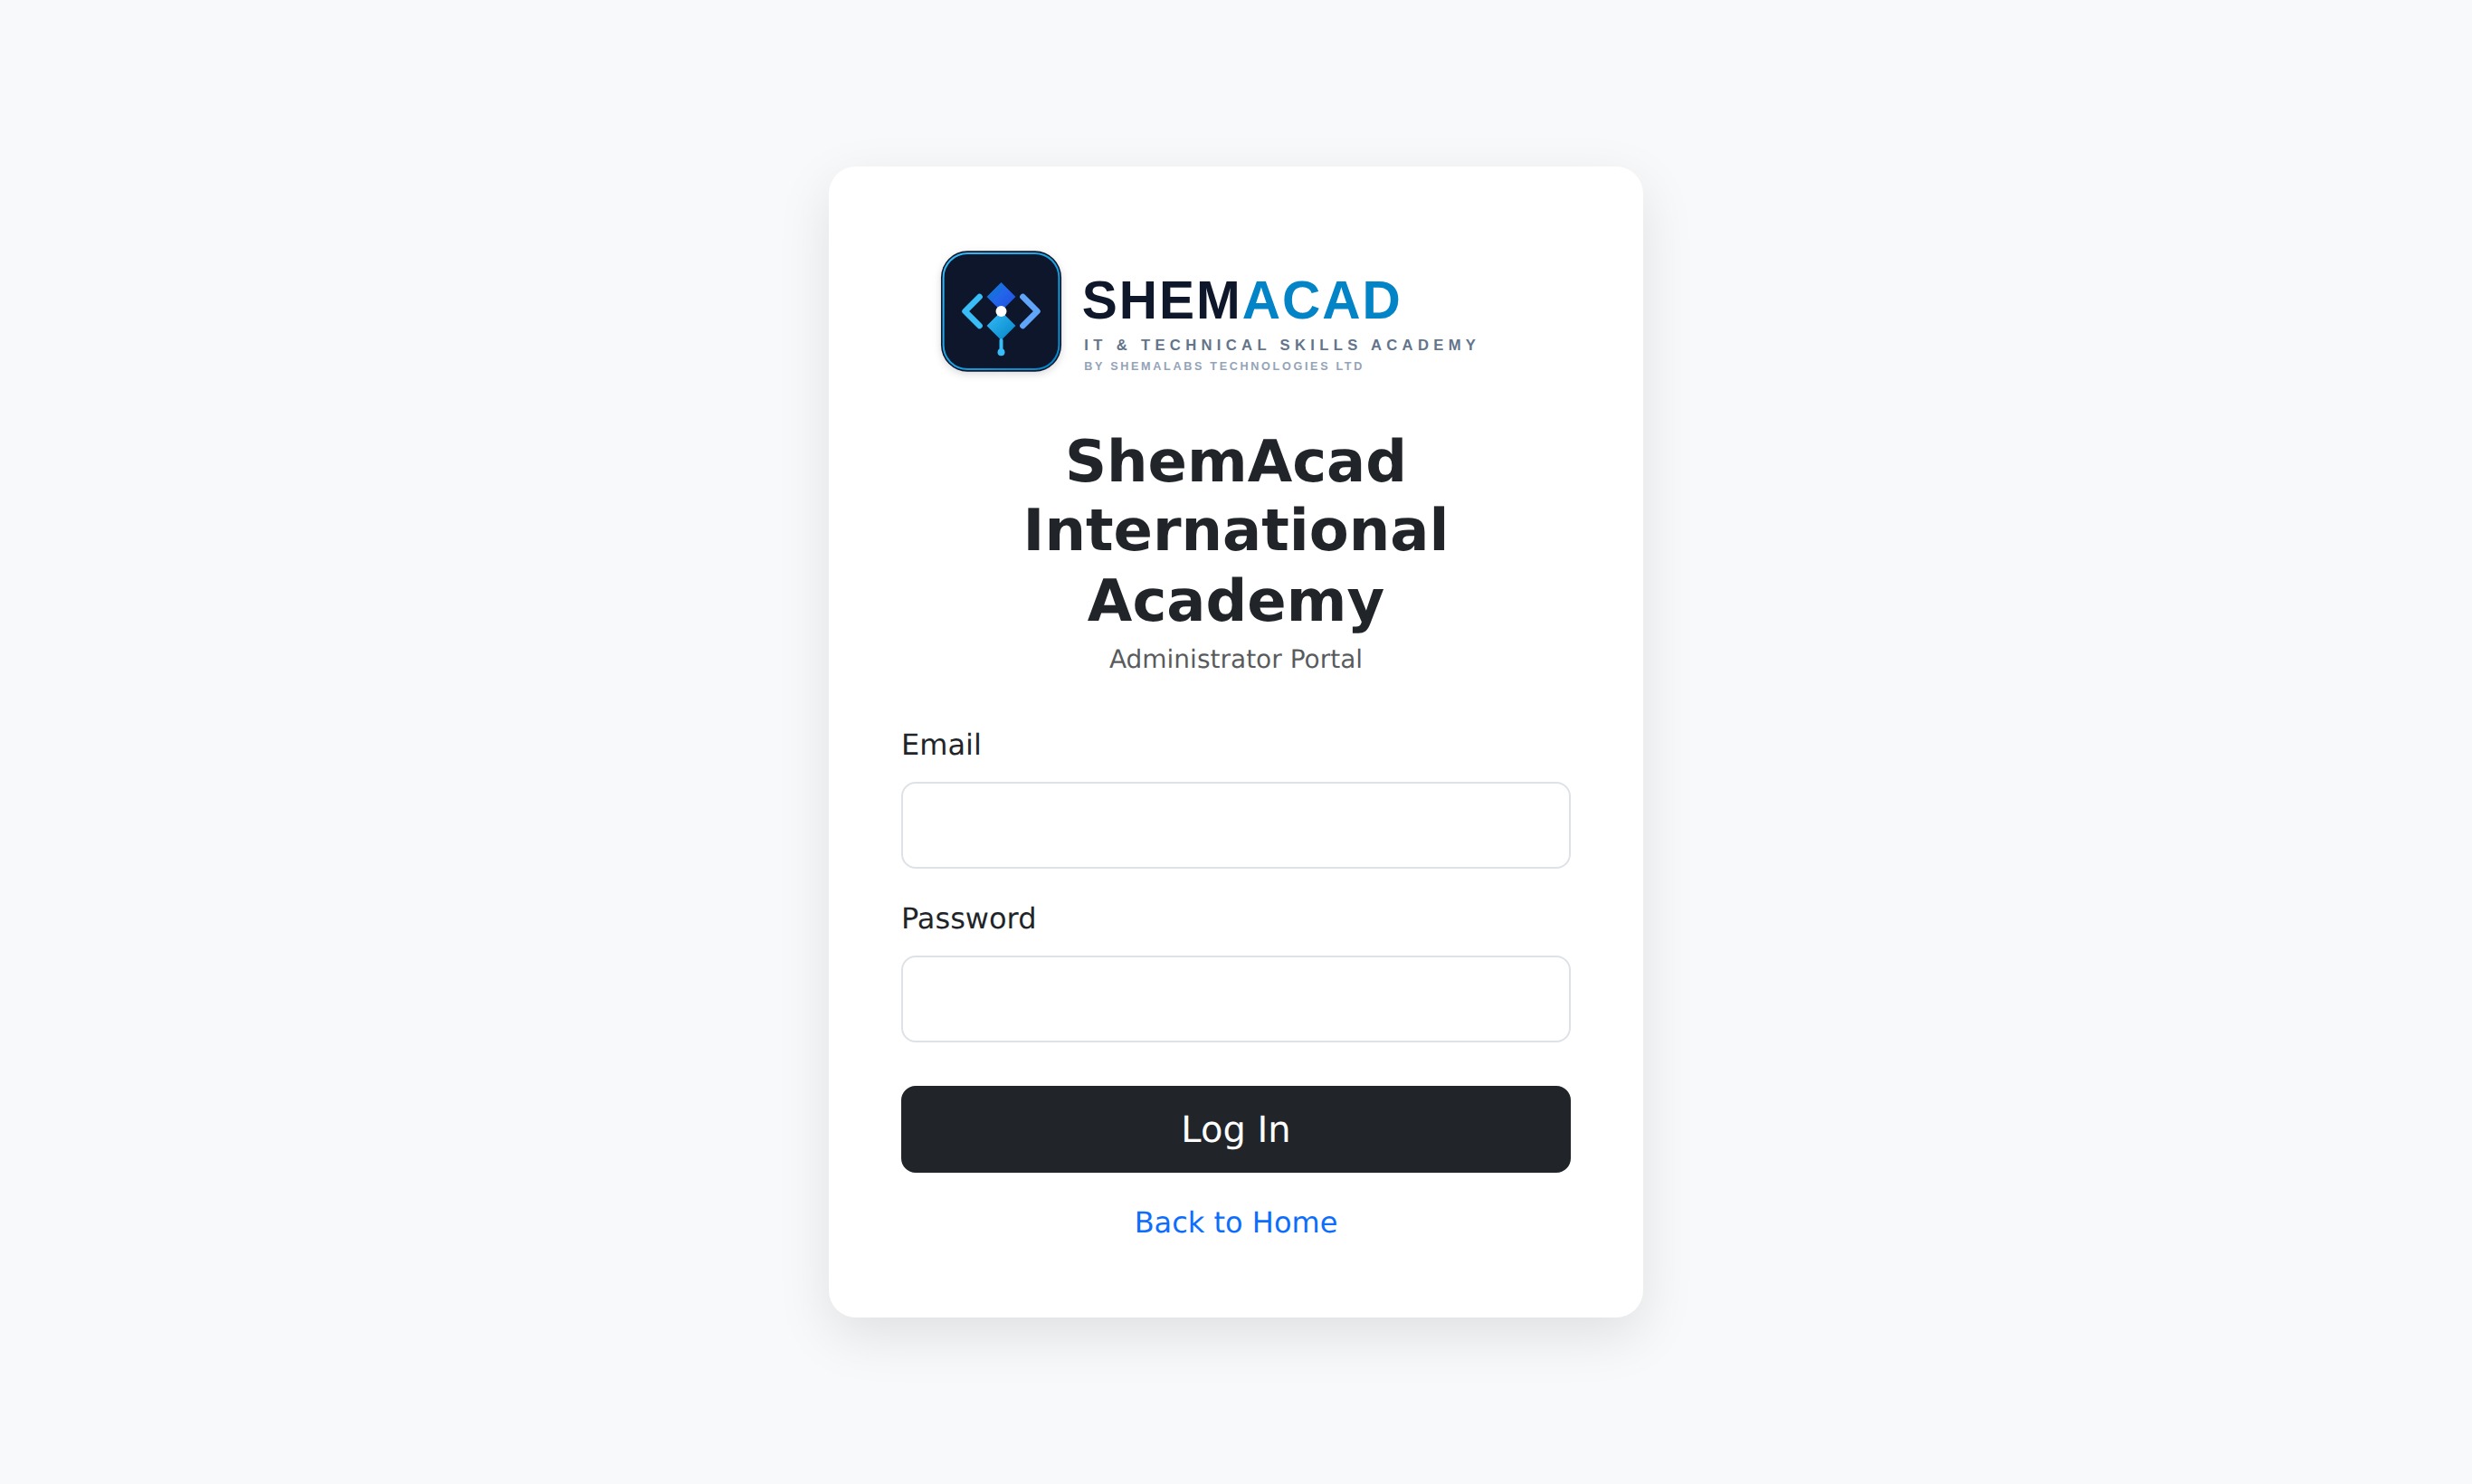
Administrator Login Screen
Admin Login: Enter your registered Admin Email & Password.
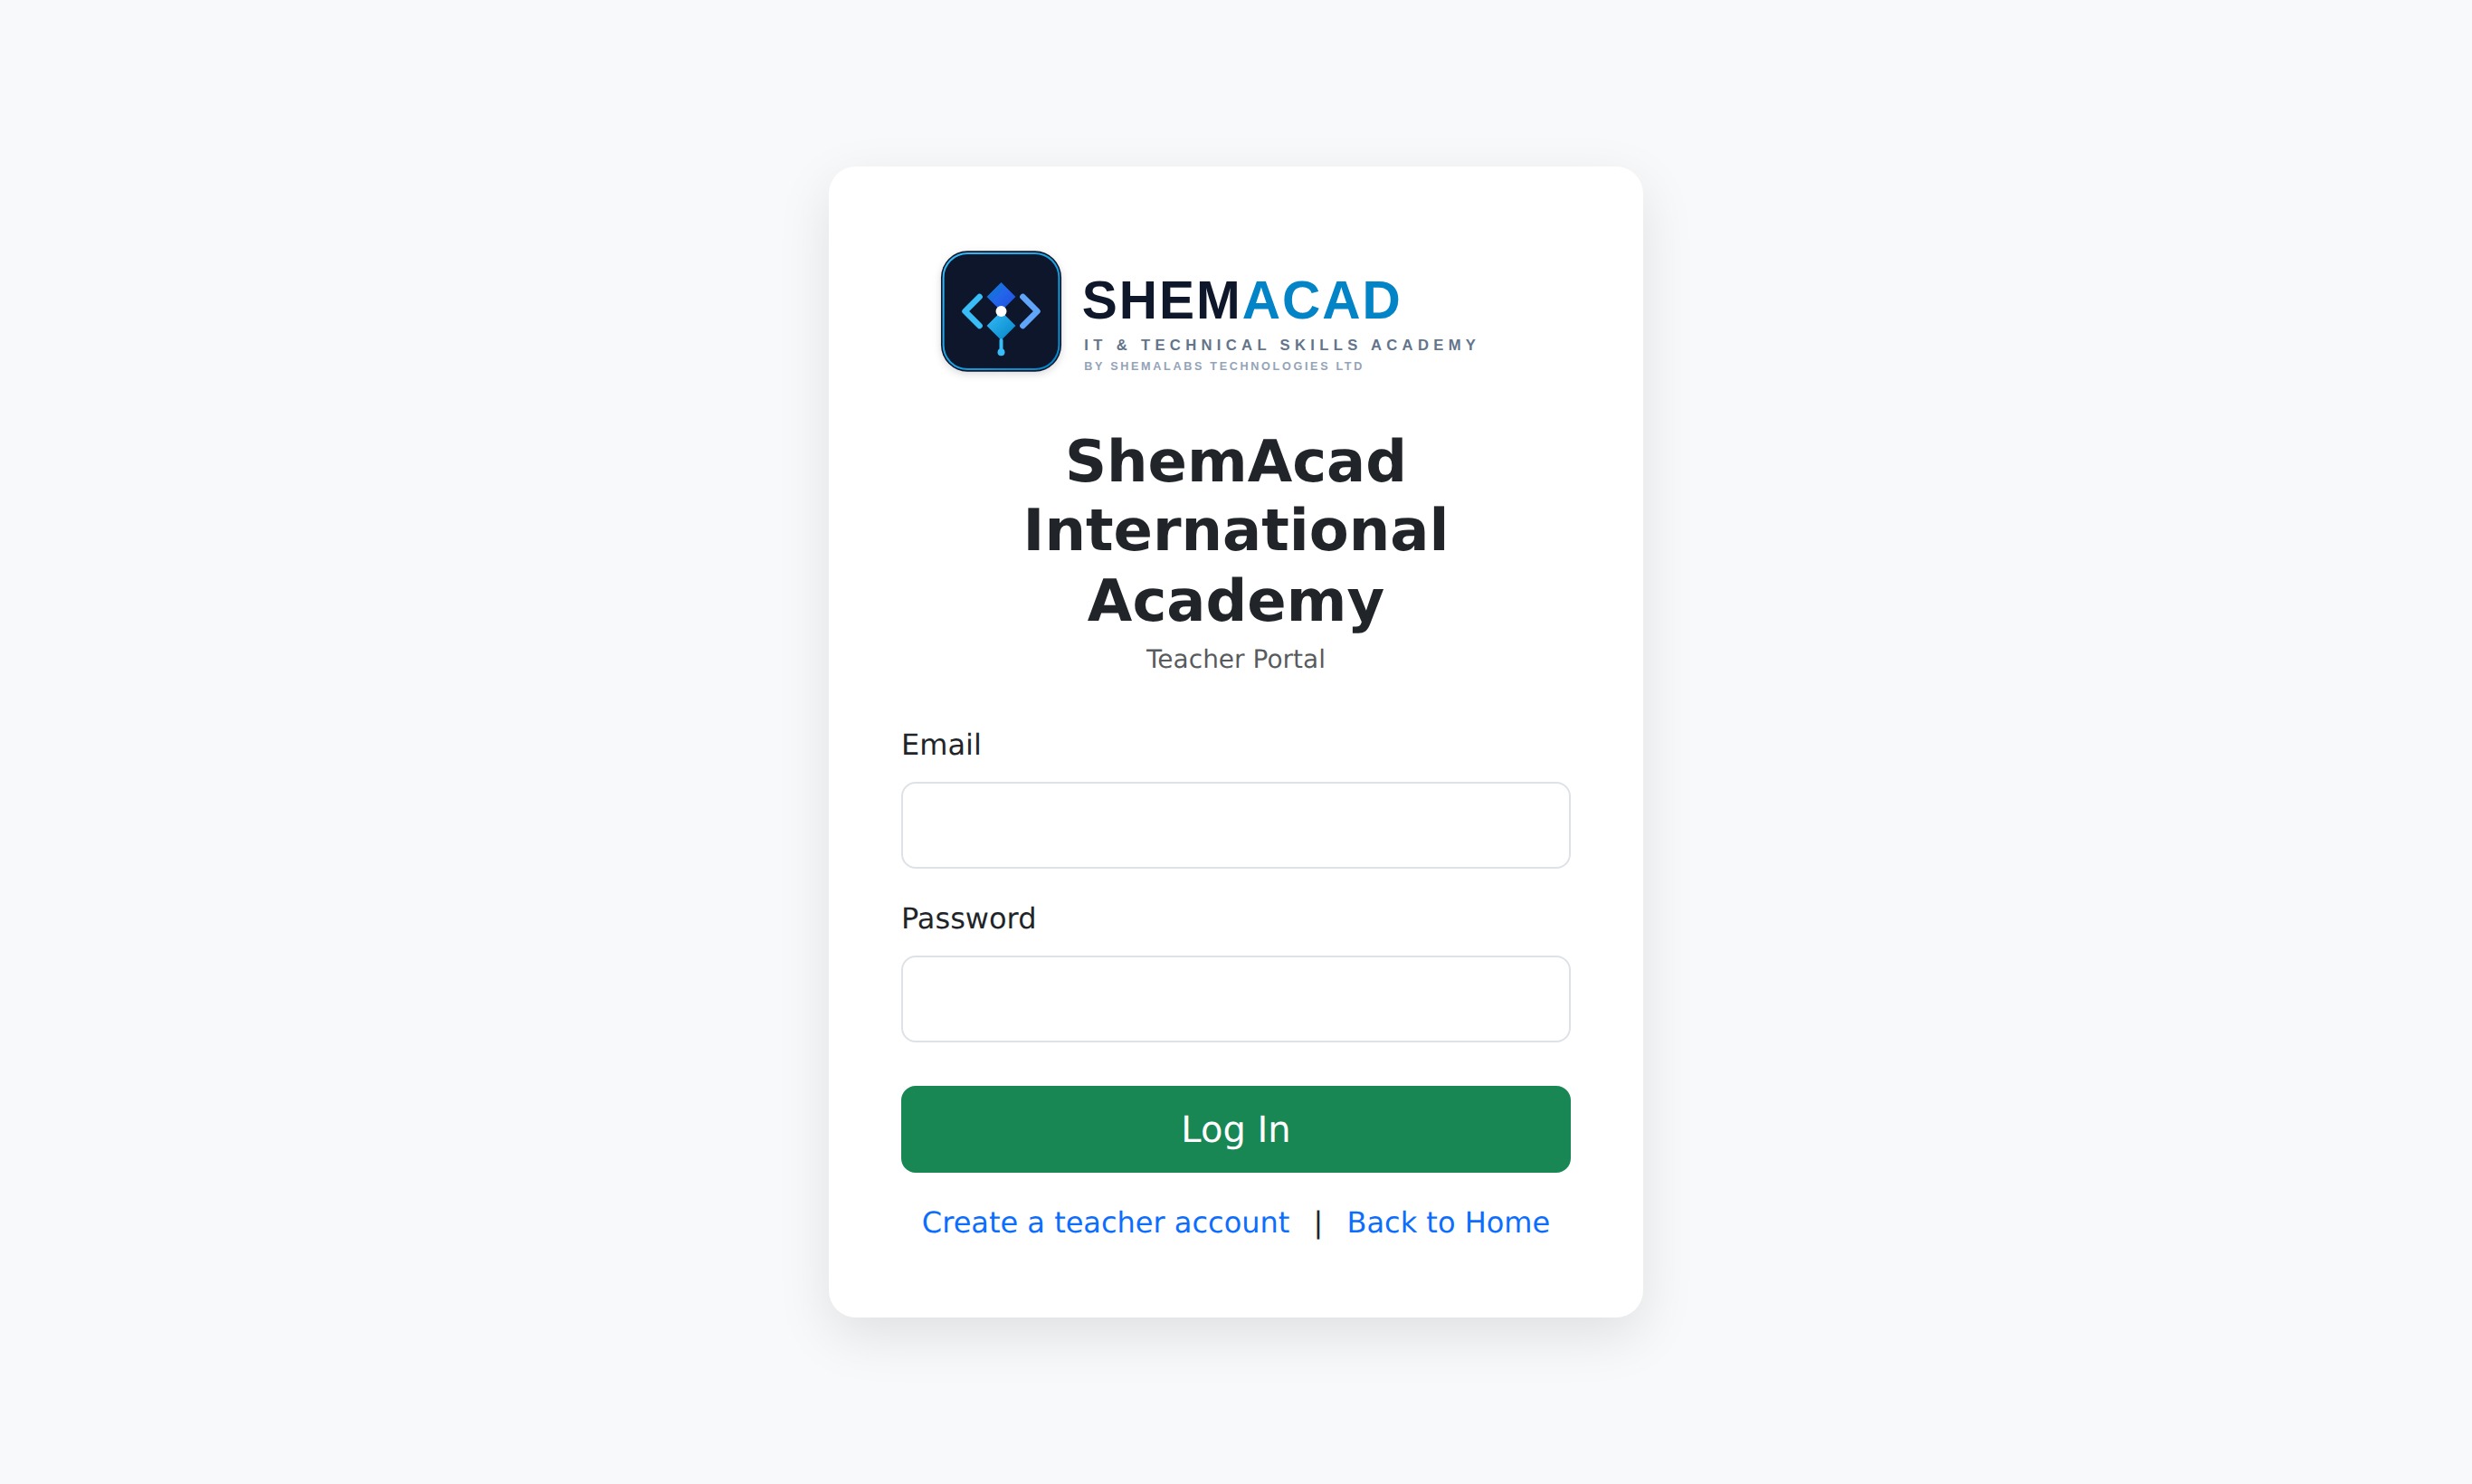
Teacher Login Screen
Teacher Login: Enter your Teacher Email & Password.
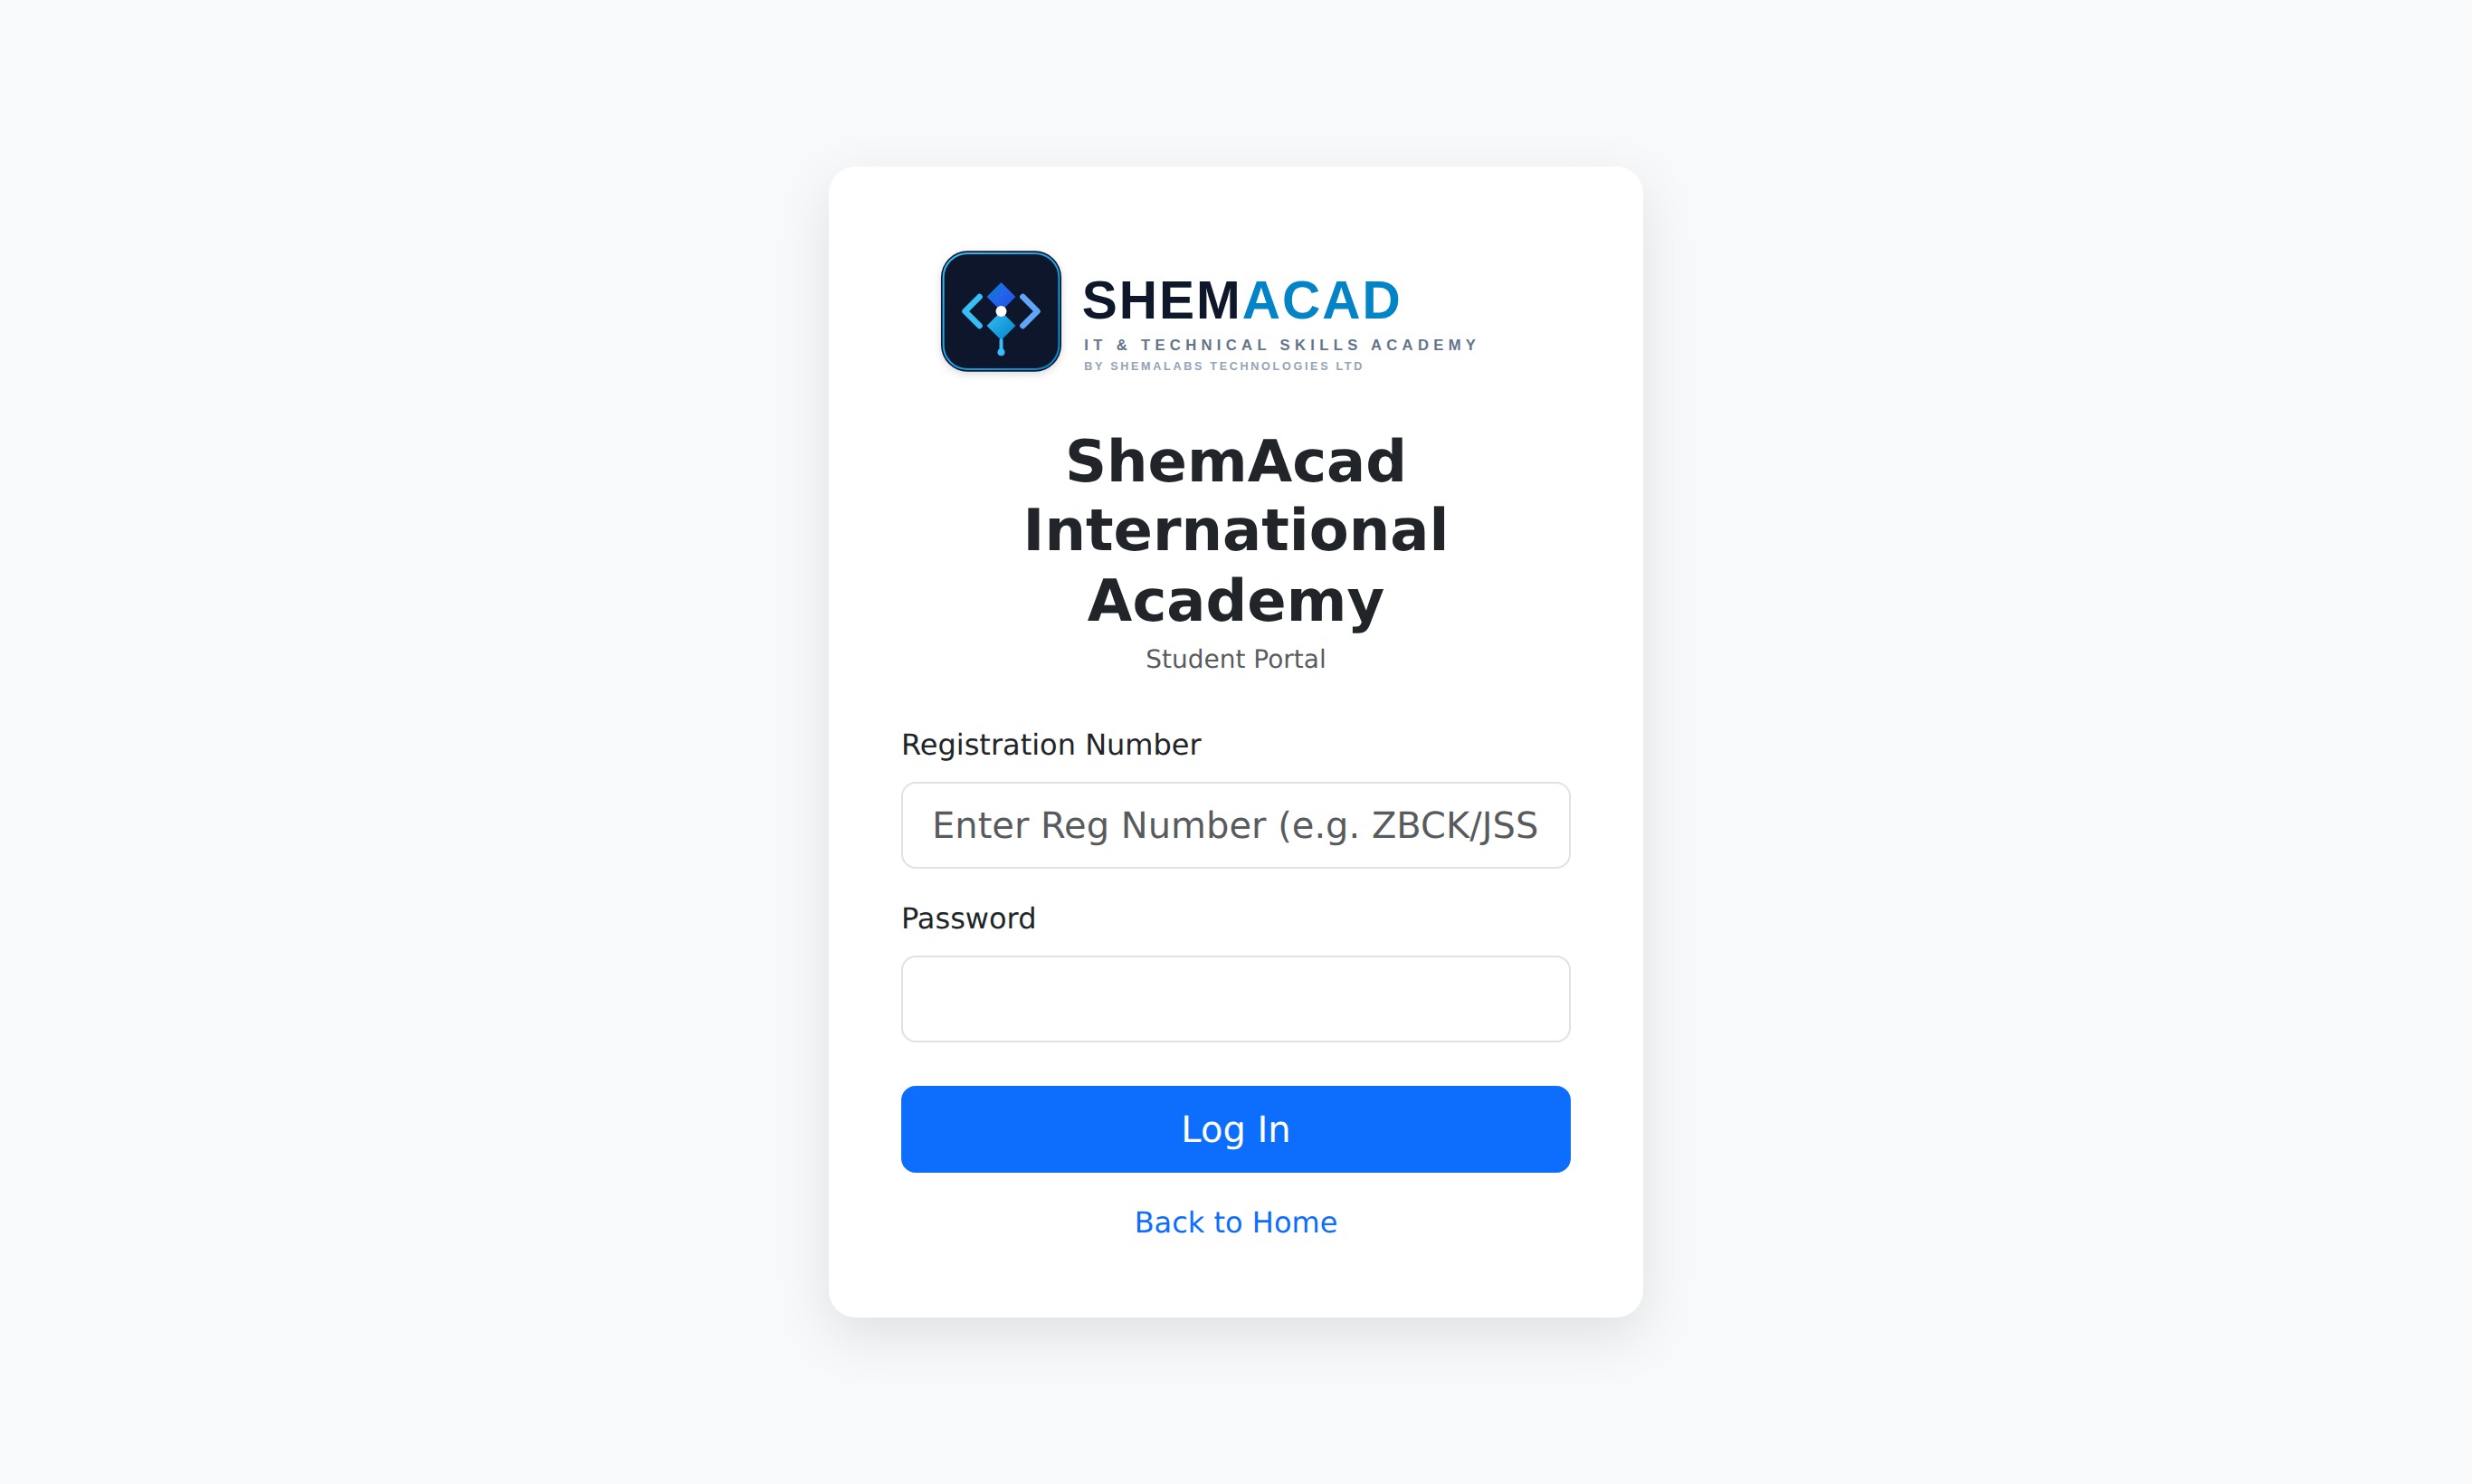
Student Login Screen
Student Login: Enter your exact Registration Number & Password.
Forgot Your Password?
New students and teachers typically start with the default password set by the school (commonly 123456). If anyone forgets their password, the School Admin can reset it in one click from Manage Students or Manage Teachers.
Section 2 • School Administrator, Principal & Exam Officer

School Administrator Step-by-Step Guide

Everything the school management team needs to set up terms, classes, staff, students, CBT tests, and report cards.

Step 2.1

Checking Your Admin Dashboard Overview

School Admin

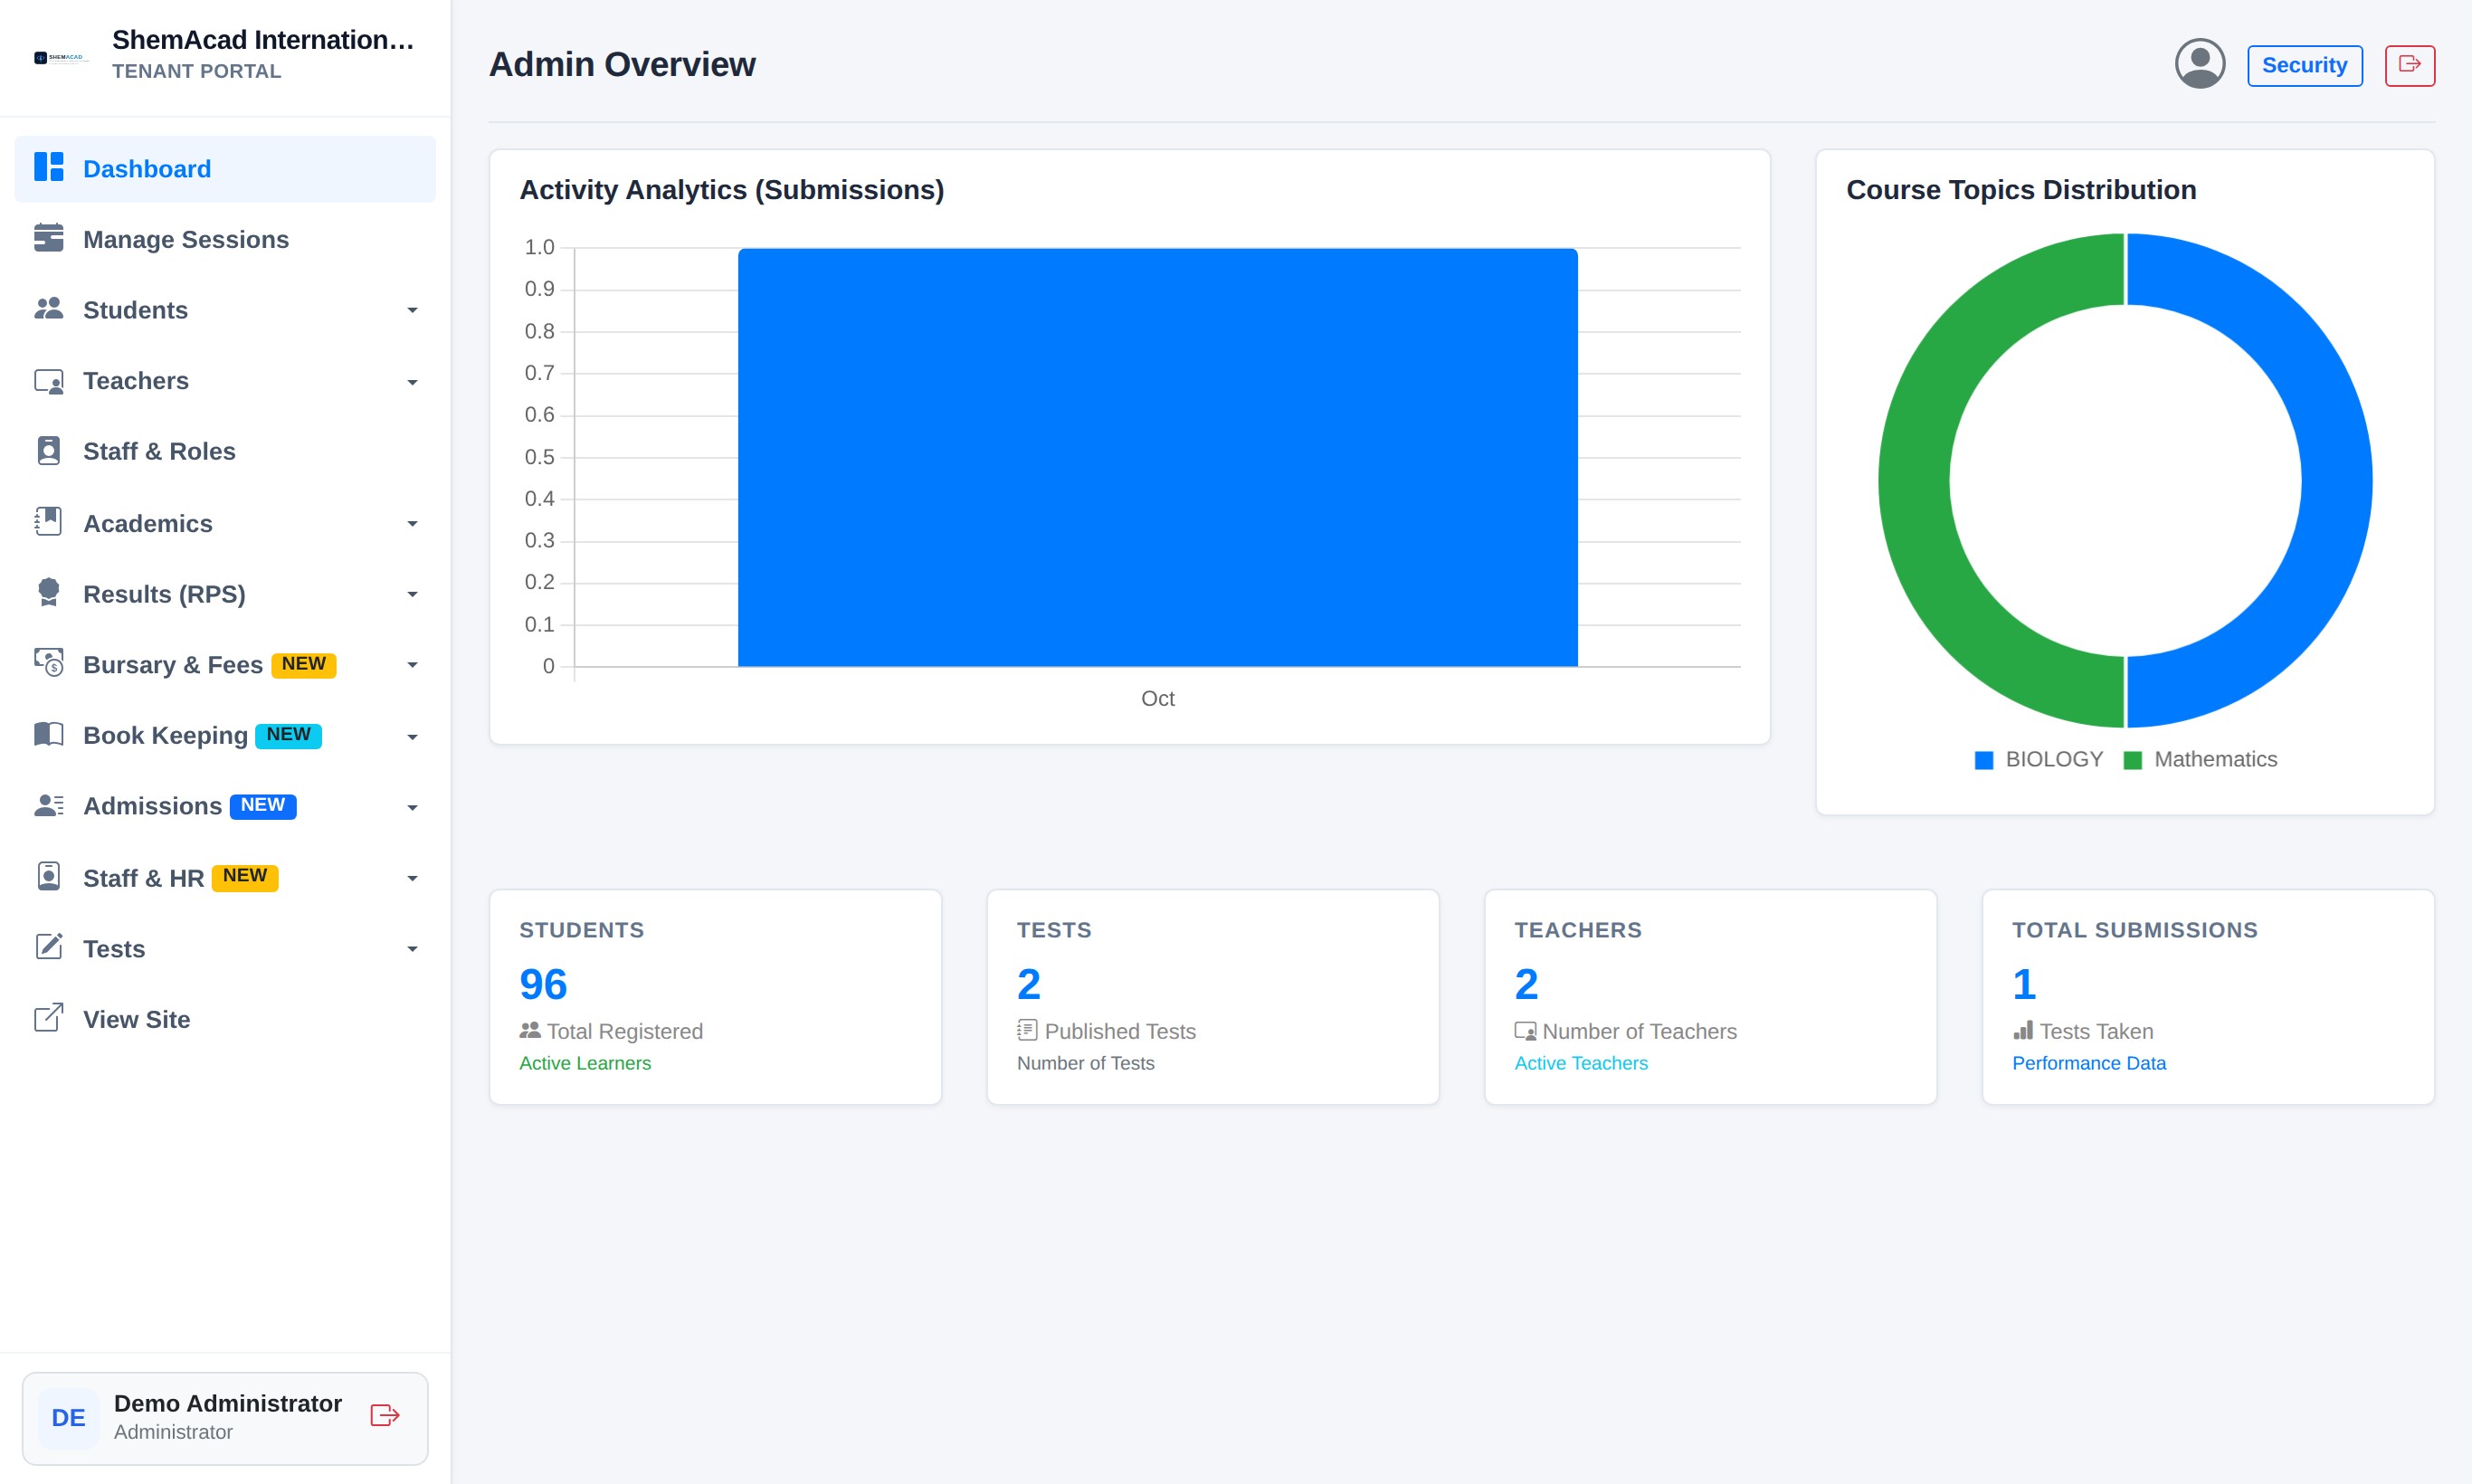
Right after signing in as an Administrator, you land on the Admin Overview screen. Use this page as your daily health check.

  1. At the bottom, check the four live summary boxes: Total Students, Published Tests, Active Teachers, and Total Submissions.
  2. At the top, the Activity Analytics chart shows test activity over time, and Course Topics Distribution shows which subjects have active CBT tests.
  3. Use the left white navigation sidebar to jump to any tool. Items with small arrows expand when clicked.
Helpful Tip
Notice your name and role at the bottom-left corner of the sidebar, along with the red logout icon when you finish work on a shared computer.
Checking Your Admin Dashboard Overview
Admin Overview Dashboard showing analytics charts, KPI totals, and left navigation menu.
Step 2.2

Setting the Active Session & Switching Terms

Start Here Every Term

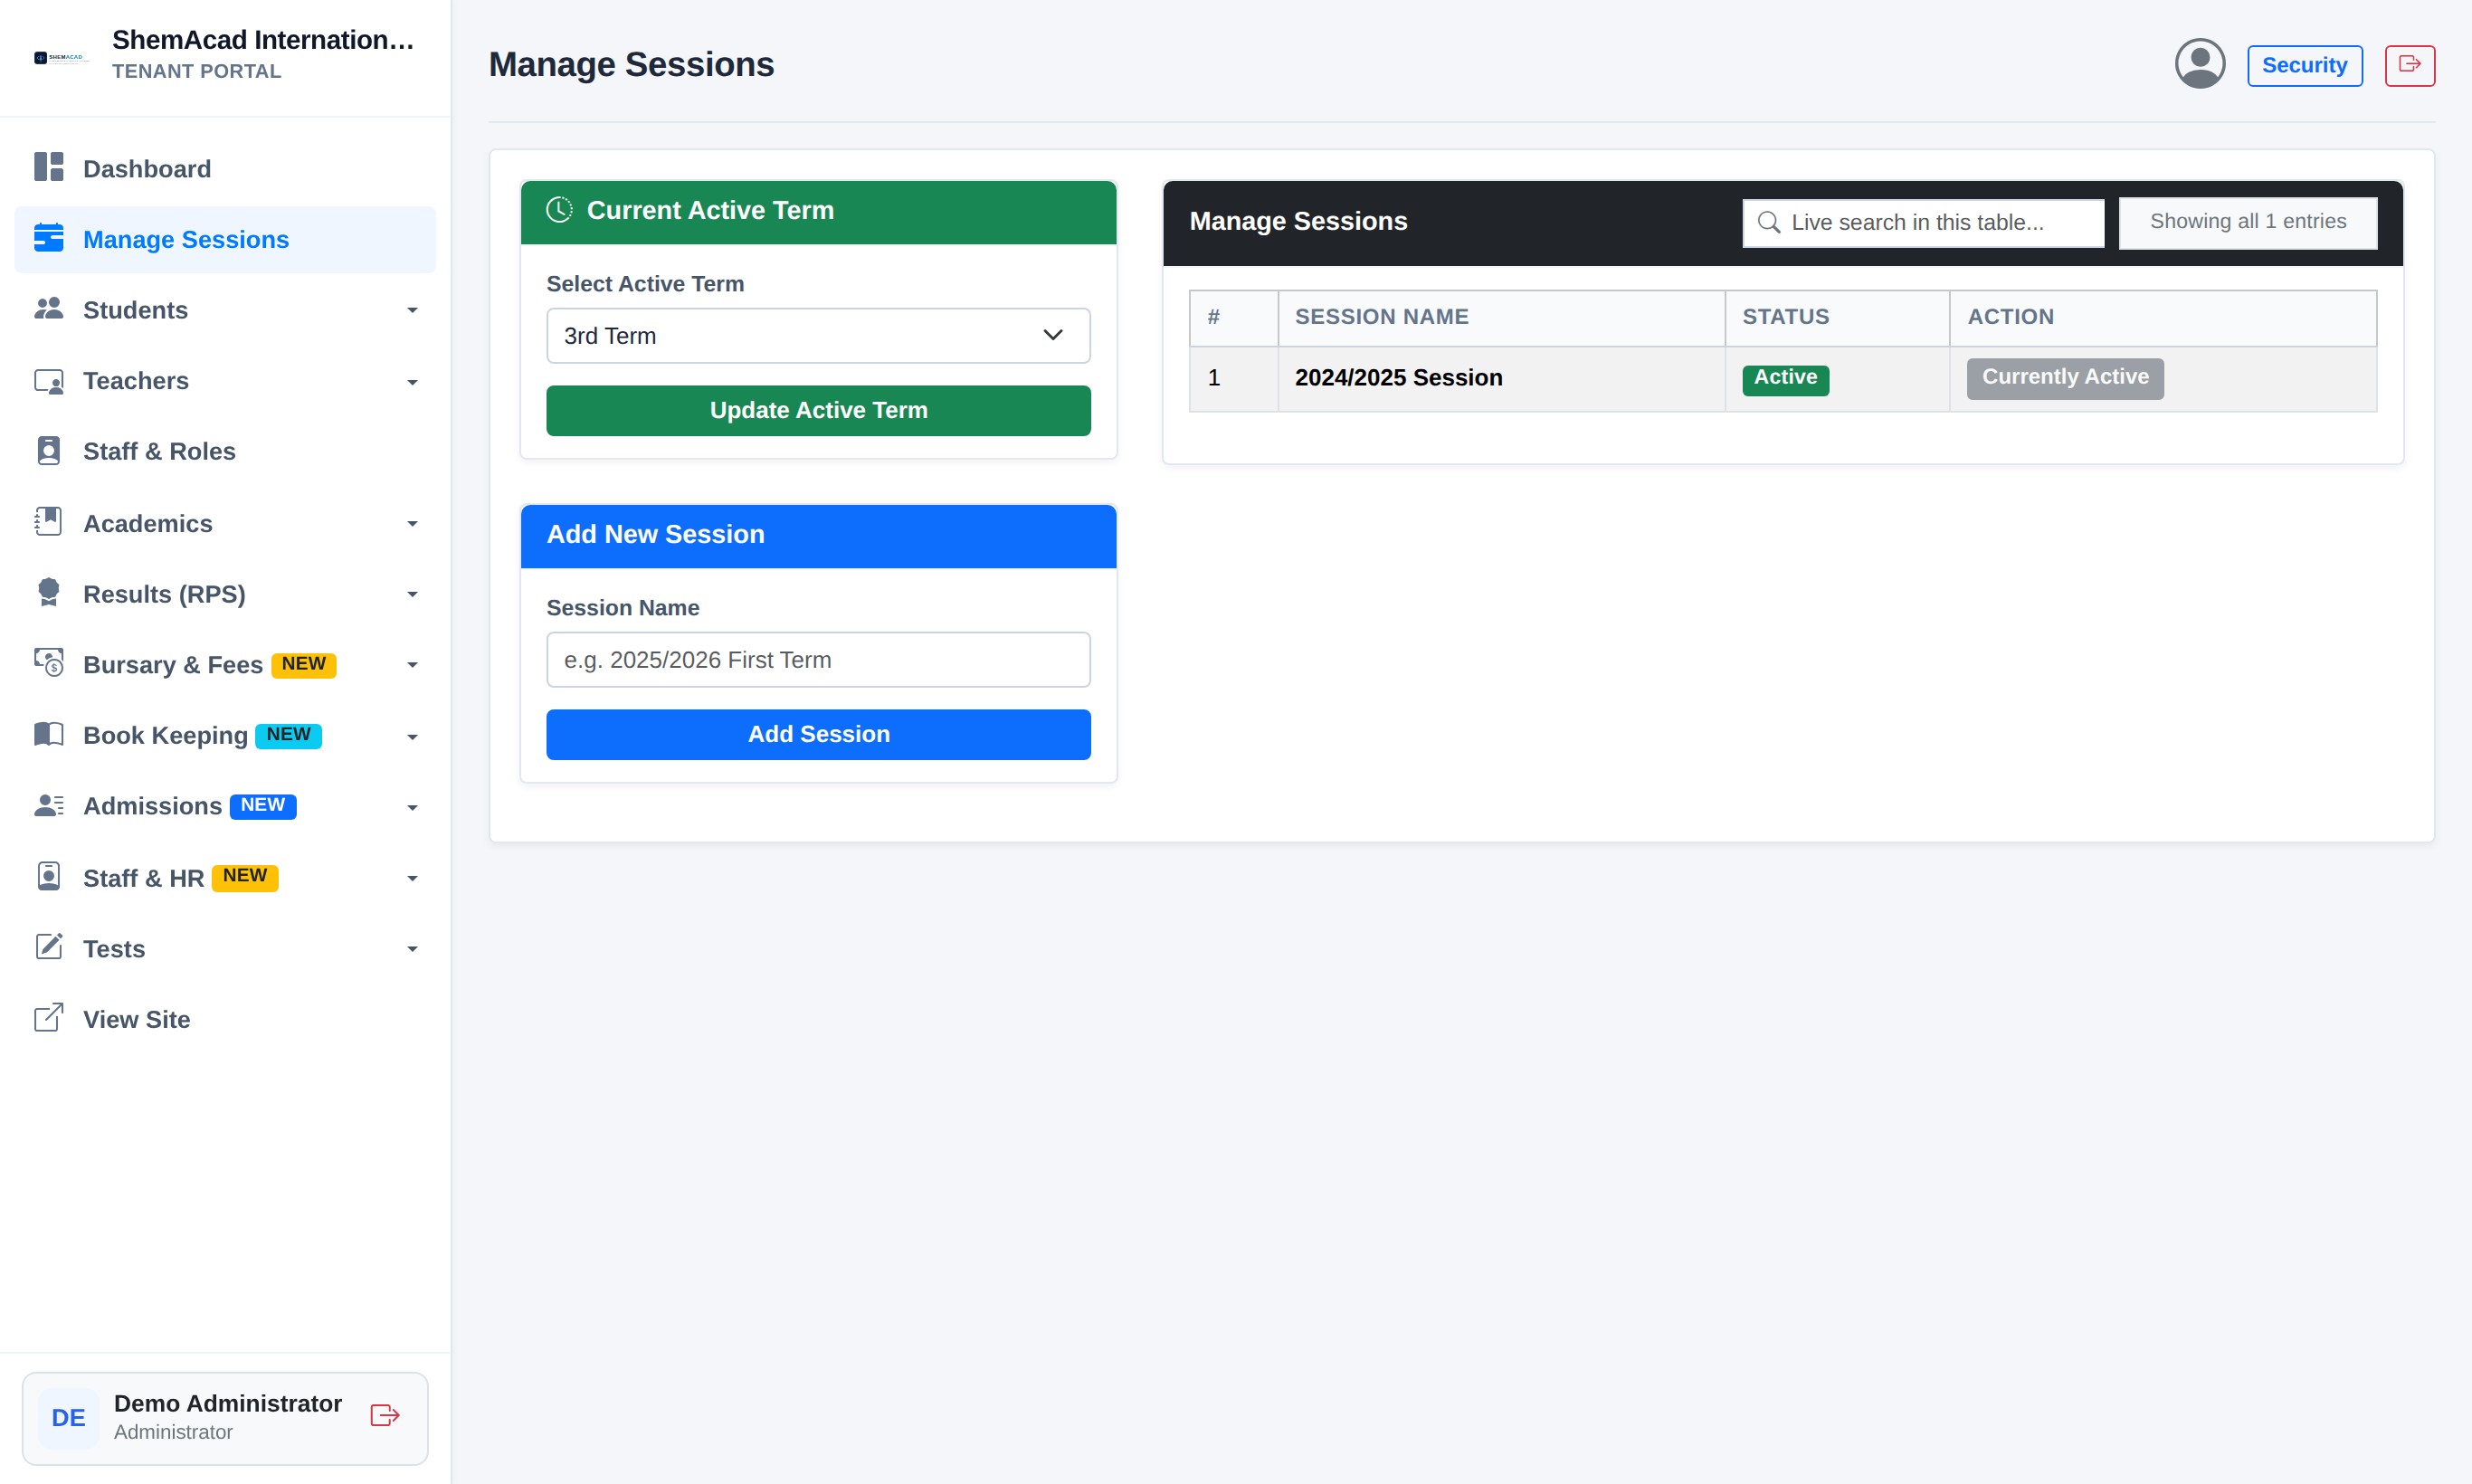
Your entire school operates inside whichever Session and Term is marked Active. All new tests, score entries, and report cards automatically save under the active session and term.

  1. In the left sidebar, click Manage Sessions.
  2. To start a brand-new school year, type the name under Add New Session (for example 2026/2027 Session) and click Add Session.
  3. In the Manage Sessions table on the right, click Set as Active next to the current school year.
  4. At the start of 1st Term, 2nd Term, or 3rd Term, use the Select Active Term dropdown at top-left, choose the term, and click Update Active Term.
Helpful Tip
Never delete old academic sessions! Past sessions remain safely archived so you or parents can reprint historical report cards anytime.
Setting the Active Session & Switching Terms
Manage Sessions page showing active term selector and session activation table.
Step 2.3

Activating Sections, Managing Classes & Assigning Form Teachers

Academics Setup

Before adding students, verify that your school's educational sections, classes, and Form Teachers are properly linked.

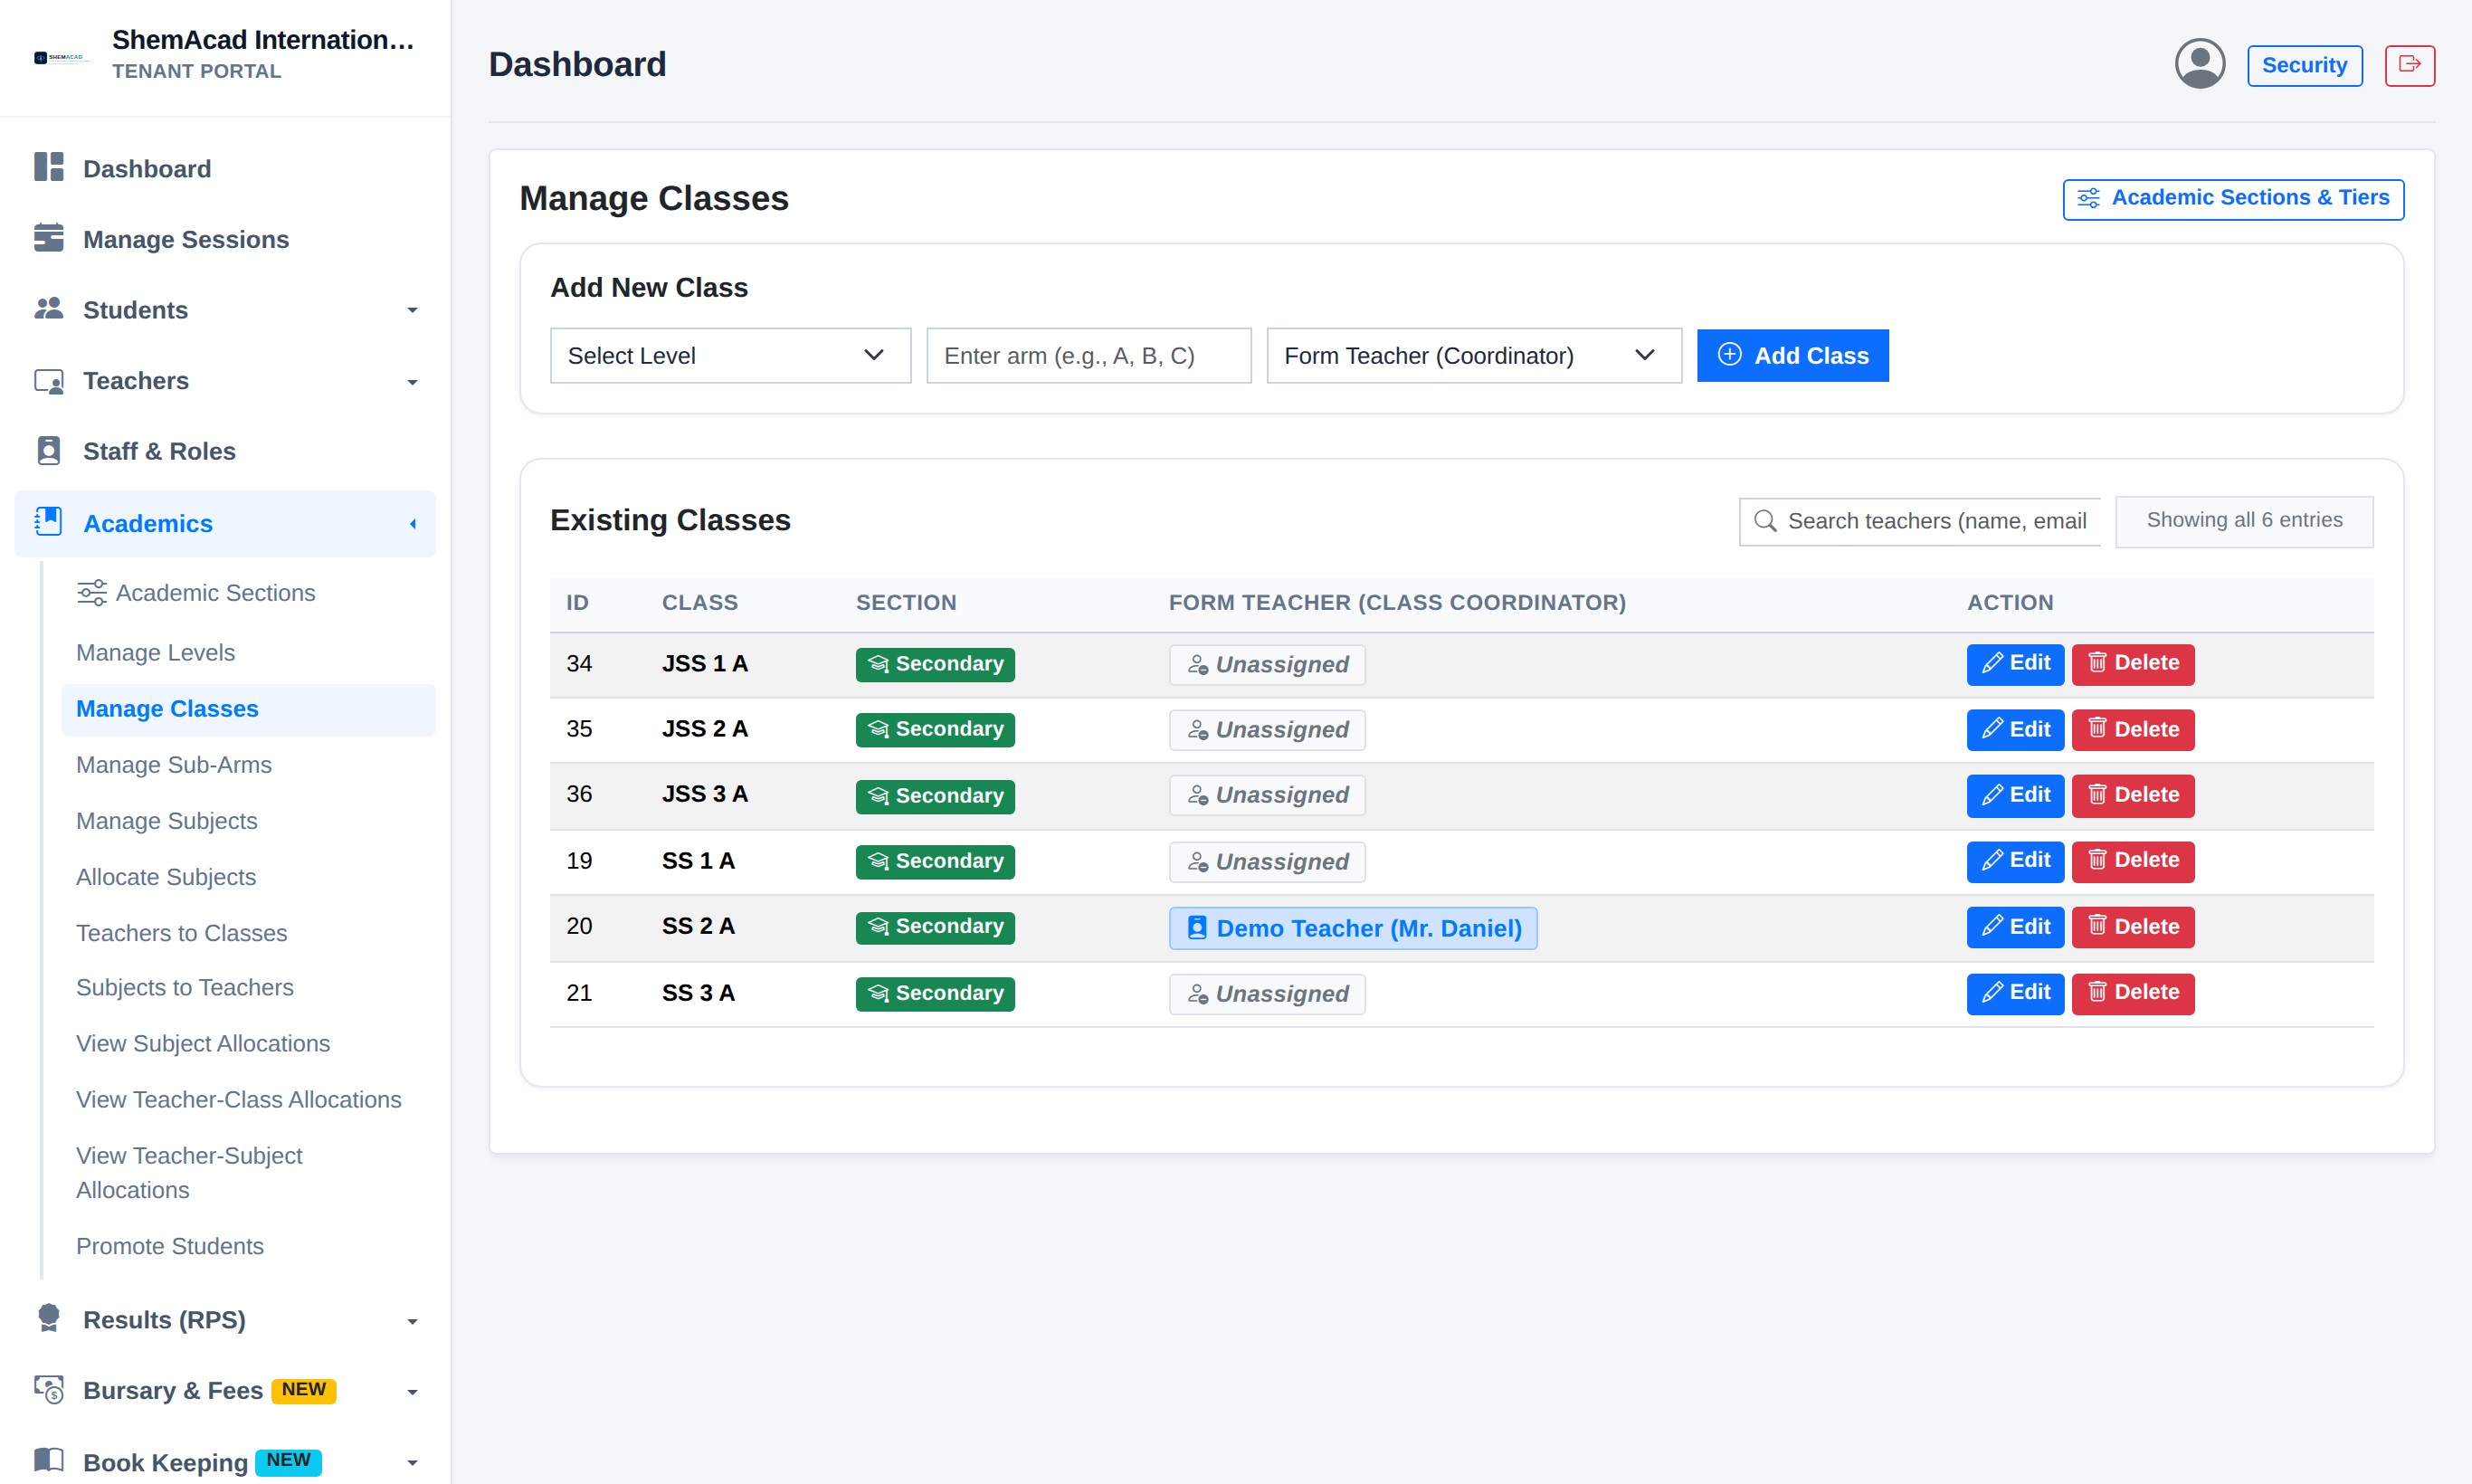
  1. Go to Academics → Academic Sections to switch ON Nursery, Primary, or Secondary Education for your school, then click Save Academic Structure.
  2. Go to Academics → Manage Classes to create class arms (such as JSS 1 A, SS 1 A, Primary 3 Gold).
  3. Choose the Level, type the Arm name (e.g. A), pick the Form Teacher (Coordinator) from the dropdown, and click Add Class.
  4. To assign or change a Form Teacher on an existing class, click Edit beside that class row in the table.
Helpful Tip
Assigning a Form Teacher here unlocks two key features immediately: the teacher sees My Class on their portal, and every student in that class sees their Form Teacher's name bold at the top of their Student Portal.
Activating Sections, Managing Classes & Assigning Form Teachers
Manage Classes screen showing class arms and assigned Form Teachers.
Step 2.4

Setting Up Sub-Arms (Science / Arts / Commercial Streams)

Senior Classes

If your senior classes (such as SS 1–SS 3) split students into departments like Science, Art, or Commercial, configure Sub-Arms so students only see and take tests for their own department.

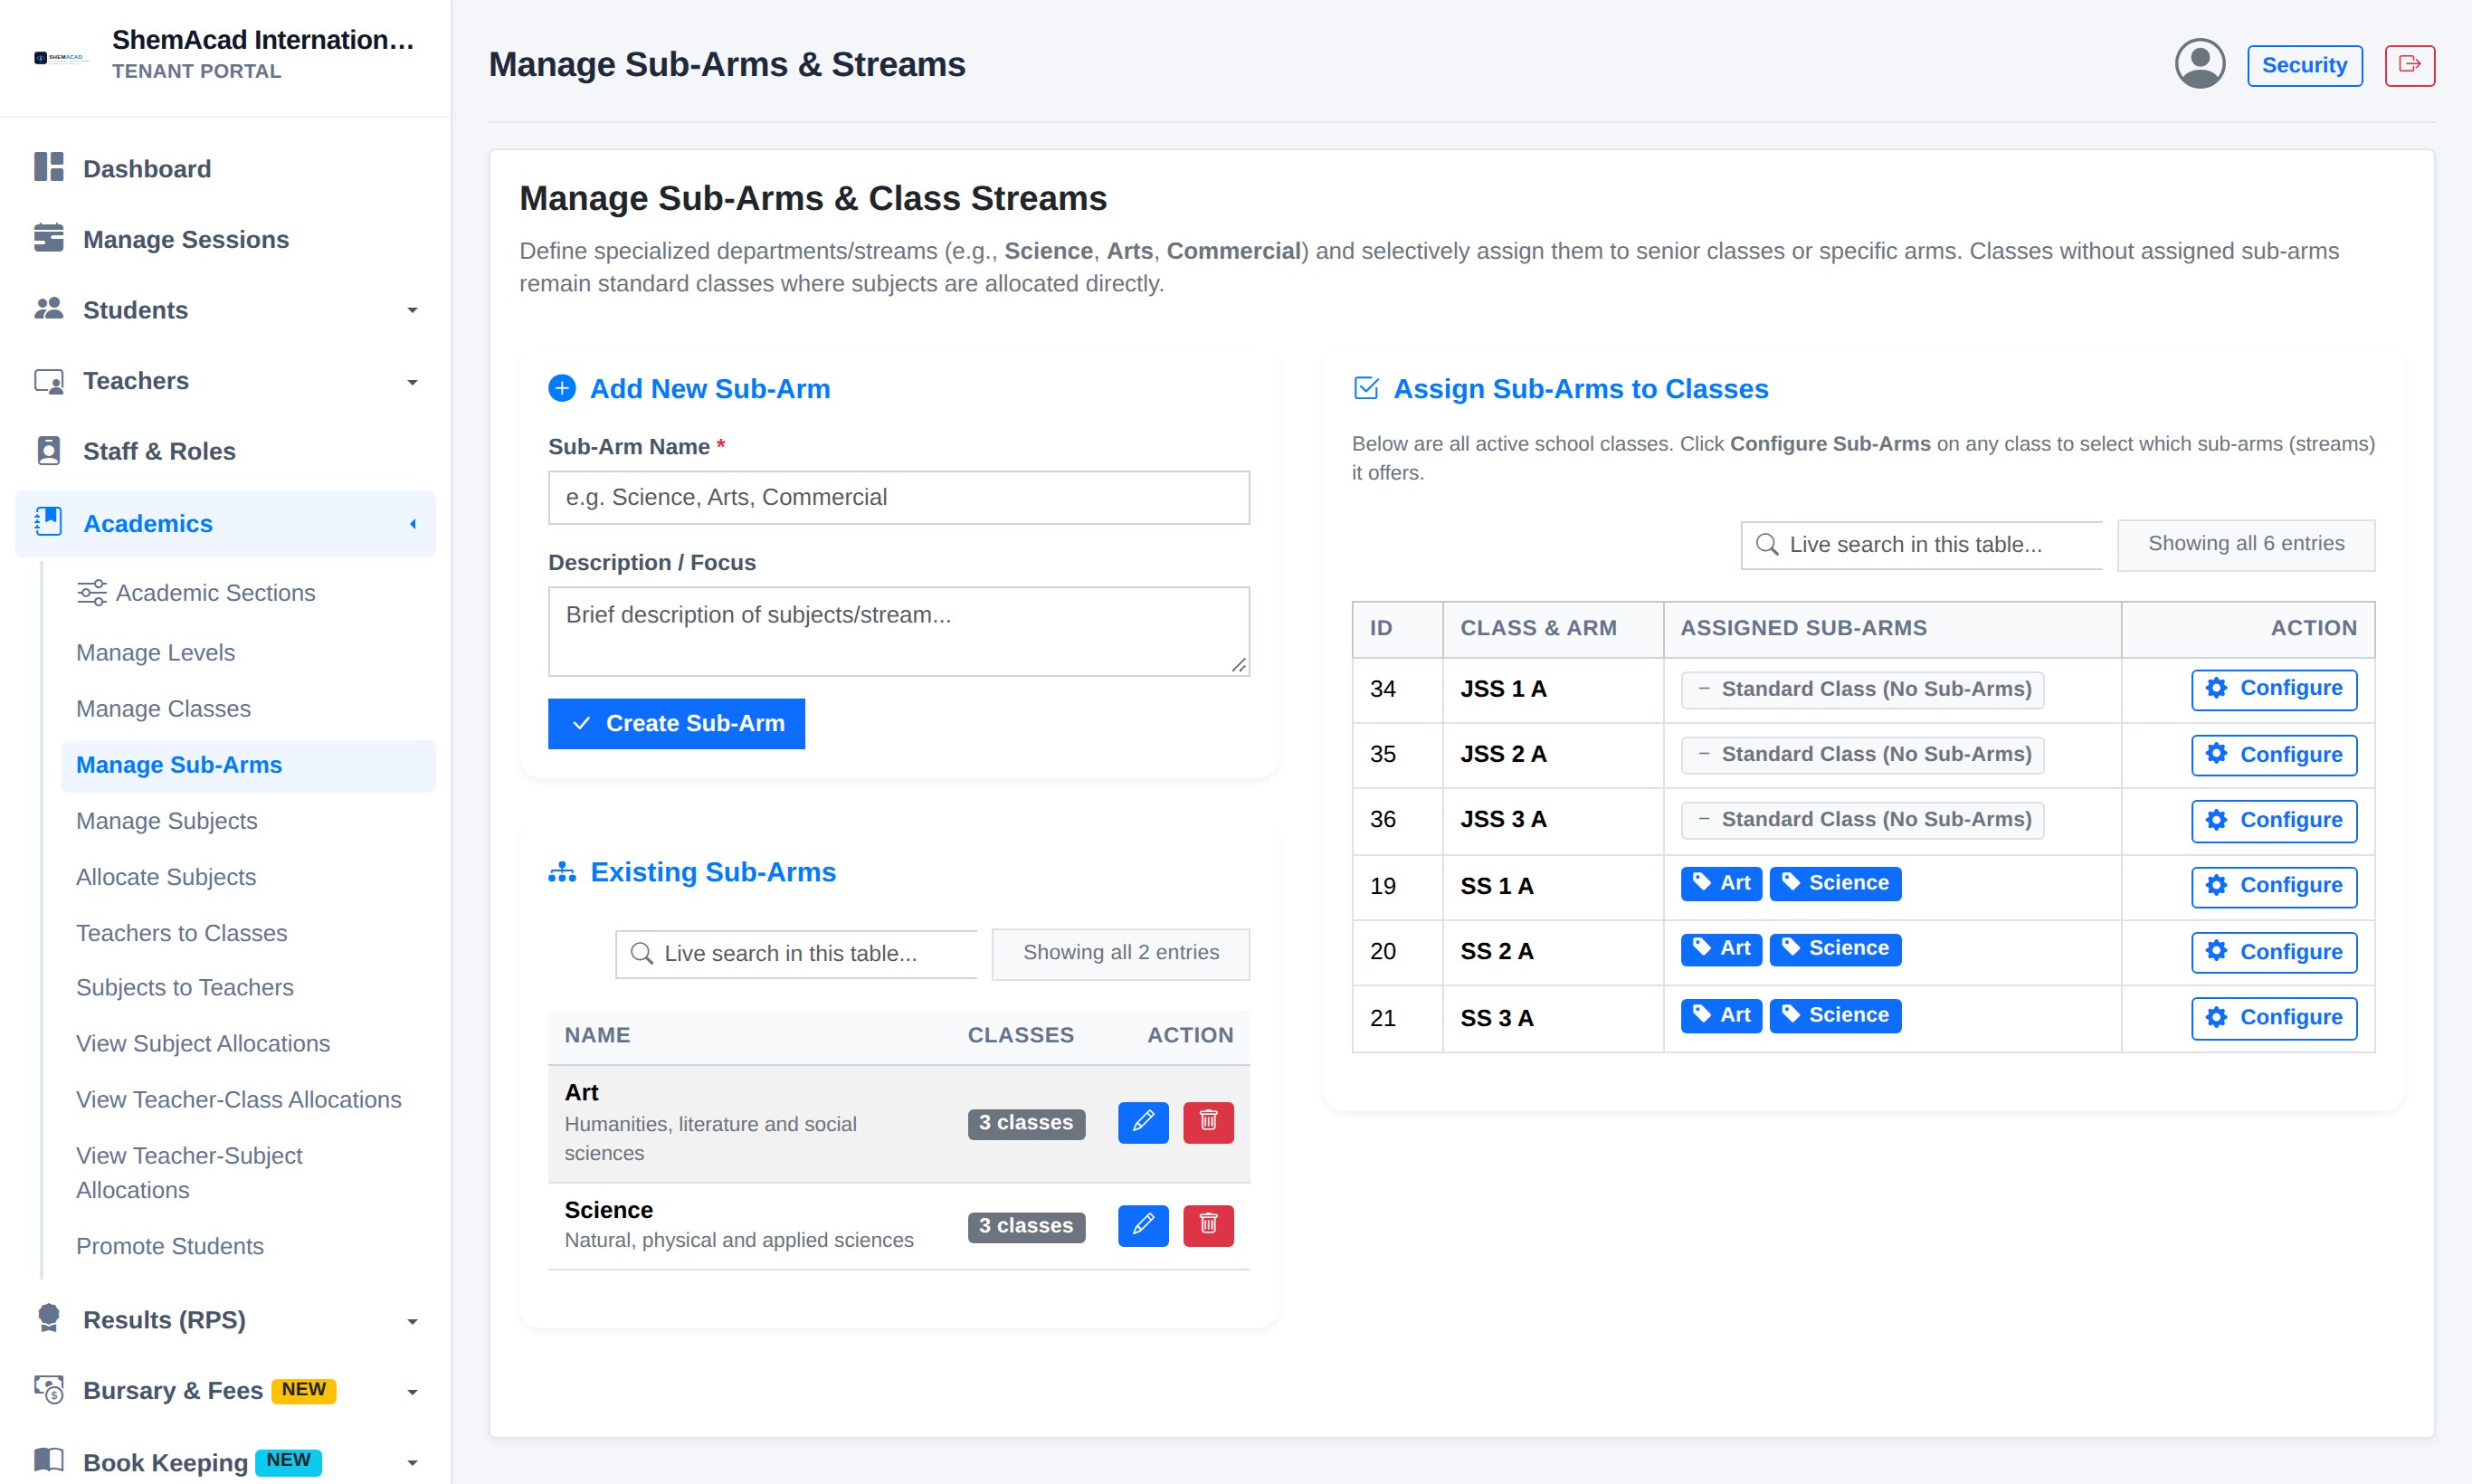
  1. Go to Academics → Manage Sub-Arms.
  2. To create a stream, type its name under Add New Sub-Arm (e.g. Science, Art, Commercial) and click Create Sub-Arm.
  3. In the right-hand table Assign Sub-Arms to Classes, click Configure on each senior class (like SS 1 A) and tick the streams offered in that class.
  4. Junior classes like JSS 1 A stay as Standard Class (No Sub-Arms) so every junior student shares the full subject list.
Helpful Tip
Once a class has streams assigned, you can filter broadsheets and class rosters by stream with one click.
Setting Up Sub-Arms (Science / Arts / Commercial Streams)
Manage Sub-Arms screen mapping Science and Art streams to Senior Secondary classes.
Step 2.5

Allocating Subjects to Classes & Streams

Curriculum Setup

Students and result broadsheets only display subjects officially allocated to their class.

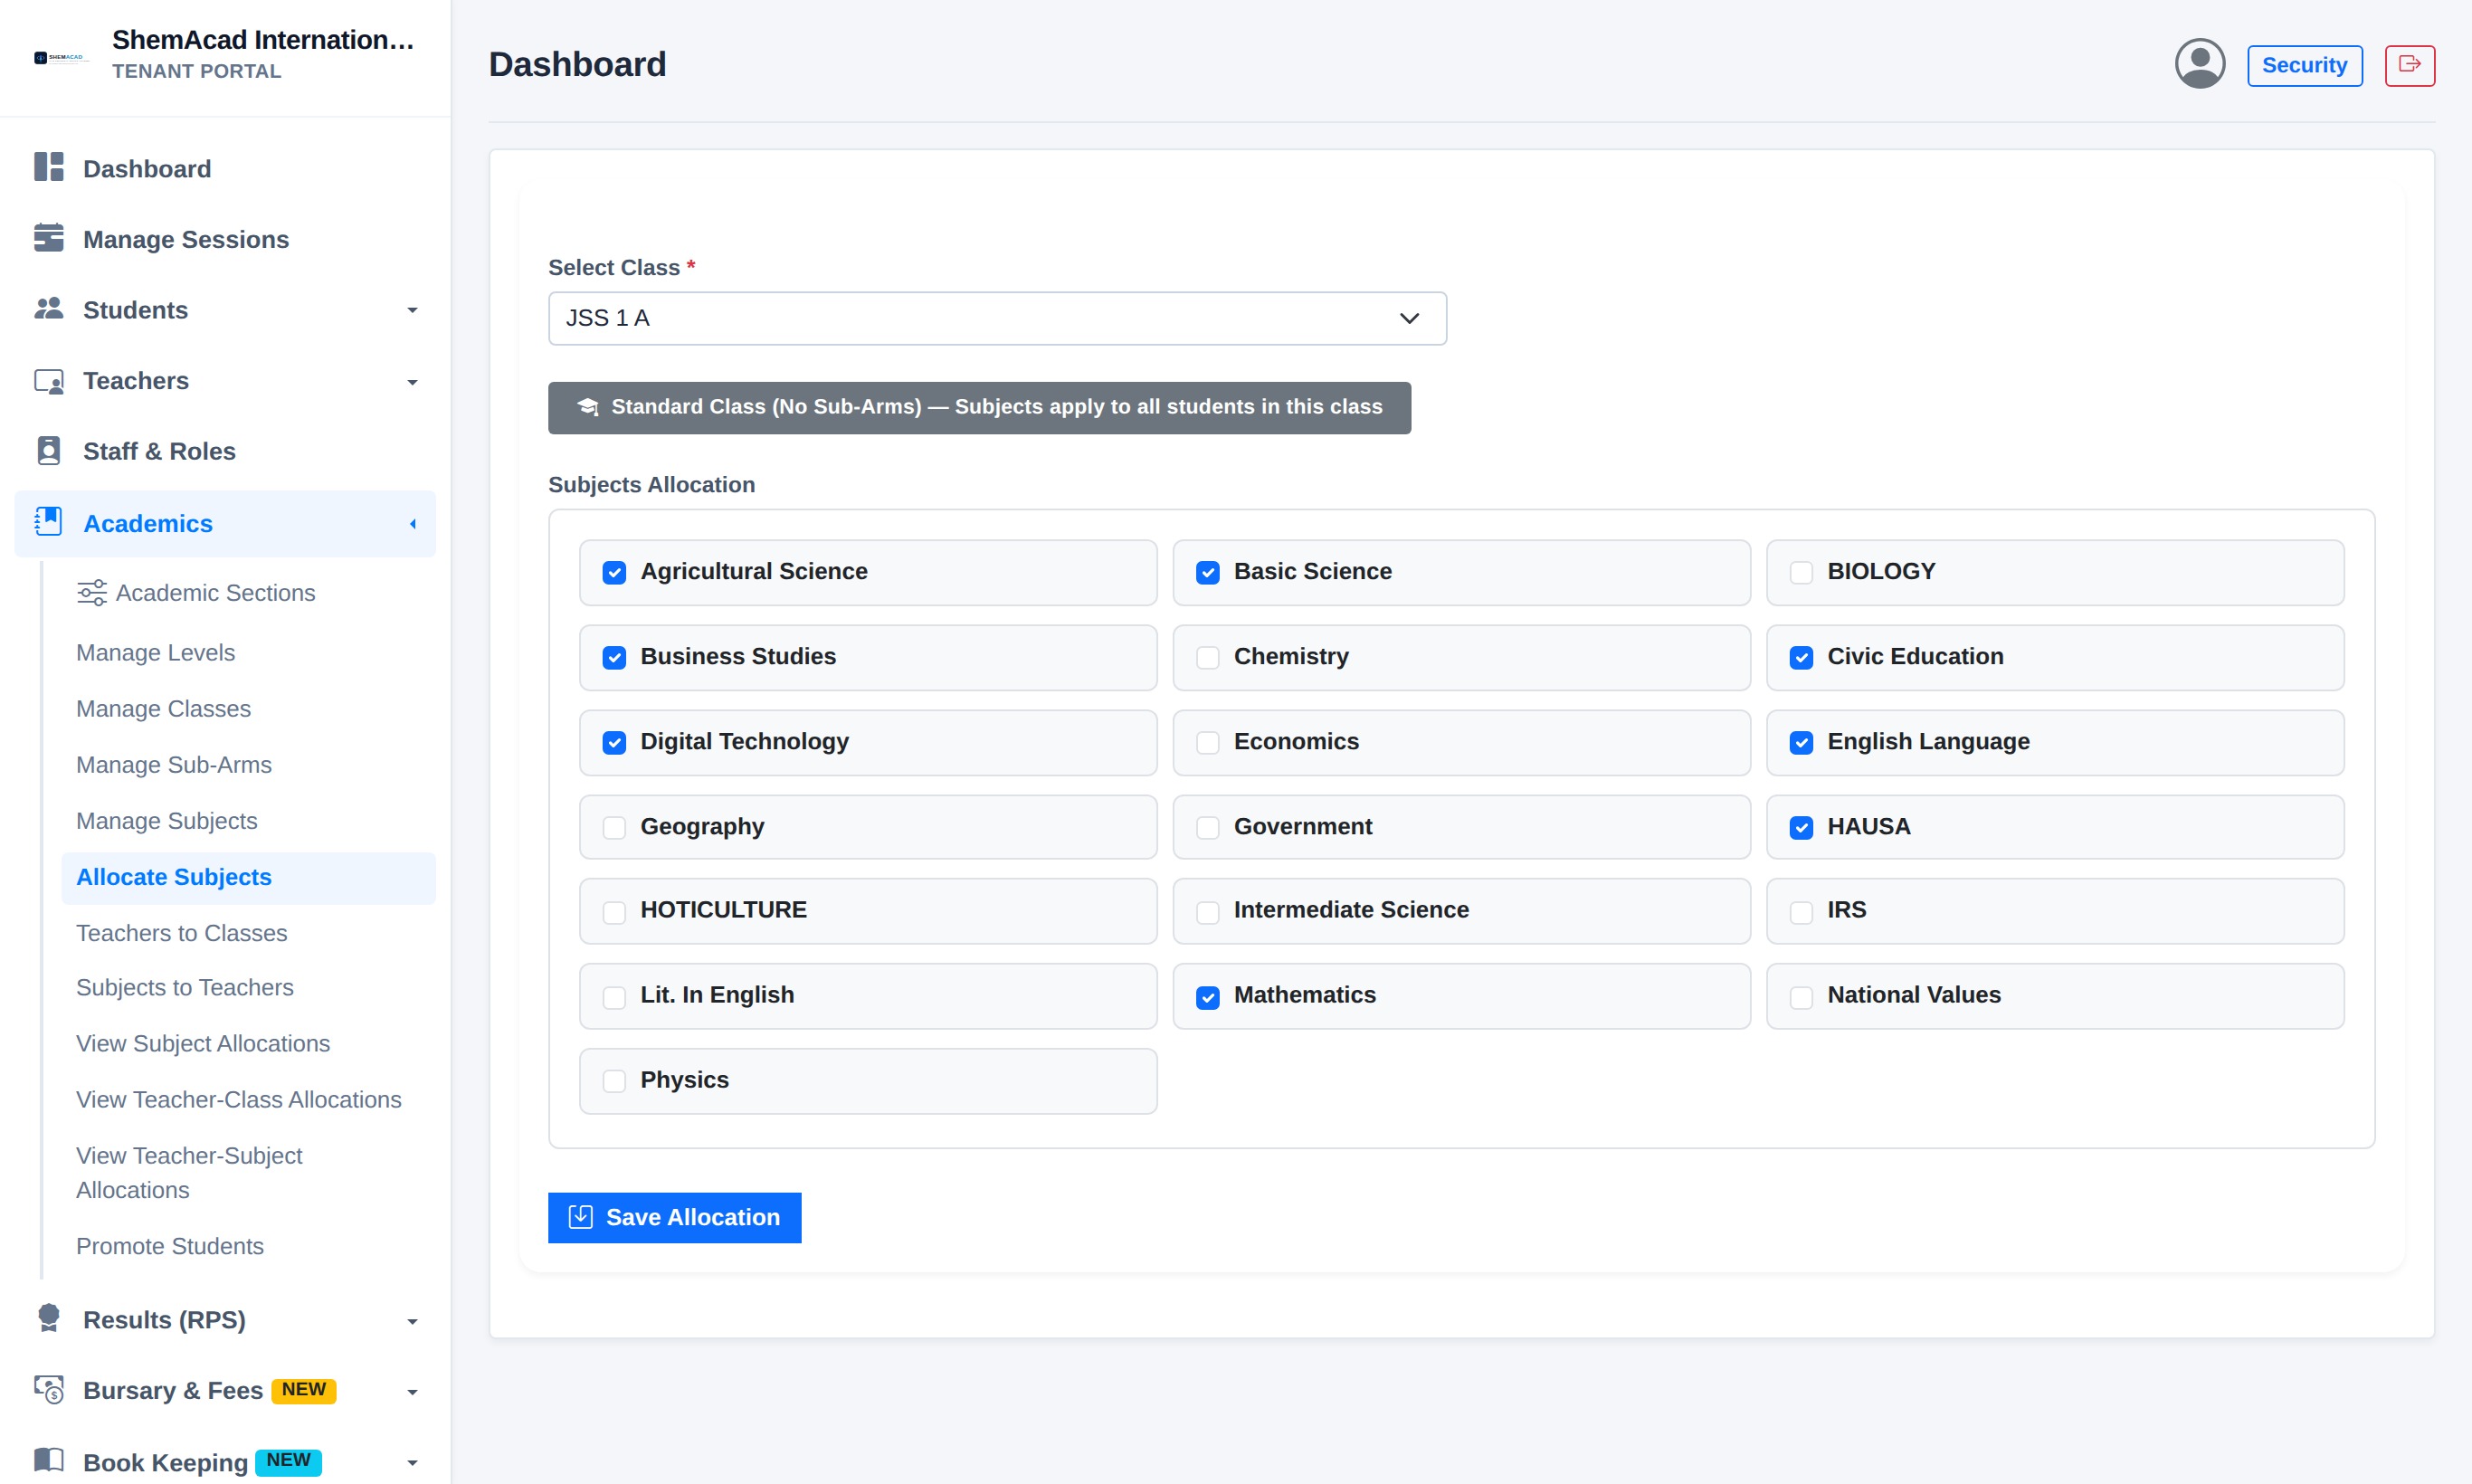
  1. First ensure all your subjects exist under Academics → Manage Subjects.
  2. Next open Academics → Allocate Subjects.
  3. Select a class from Select Class (for example JSS 1 A or SS 1 A). If the class has streams, also pick the target stream (or General/Core).
  4. Tick the checkboxes next to every subject offered in that class and click Save Allocation.
Helpful Tip
To review or remove mistakes later, open View Subject Allocations under Academics.
Allocating Subjects to Classes & Streams
Allocate Subjects screen with checked class subjects and Save Allocation button.
Step 2.6

Adding Teachers, Assigning Subjects & Staff Roles

Staff Setup

Every subject teacher needs an account and must be assigned to the exact classes and subjects they teach before they can create tests or enter scores.

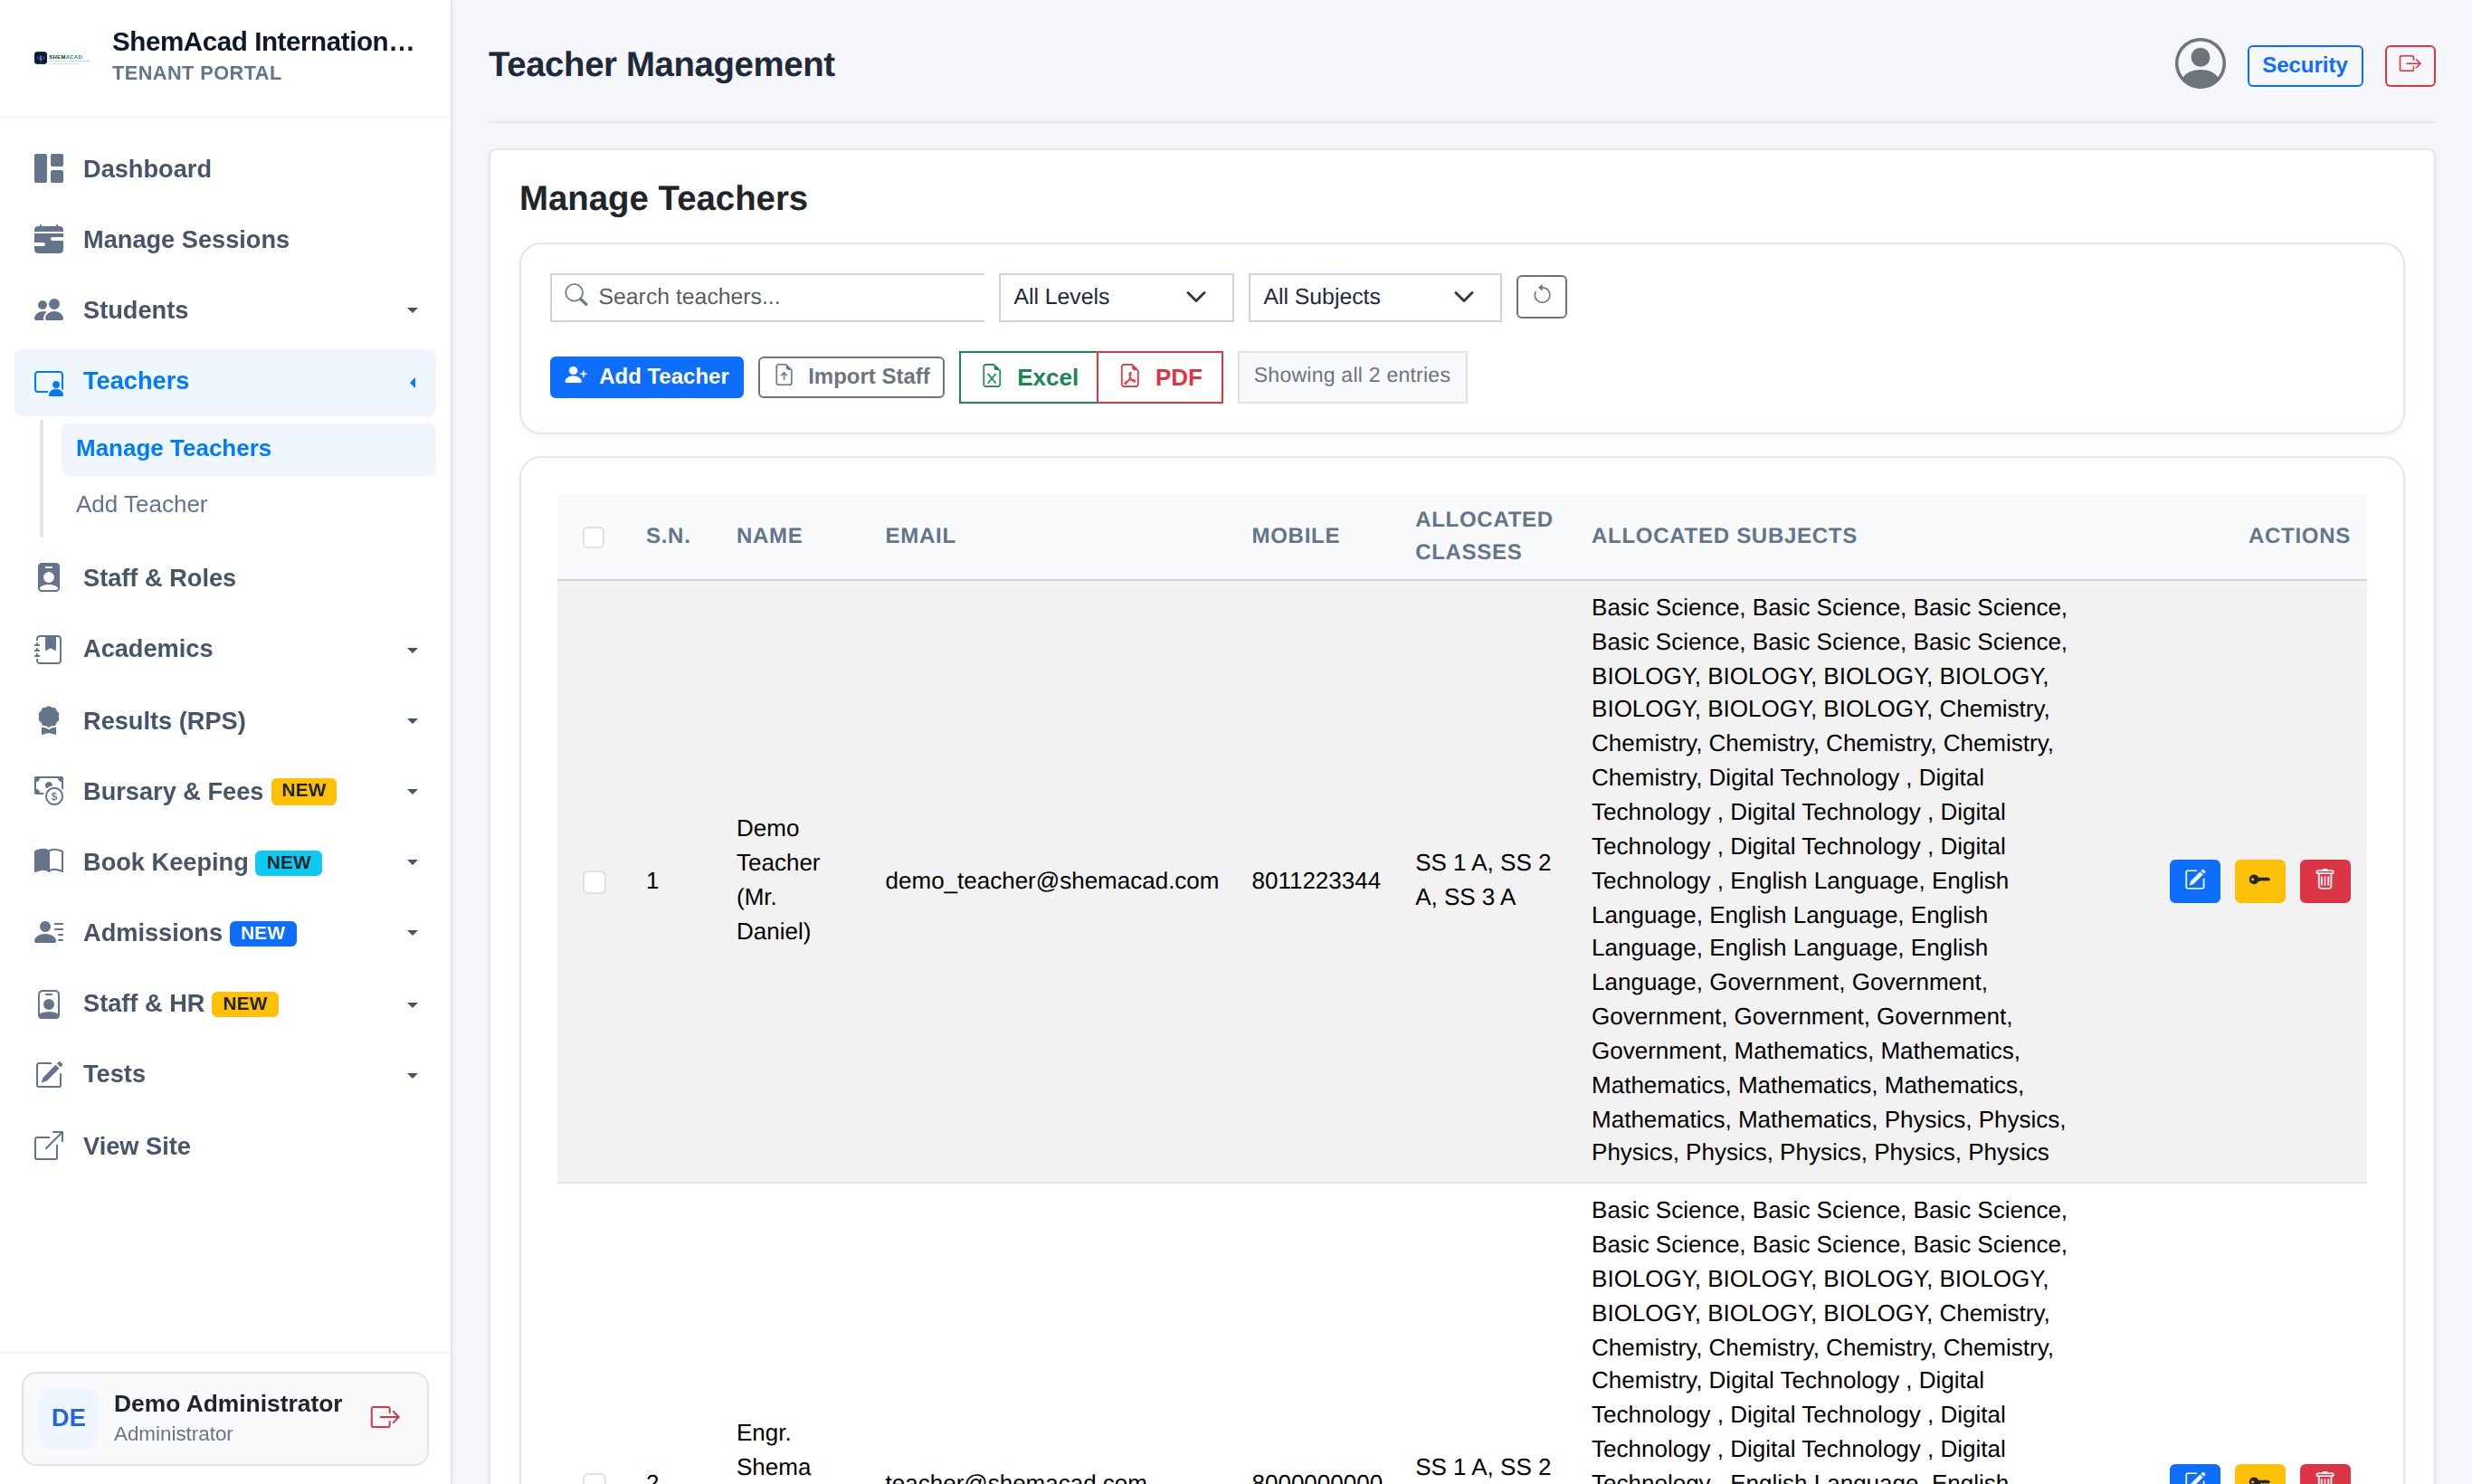
  1. Go to Teachers → Add Teacher (or click Import Staff inside Manage Teachers to upload/paste a spreadsheet list).
  2. Inside Teachers → Manage Teachers, use the search bar or filters, click the blue Edit button to update details, or click the yellow Key button to reset a forgotten teacher password back to 123456.
  3. Next go to Academics → Teachers to Classes, pick a teacher, check the classes they teach, and save.
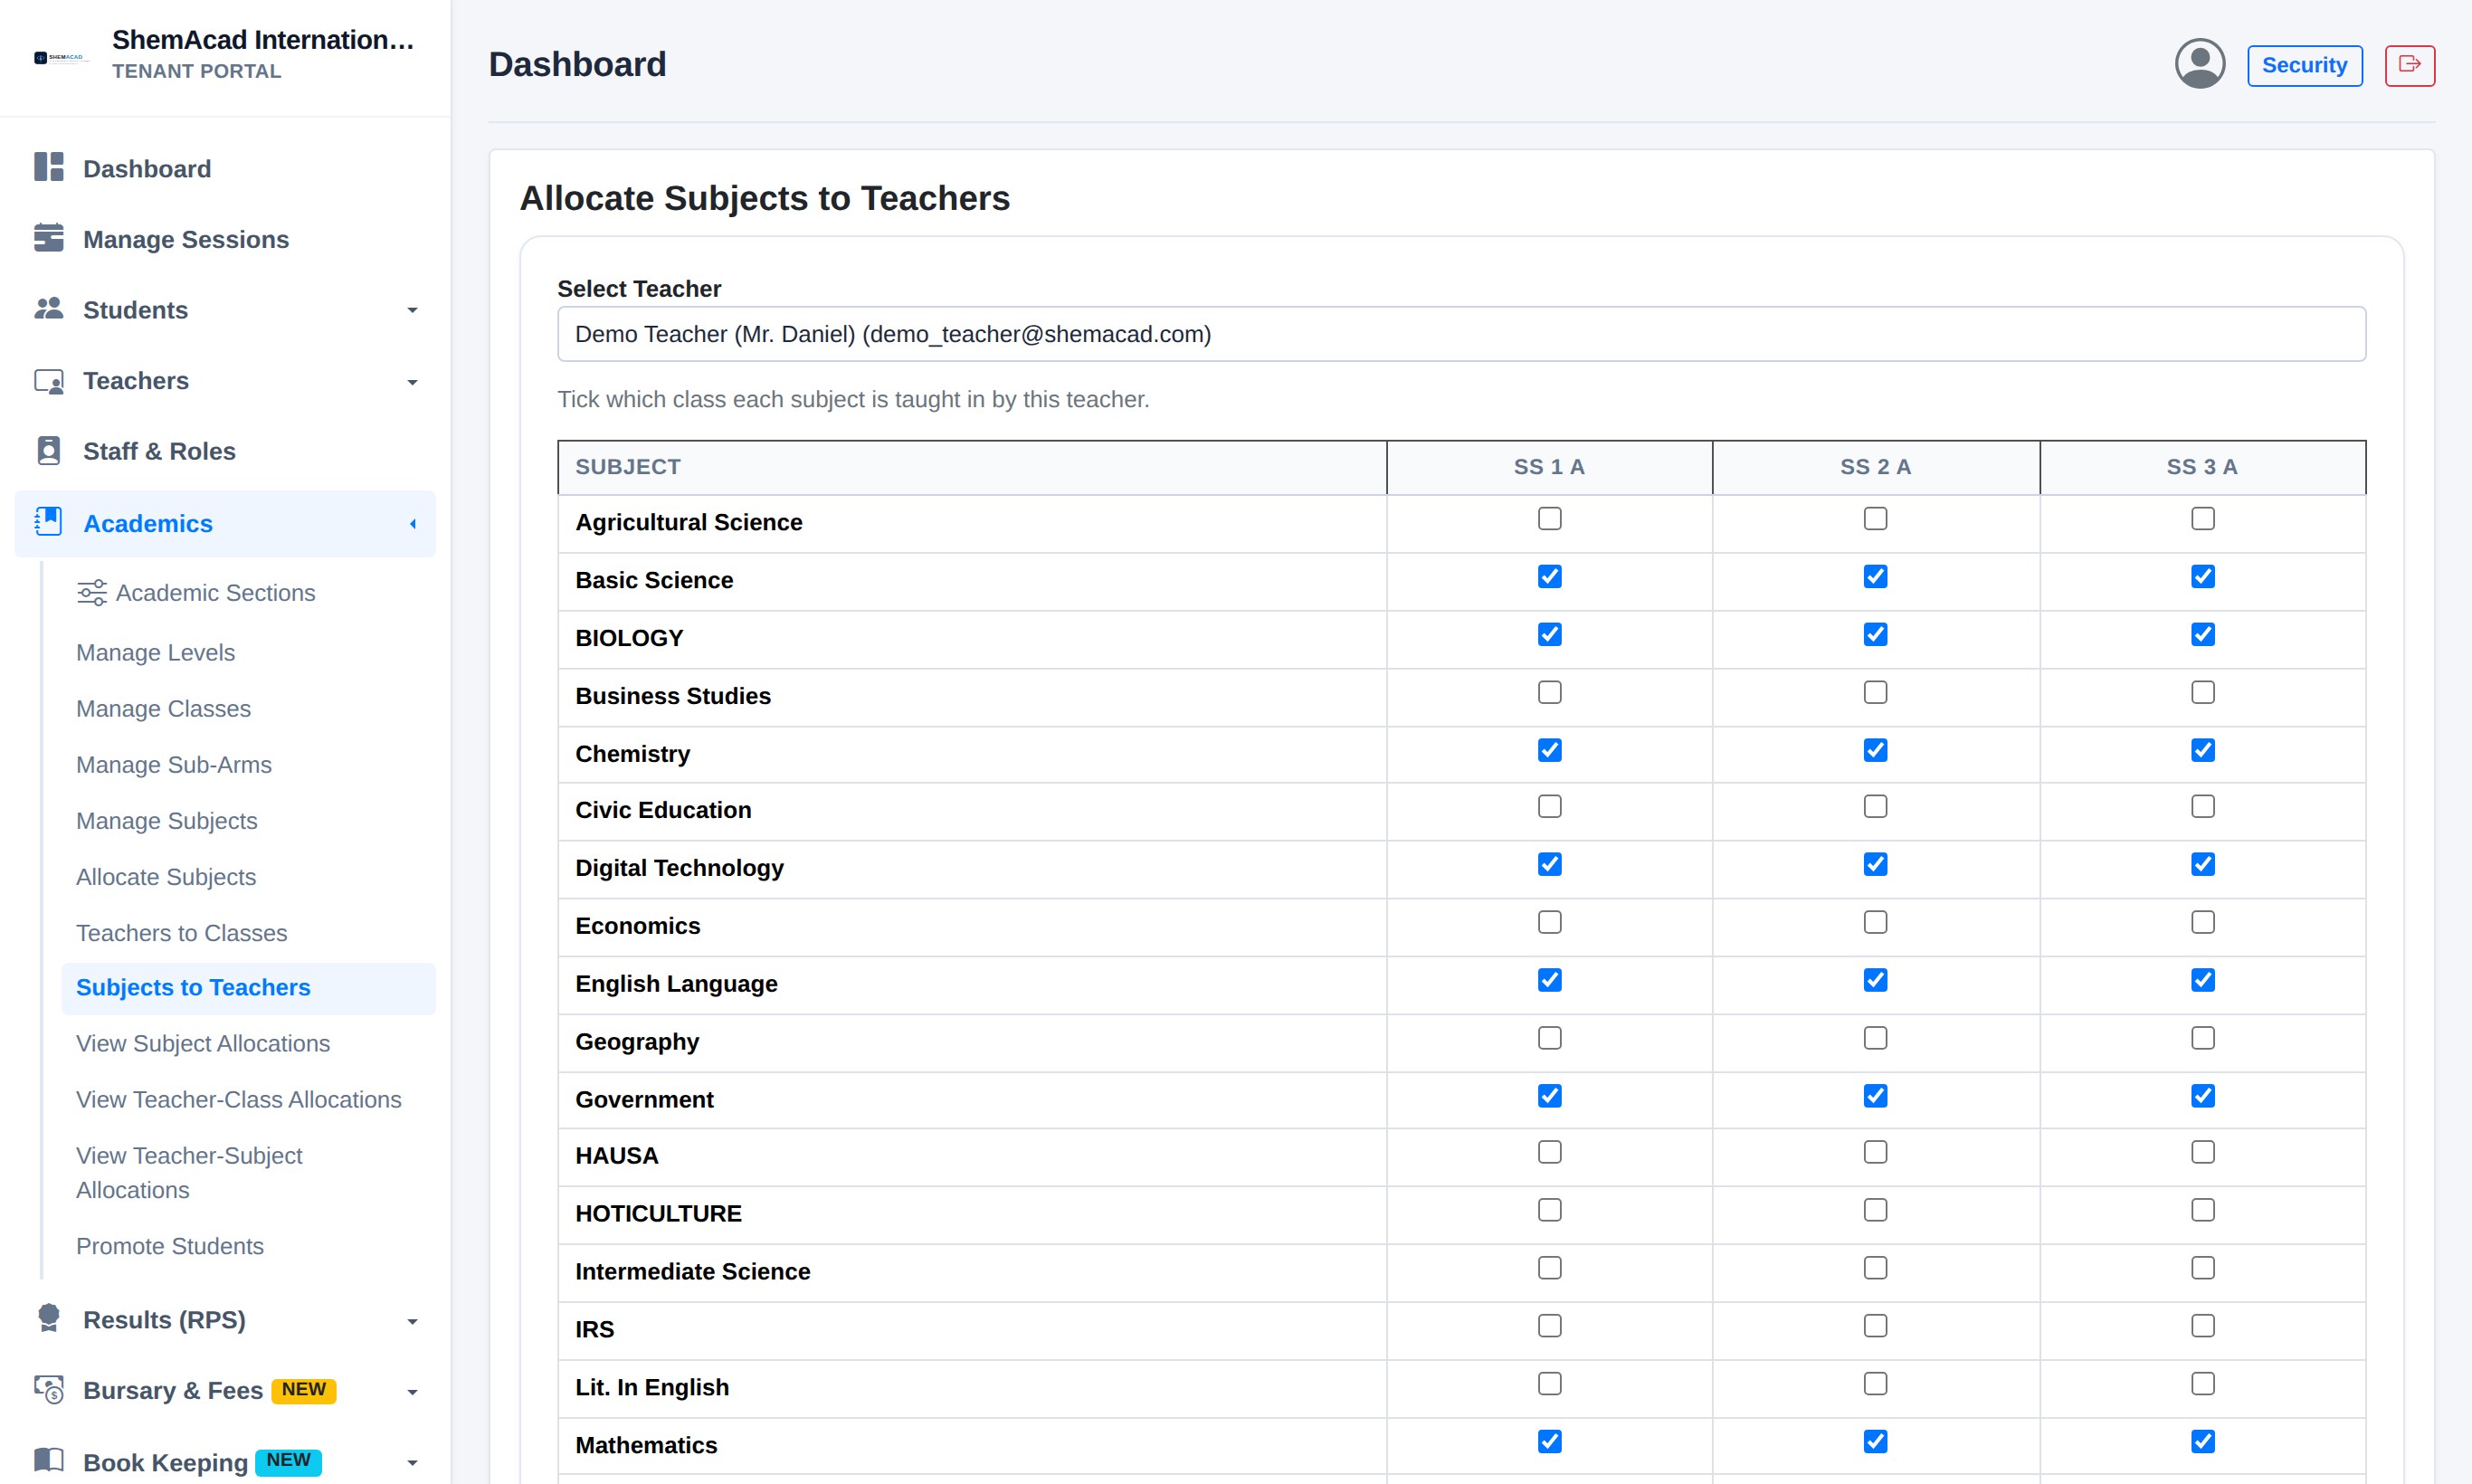
  4. Then go to Academics → Subjects to Teachers, select the teacher, tick the grid checkboxes where each subject meets each class, and click Save Subject Allocations.
Helpful Tip
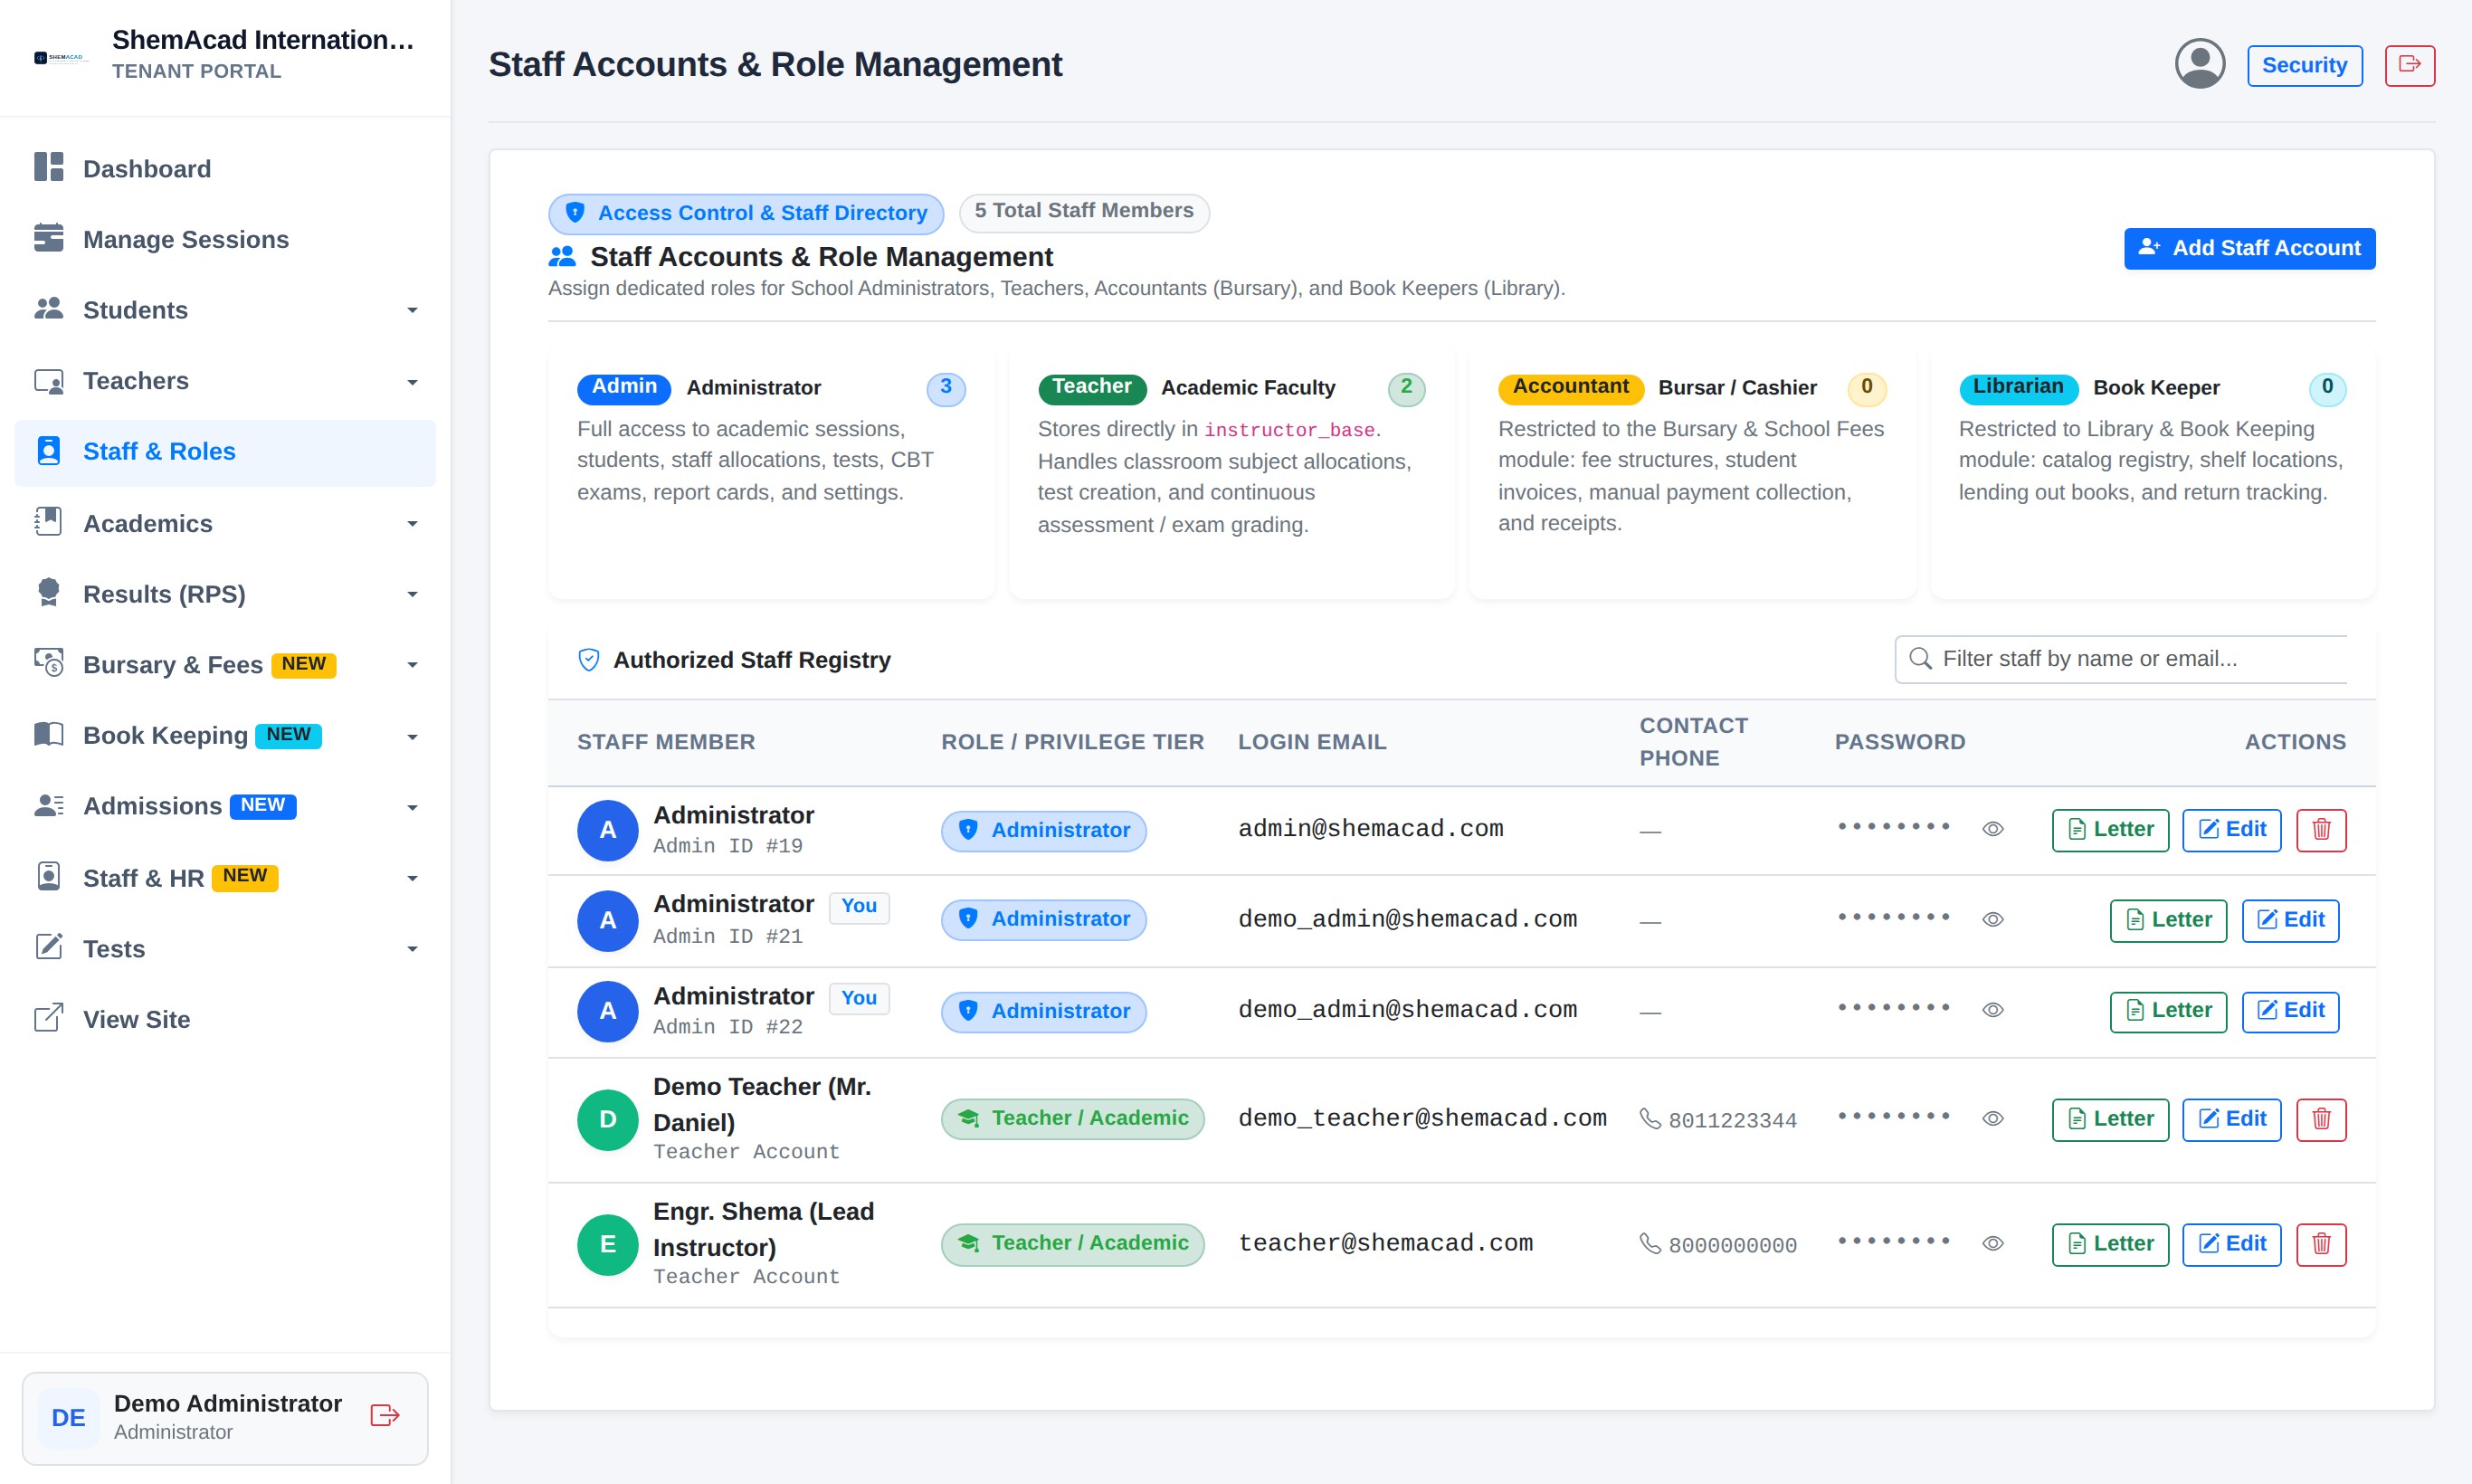
If your school uses Bursary or Library add-ons, open Staff & Roles in the sidebar to create dedicated Accountant, Librarian, or additional Co-Administrator logins.
Adding Teachers, Assigning Subjects & Staff Roles
Allocate Subjects to Teachers grid mapping subjects to specific classes for each teacher.
Step 2.6b

Manage Teachers Directory & Staff Roles Reference

Reference
Manage Teachers Directory
Manage Teachers: Search teachers, bulk import staff spreadsheets, export Excel/PDF, or reset passwords (yellow key button).
Staff Accounts & Role Management
Staff & Roles: Manage Administrators, Teachers, Accountants, and Librarians in one directory.
Step 2.7

Enrolling Students (Single Form & Bulk Spreadsheet Upload)

Student Roster

You can register students one-by-one or upload an entire class list from Microsoft Excel or Google Sheets in seconds.

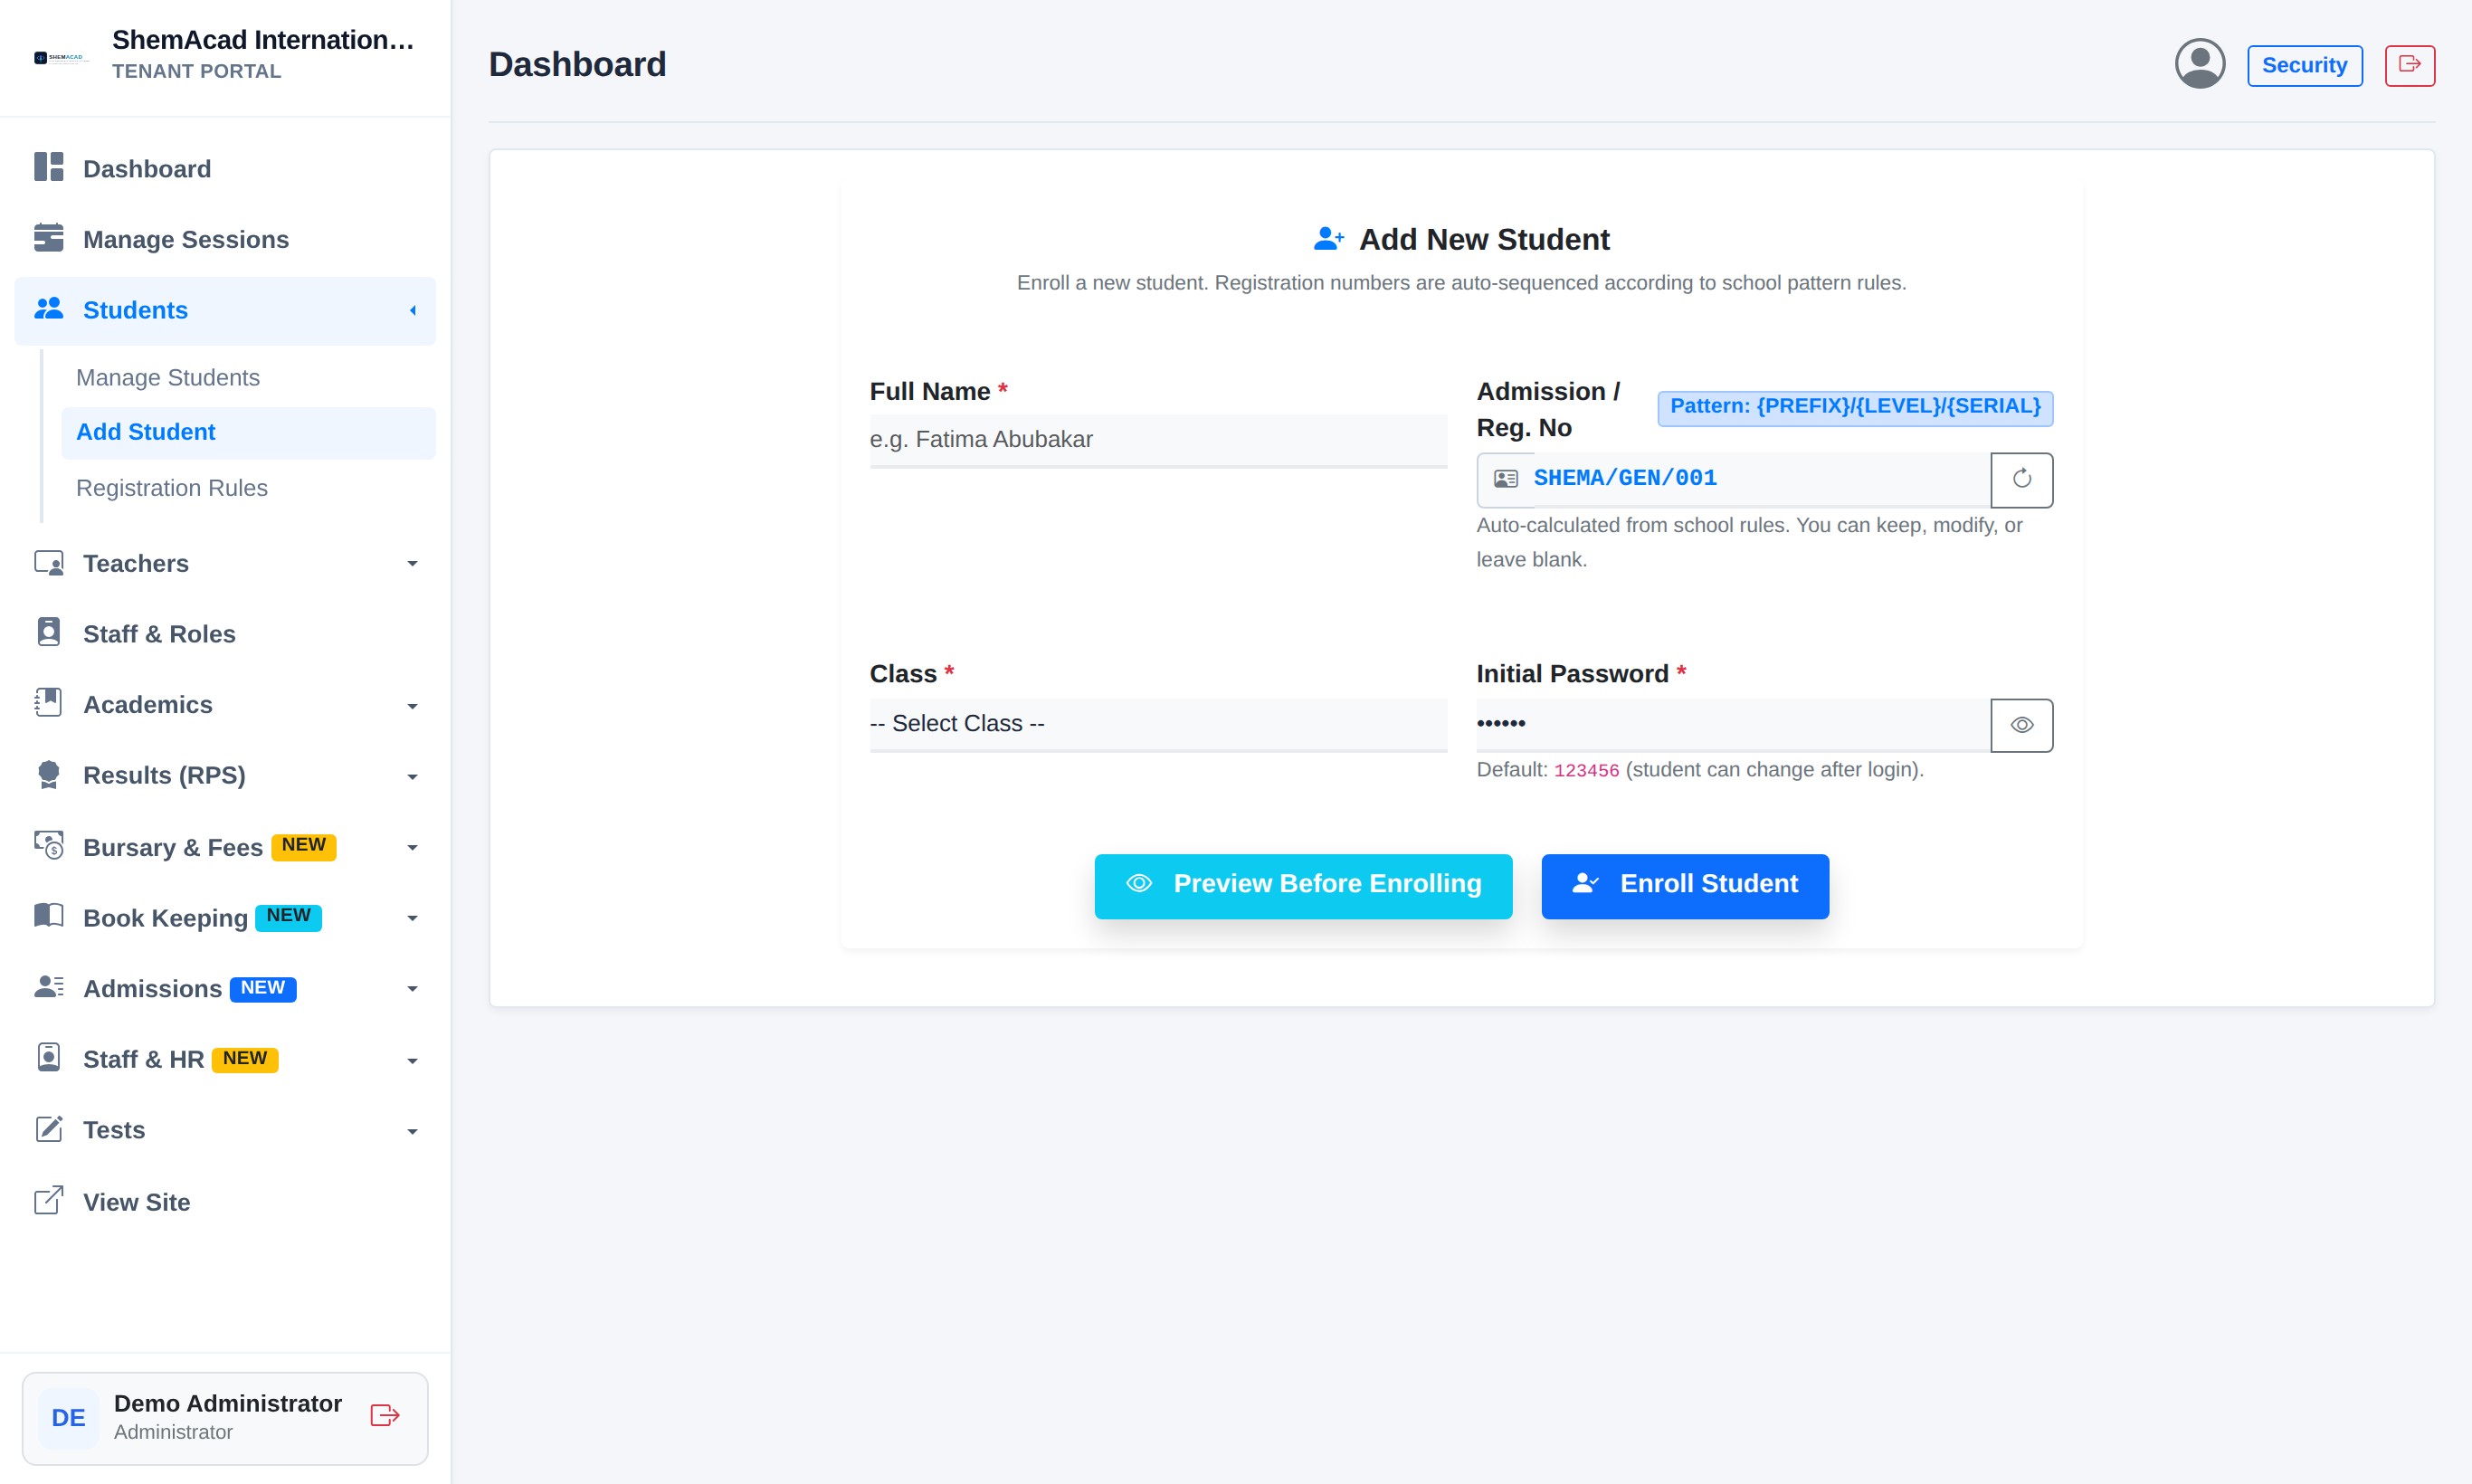
  1. One Student at a Time: Go to Students → Add Student. Type Full Name, pick Class (and Sub-Arm stream if Senior Secondary). The Registration Number is generated automatically according to your school's pattern! Click Enroll Student.
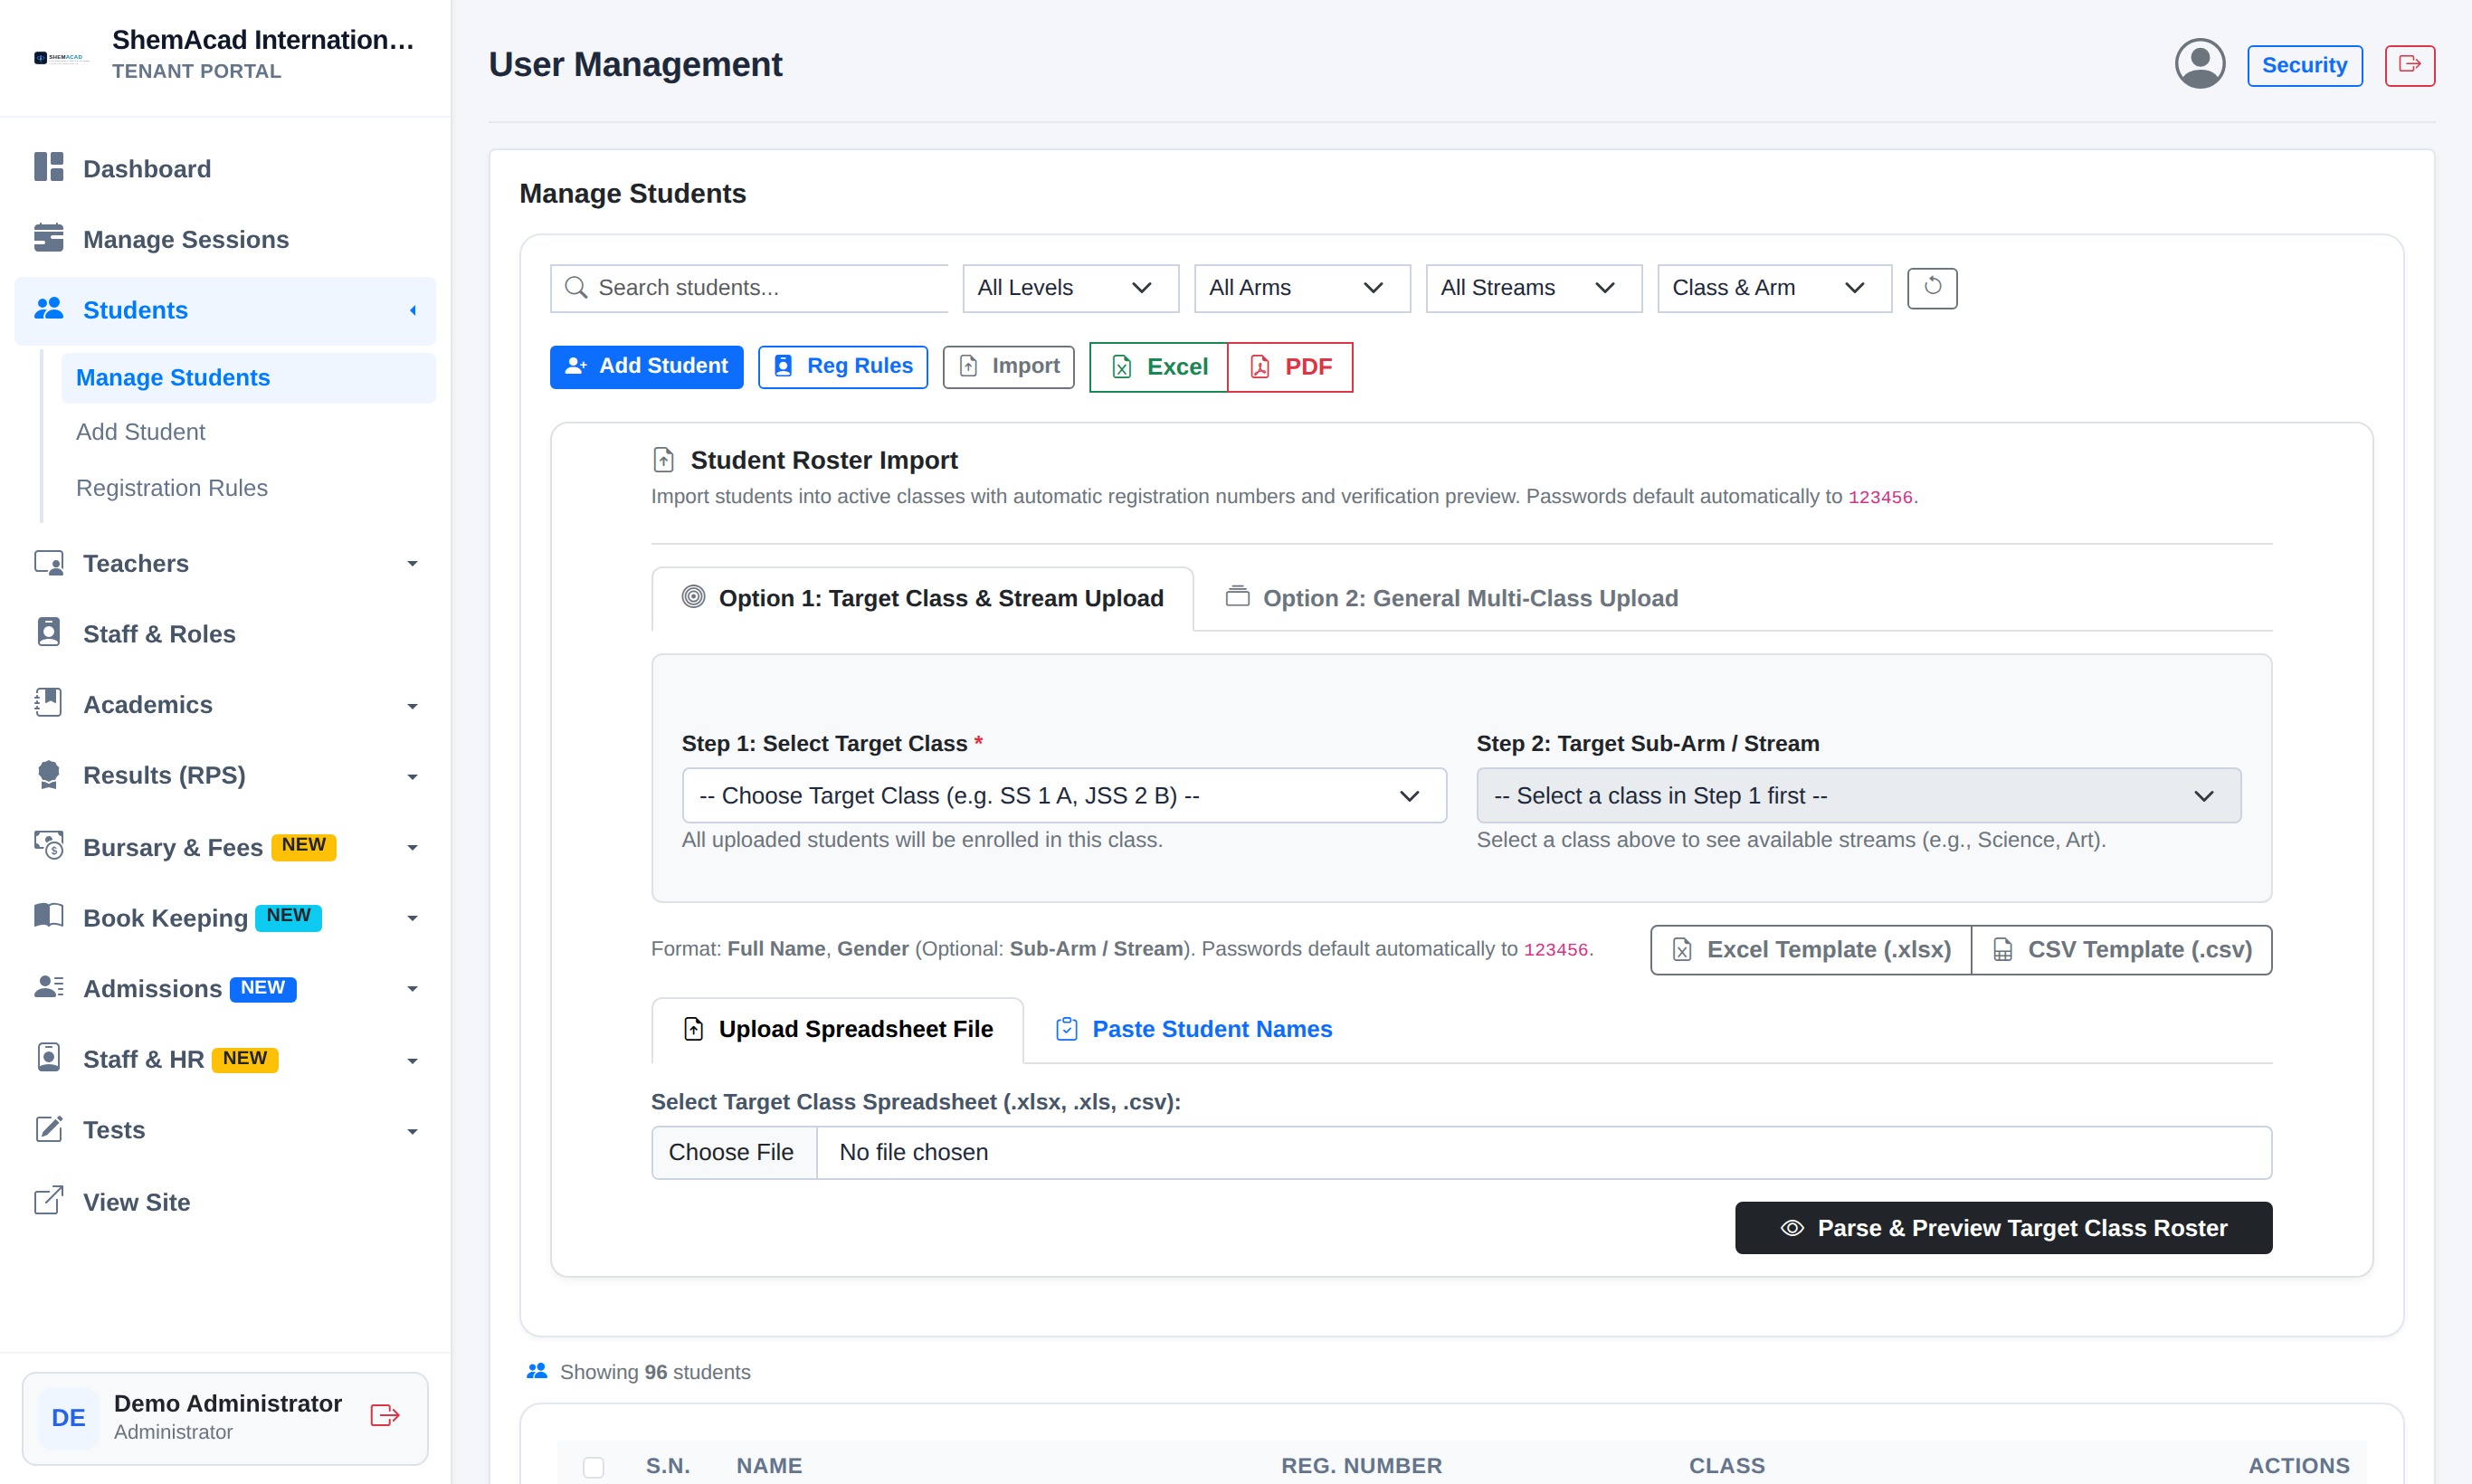
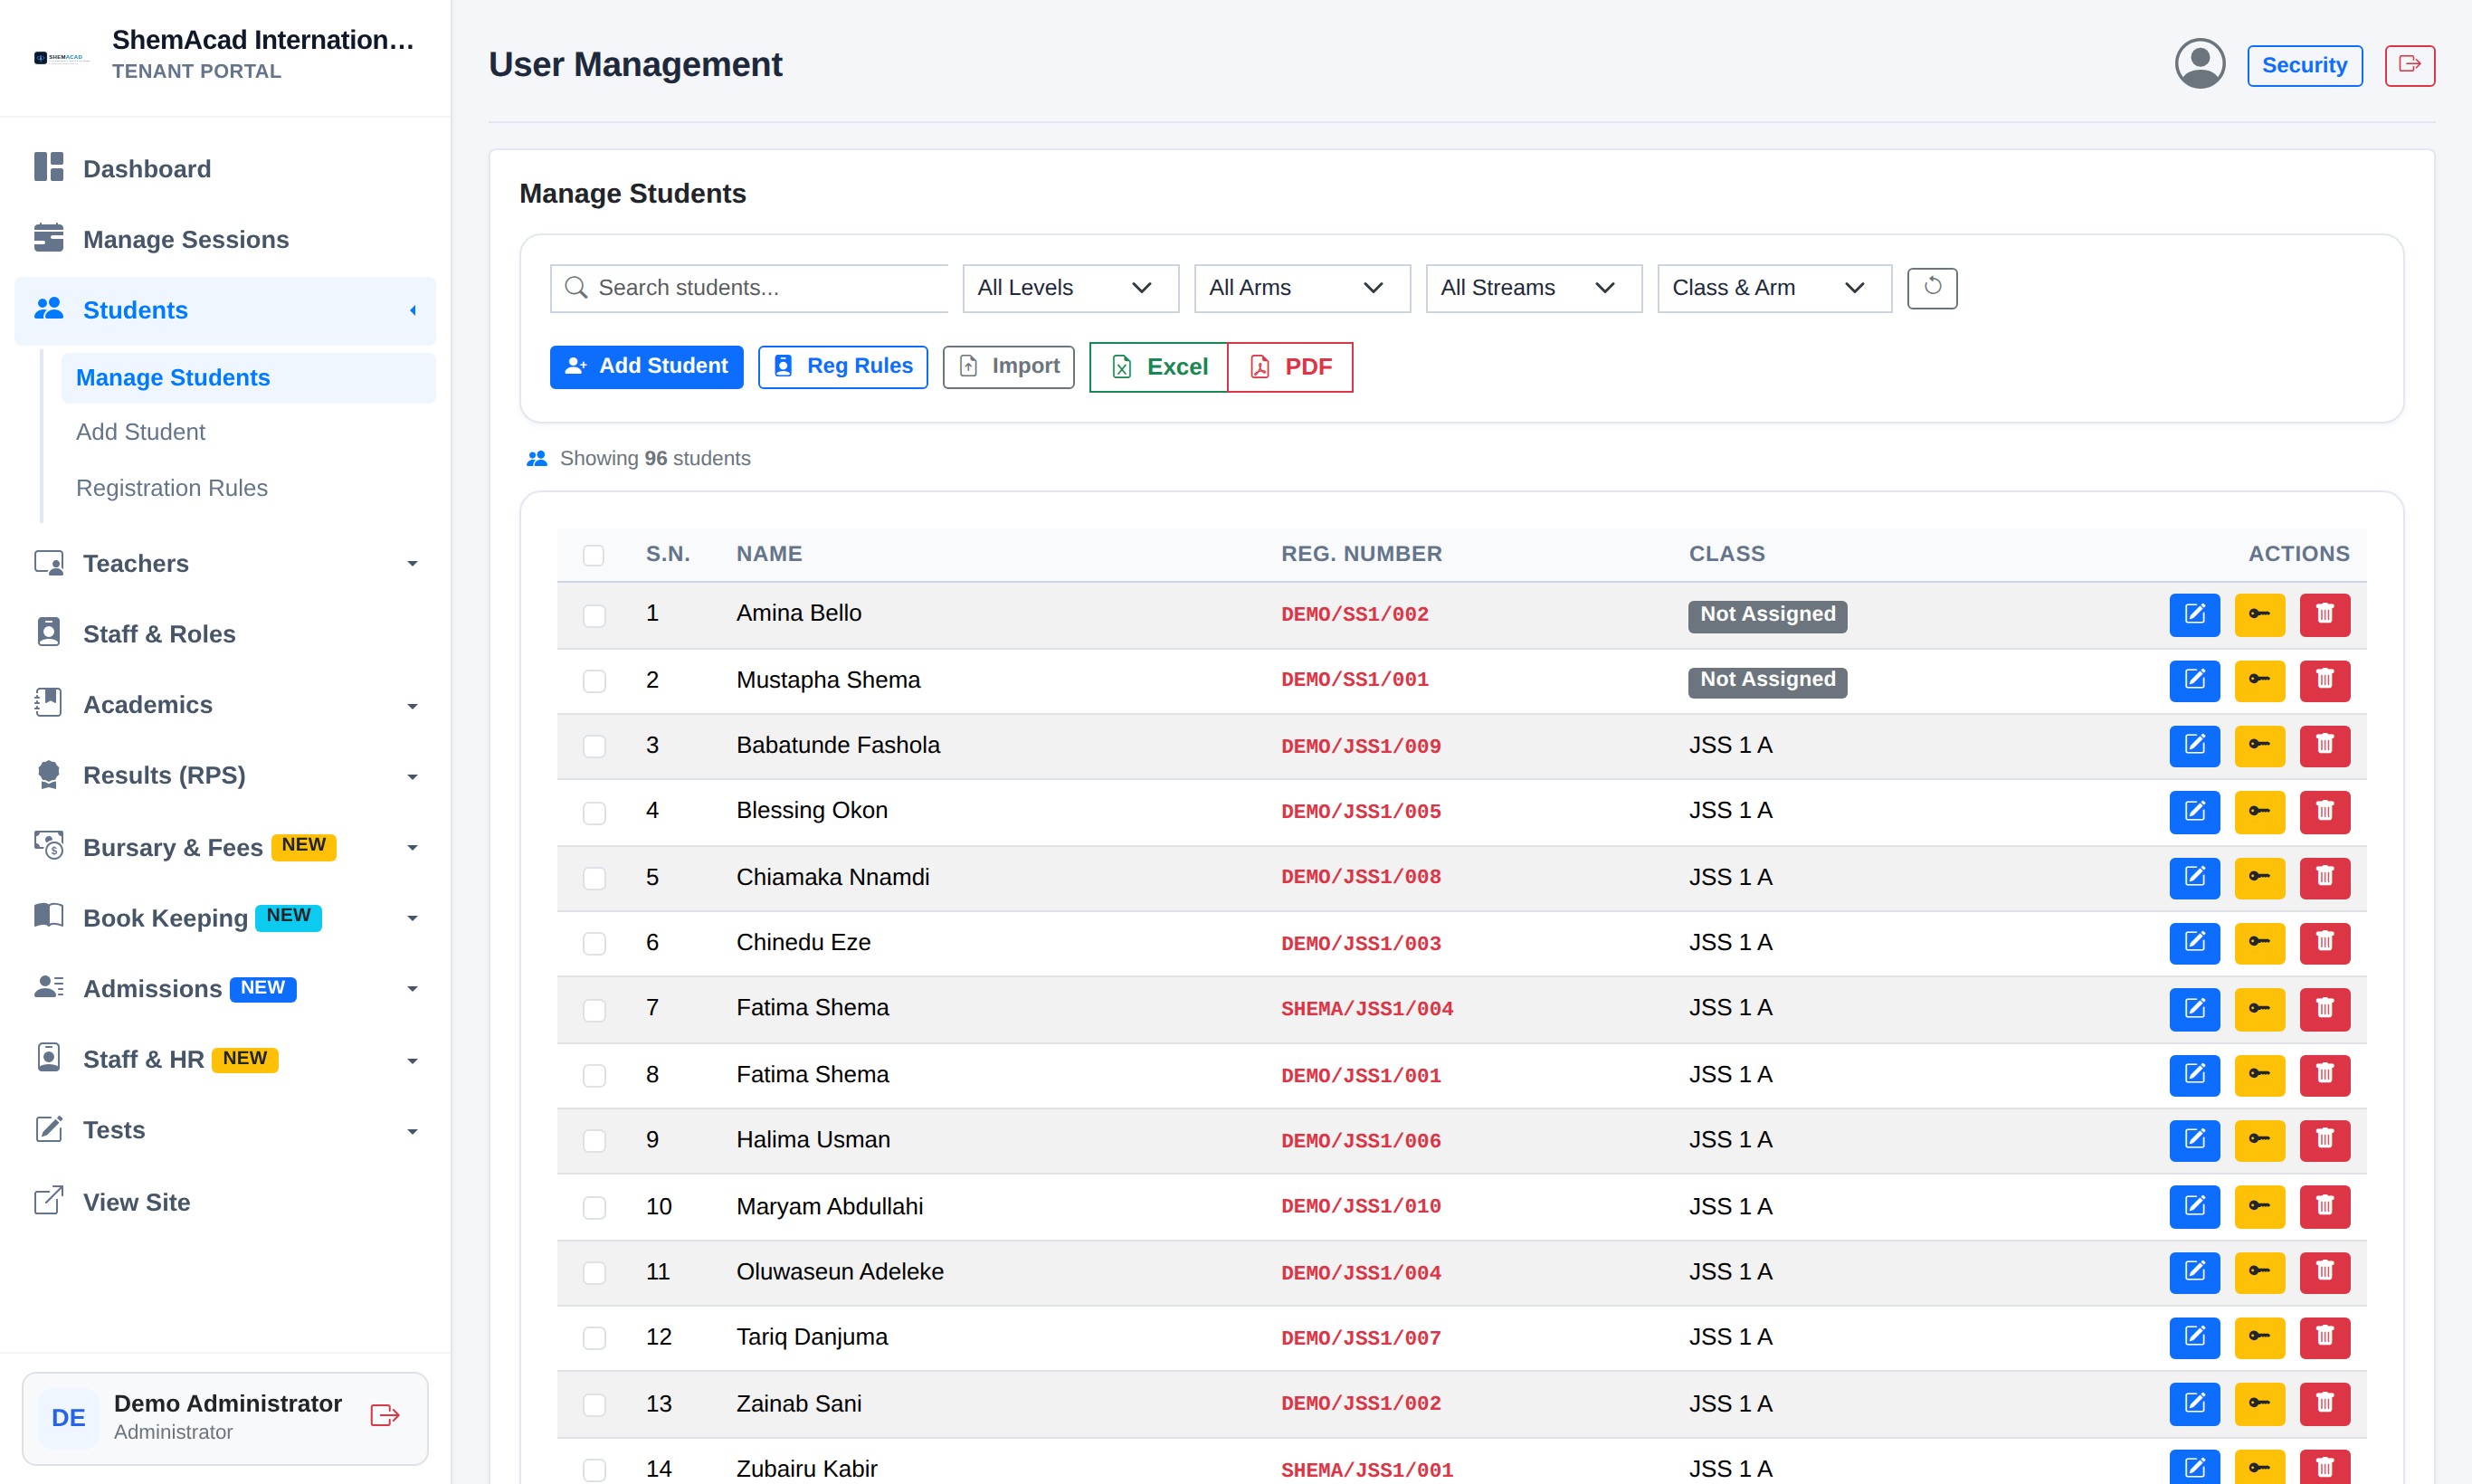
  2. Bulk Upload Whole Class: Go to Students → Manage Students and click Import at the top toolbar.
  3. Pick the Target Class (and stream), download the template or paste student names directly from Excel, then click Parse & Preview Target Class Roster to inspect every row before saving.
  4. Managing Passwords & Reg Rules: In Manage Students click the yellow key icon to reset any student password to 123456. Open Registration Rules to customize your school acronym (e.g. ZBSK/SS1/001).
Helpful Tip
Always use the Preview step before confirming bulk imports so you can catch spelling errors or wrong classes immediately.
Enrolling Students (Single Form & Bulk Spreadsheet Upload)
Student Roster Import panel inside Manage Students supporting Excel, CSV, and direct copy-paste.
Step 2.7b

Add Student Form, Roster Filters & End-of-Session Promotion

Student Lifecycle
Add New Student Form
Add Student: Auto-generates next Registration Number and lets you preview before saving.
Manage Students Table
Manage Students: Filter by Level, Arm, or Stream; export Excel/PDF; edit or reset passwords.
Promote Students Tool
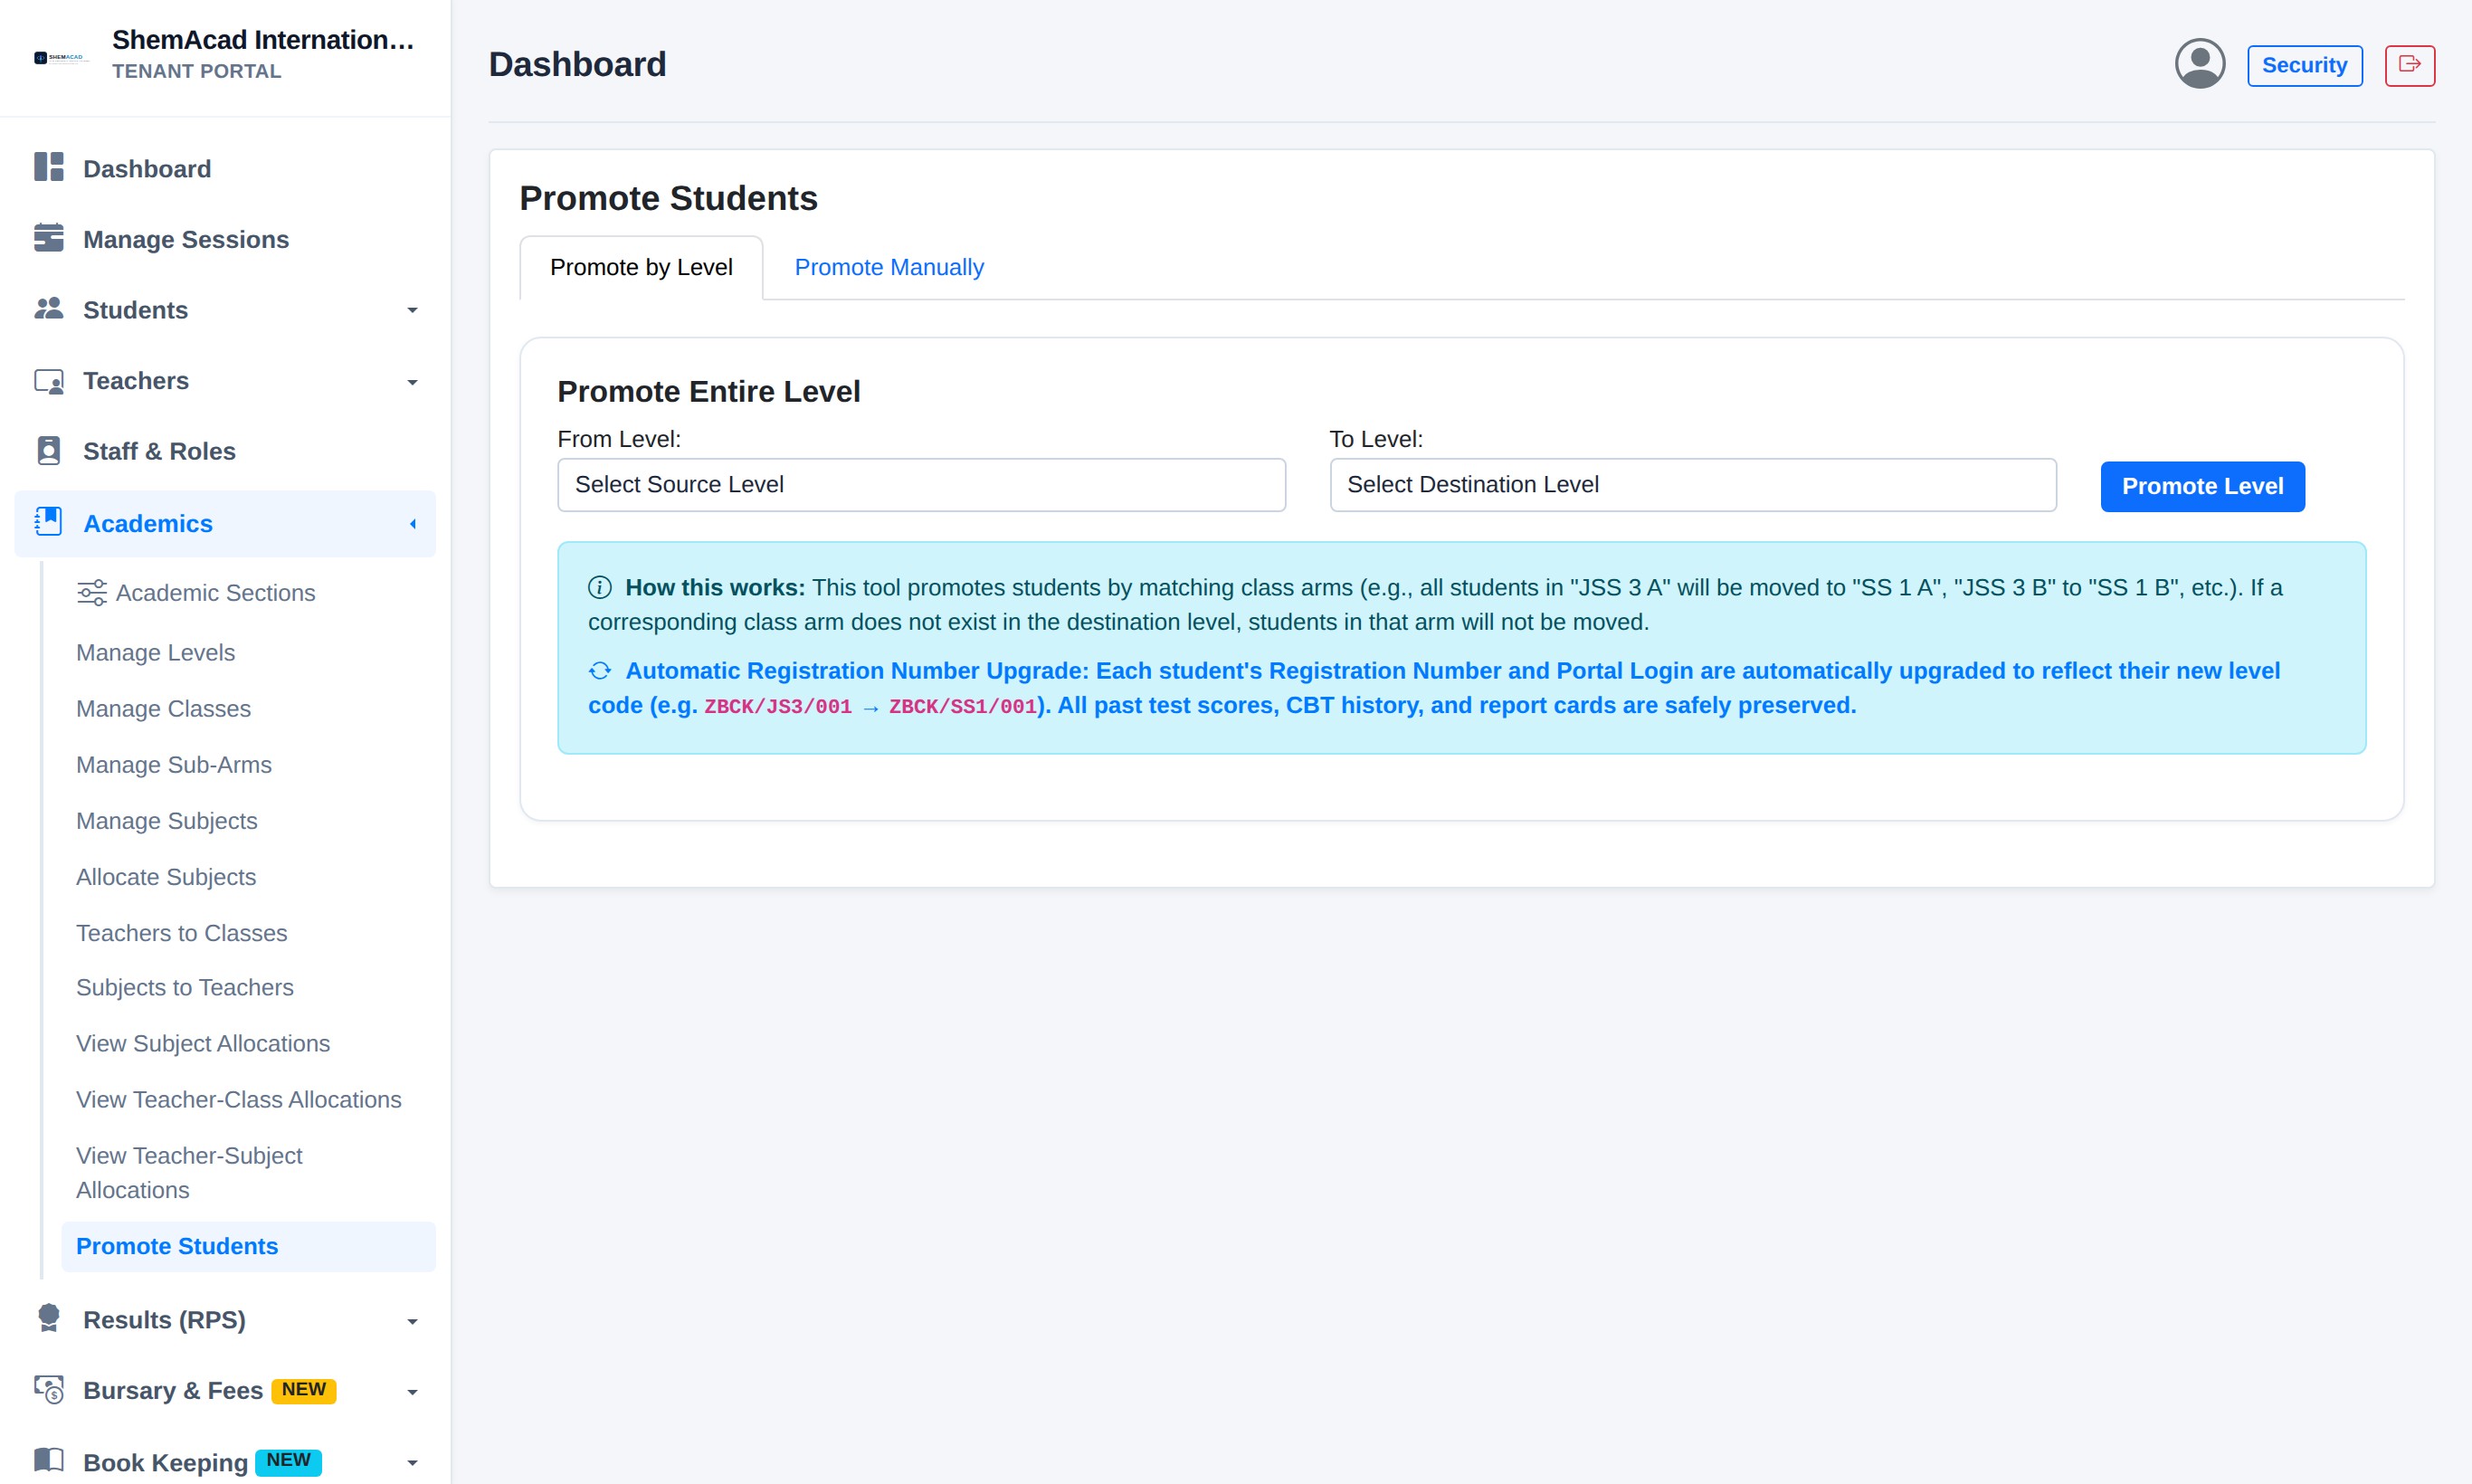
Promote Students: Move a whole level up (e.g. JSS 1 → JSS 2) cleanly at session end.
How End-of-Year Promotion Works (Academics → Promote Students)
Promote top classes downwards (first graduate/move SS 3, then SS 2 → SS 3, then SS 1 → SS 2, etc.) so two levels do not mix together! All past report cards and CBT history stay safely preserved, and student Registration Numbers upgrade automatically if enabled in Registration Rules.
Step 2.8

Configuring School Assessment Limits & CBT Policy

Before Exams

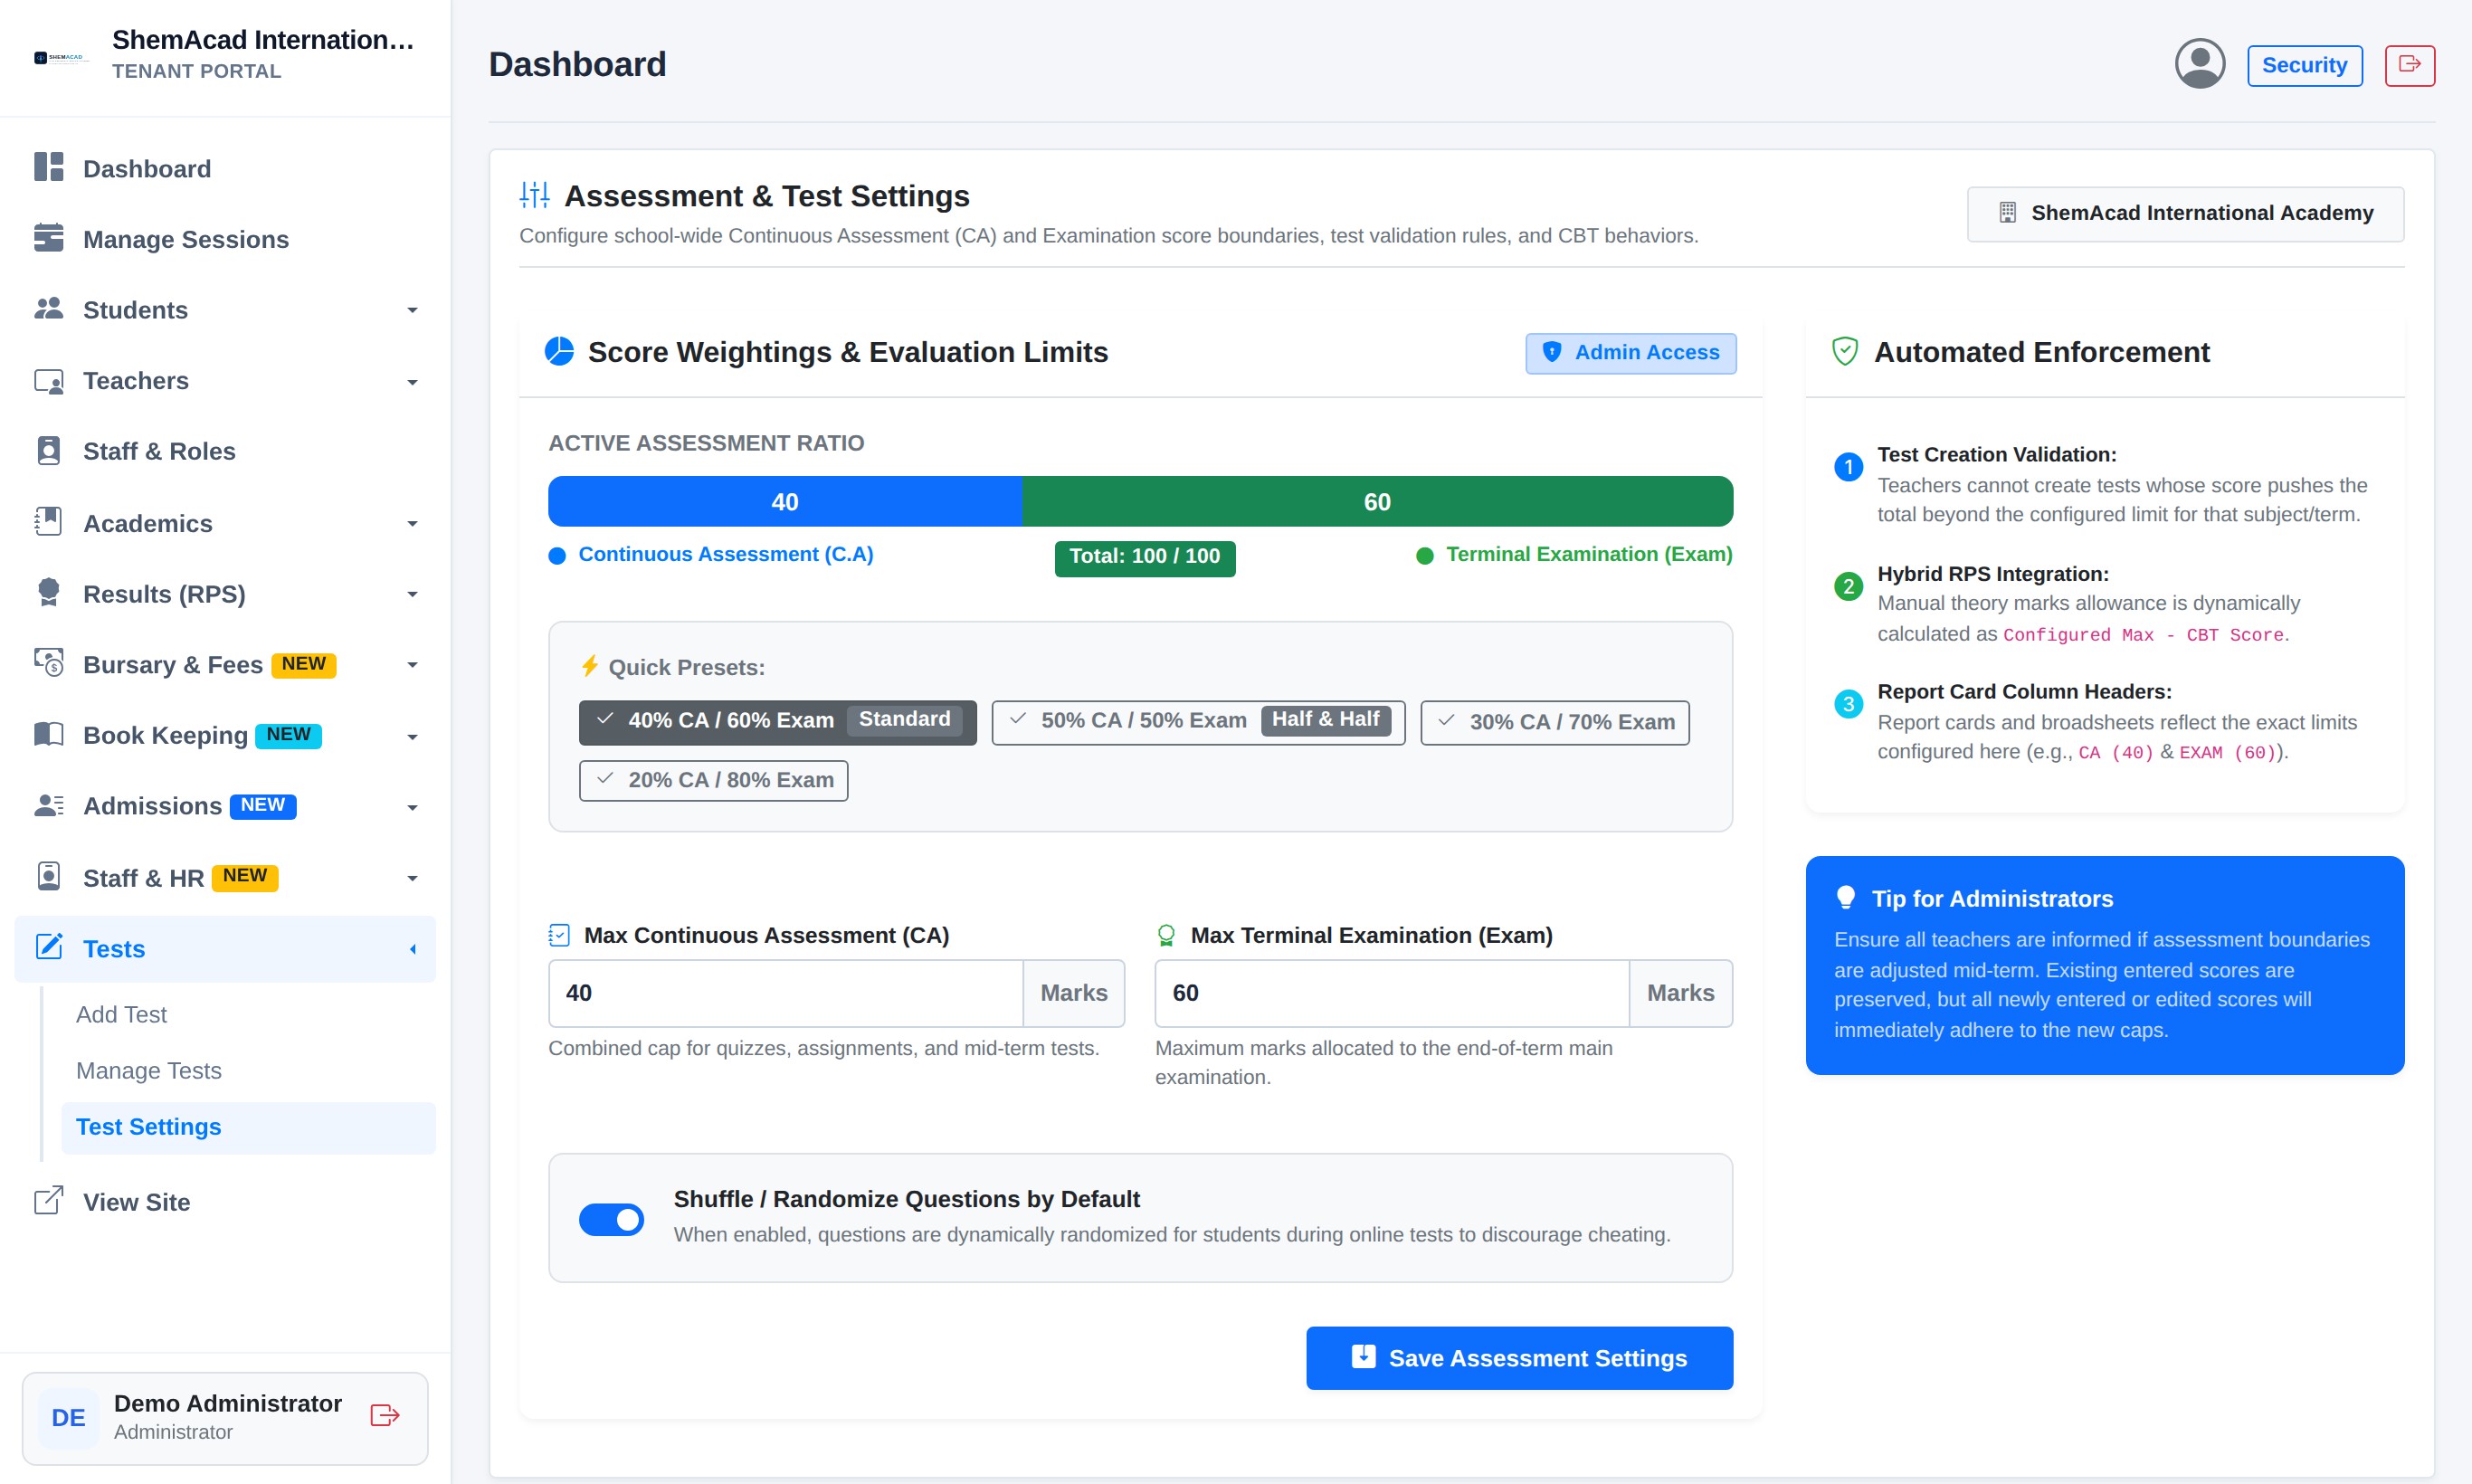
Decide how many marks belong to Continuous Assessment (CA) versus Terminal Exams (your school setting: 50% CA / 50% Exam). The system automatically protects teachers from exceeding these limits.

  1. Go to Tests → Test Settings.
  2. Click a quick preset button (such as 40% CA / 60% Exam or 50% CA / 50% Exam) or type your custom split totaling 100 marks.
  3. Leave Shuffle / Randomize Questions by Default switched ON so students sitting next to each other see questions in different order.
  4. Click Save Assessment Settings.
Helpful Tip
If a teacher sets a 25-mark CBT CA test, the Result System automatically locks that 25 and only allows up to 25 more manual CA marks (out of 50) during score entry.
Configuring School Assessment Limits & CBT Policy
Assessment & Test Settings controlling CA/Exam split and automatic question shuffling.
Step 2.9

Configuring Result Settings & Pre-Flight Inspection

Results Setup (RPS)

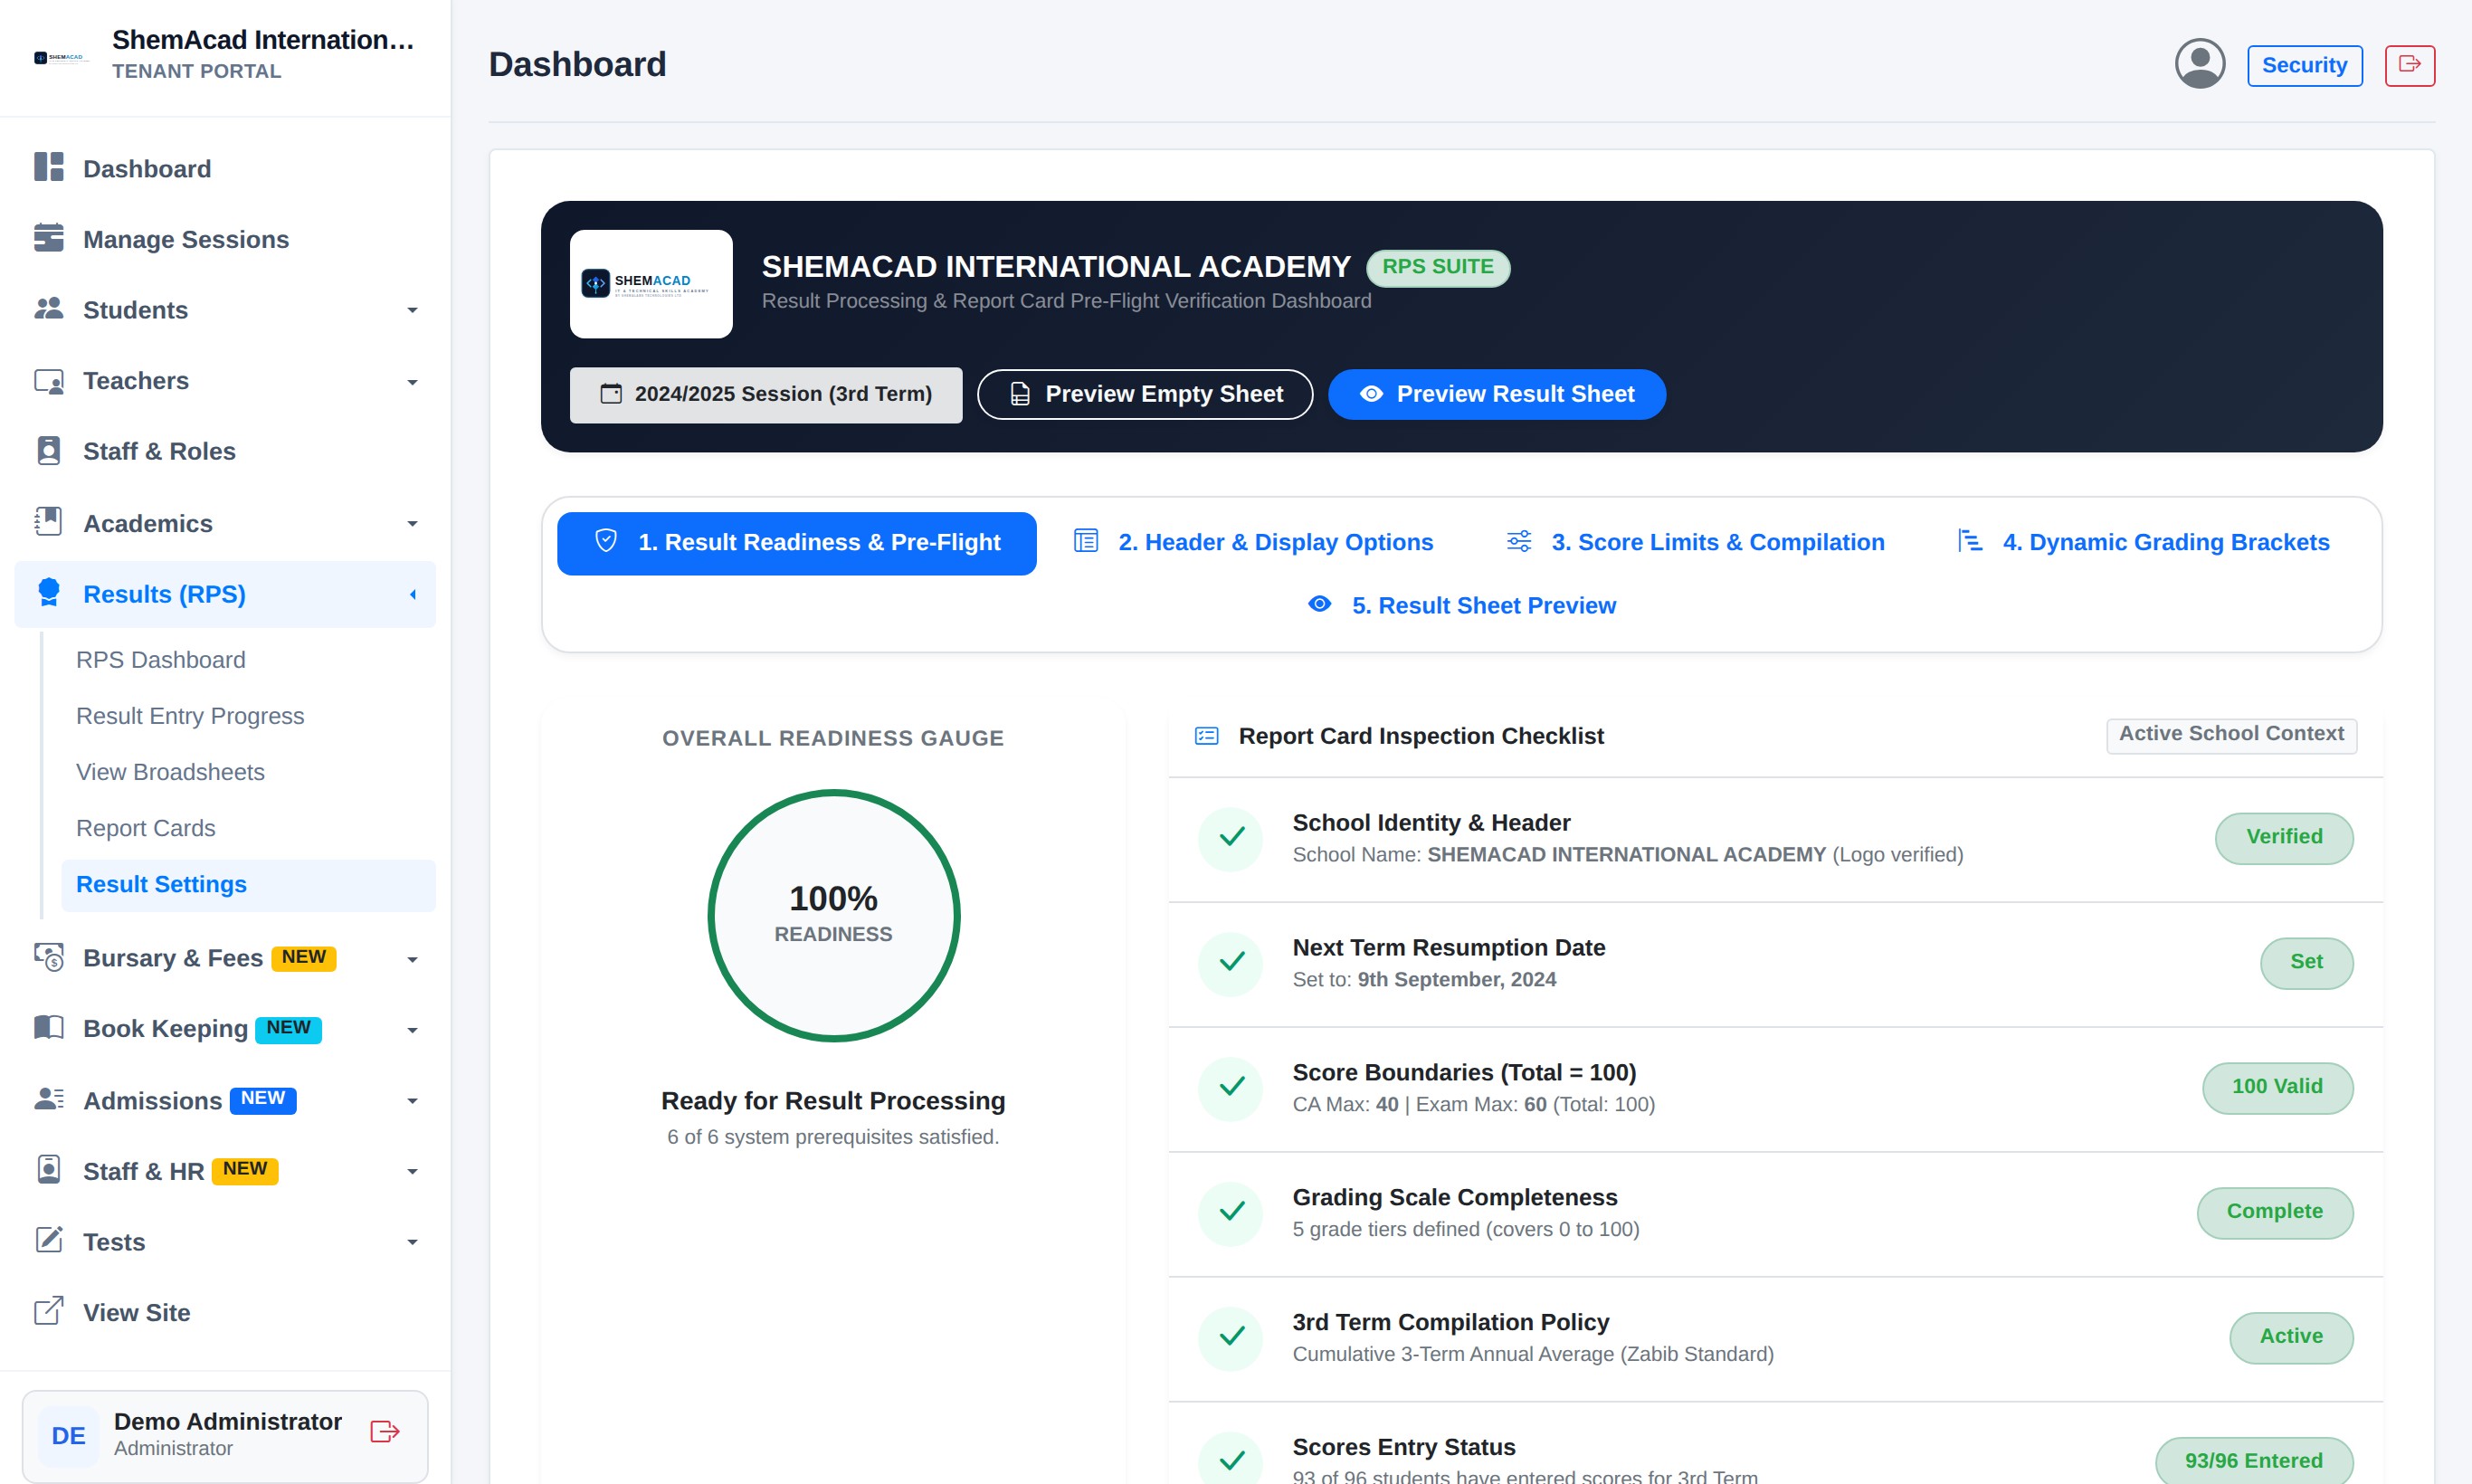
Open Results (RPS) → Result Settings to make sure report cards look exact and pass 100% of checks before compiling.

  1. Tab 1 — Result Readiness & Pre-Flight: Check that the green gauge reads 100% READINESS and all 6 checklist items (Logo, Resumption Date, 100-mark limits, Grading Scale, Compilation Policy, Score Entry) show green badges.
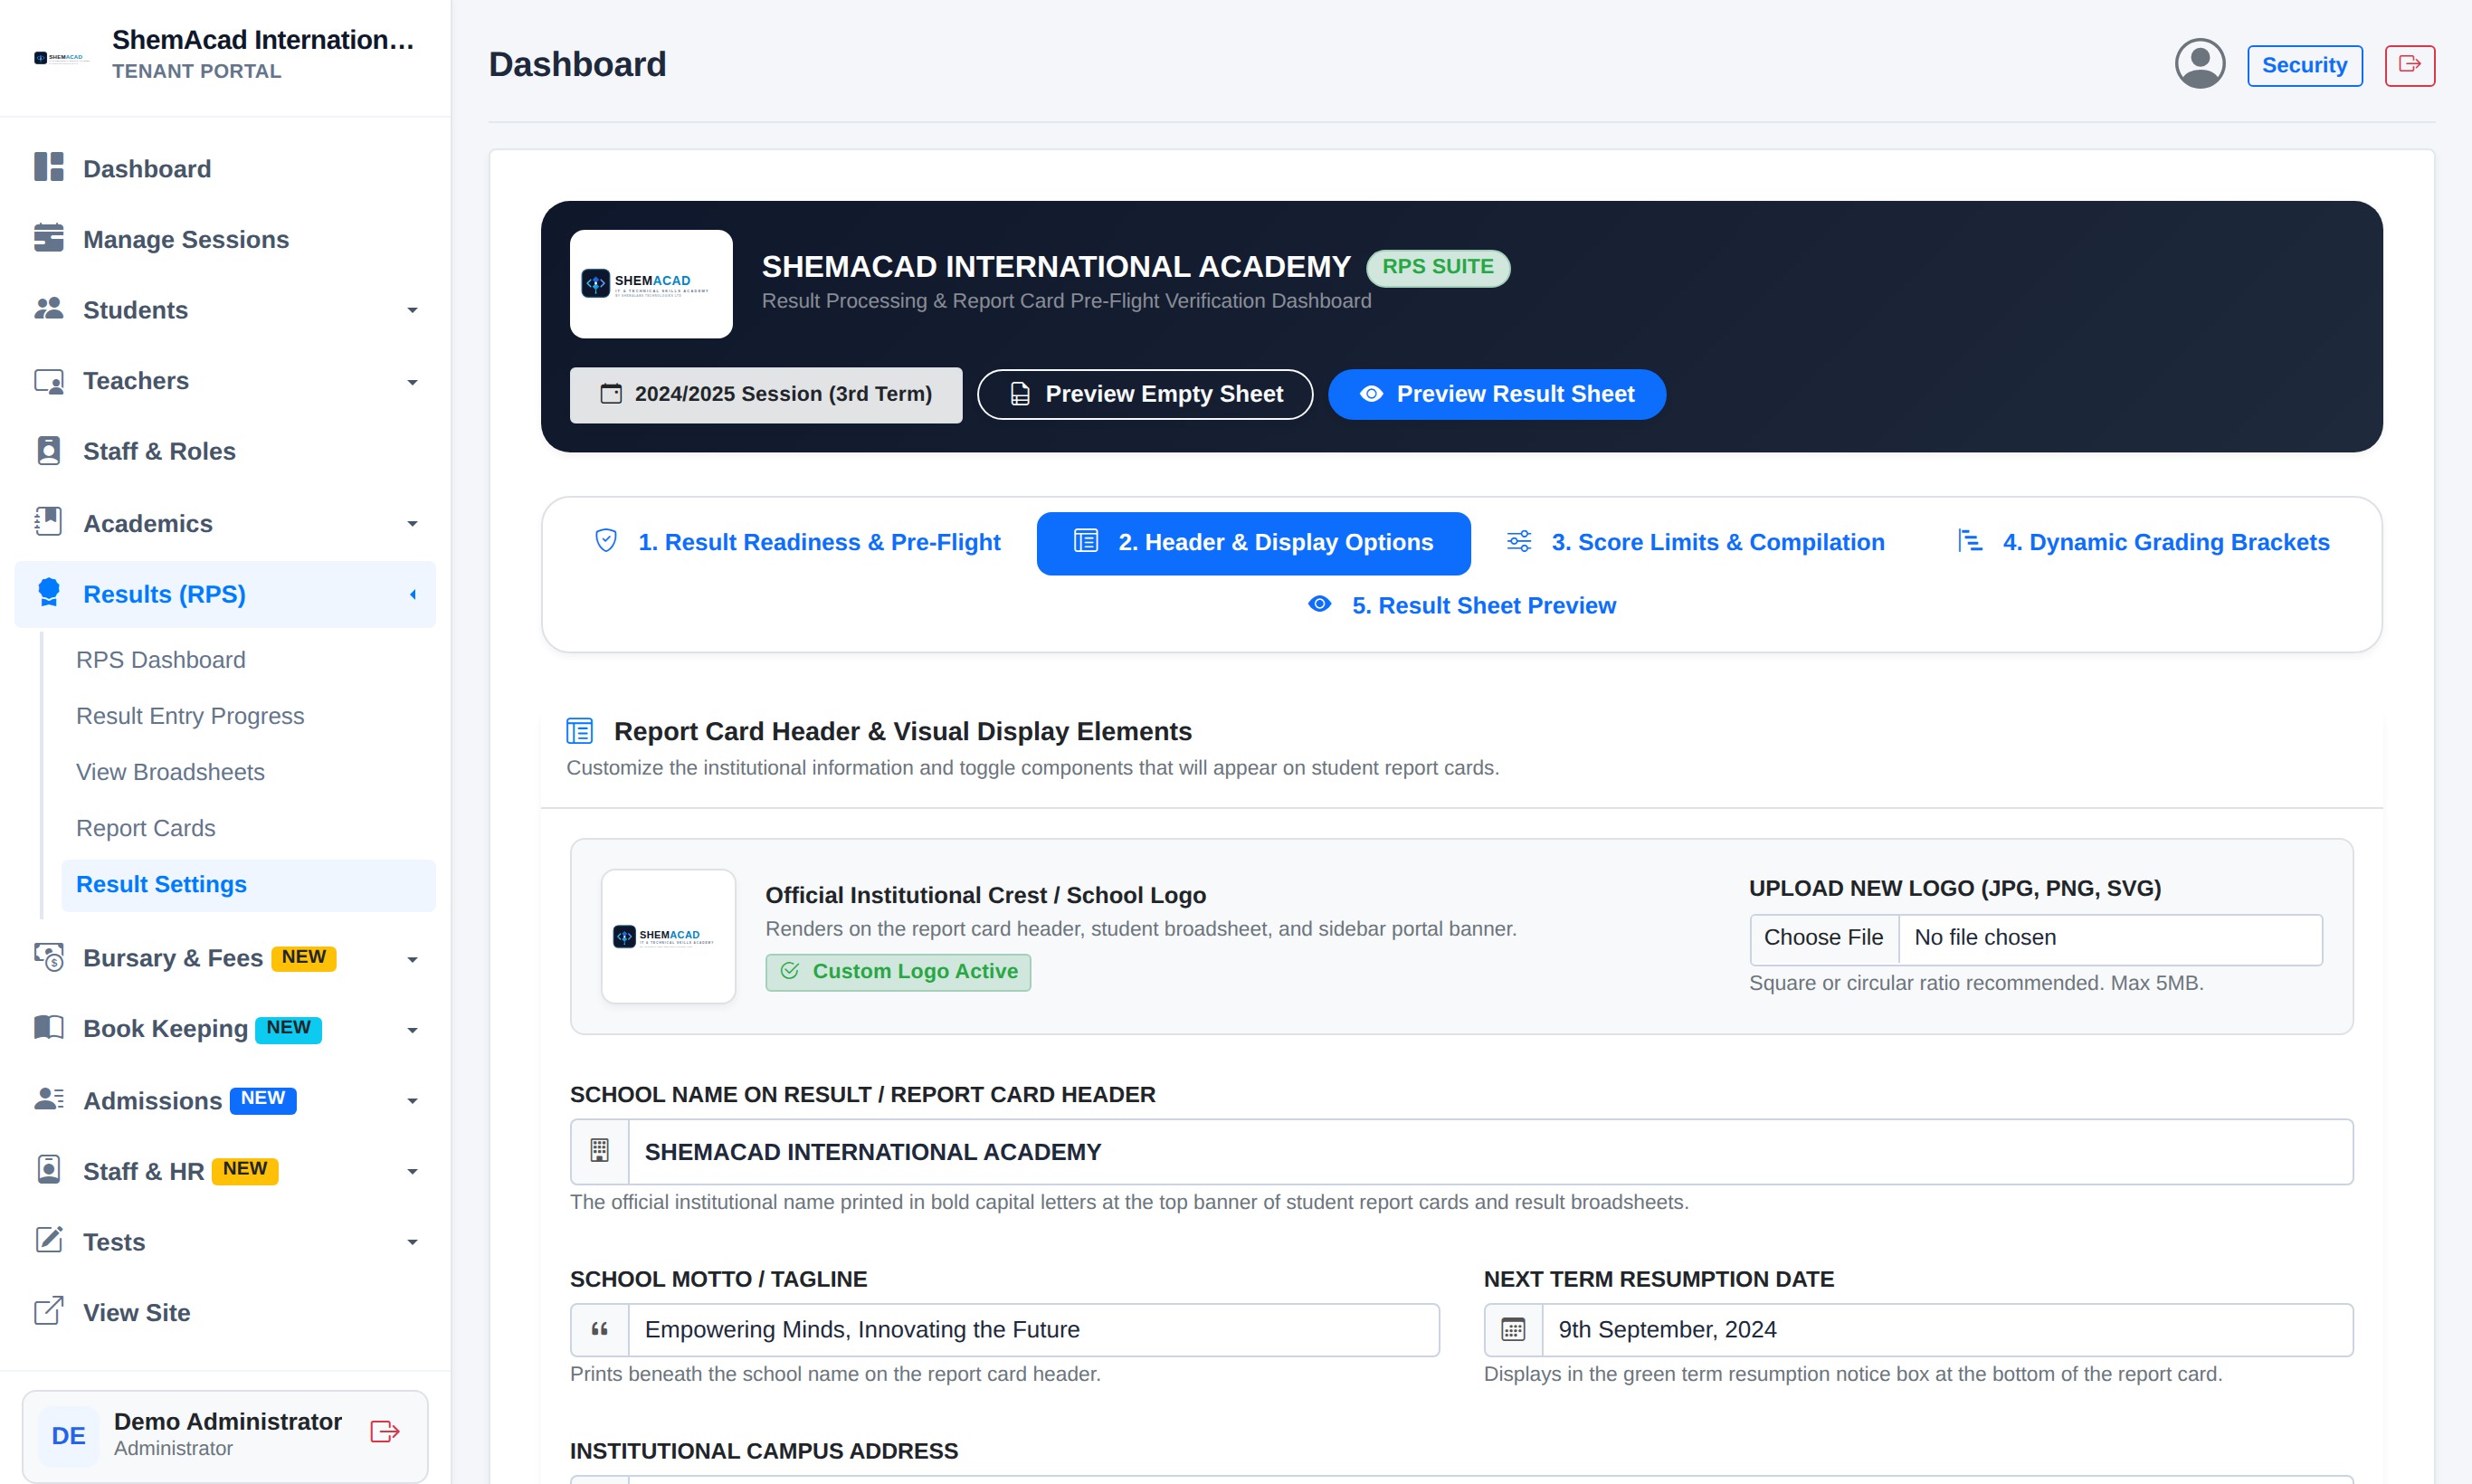
  2. Tab 2 — Header & Display Options: Upload your official school crest, confirm your school name, motto, campus address, and set Next Term Resumption Date. Toggle visibility of Position, Class Max, Traits, and Signatures.
  3. Tab 3 — Score Limits & Compilation: Enable or disable 3rd Term Cumulative Evaluation (combines 1st + 2nd + 3rd Term averages on 3rd term report cards).
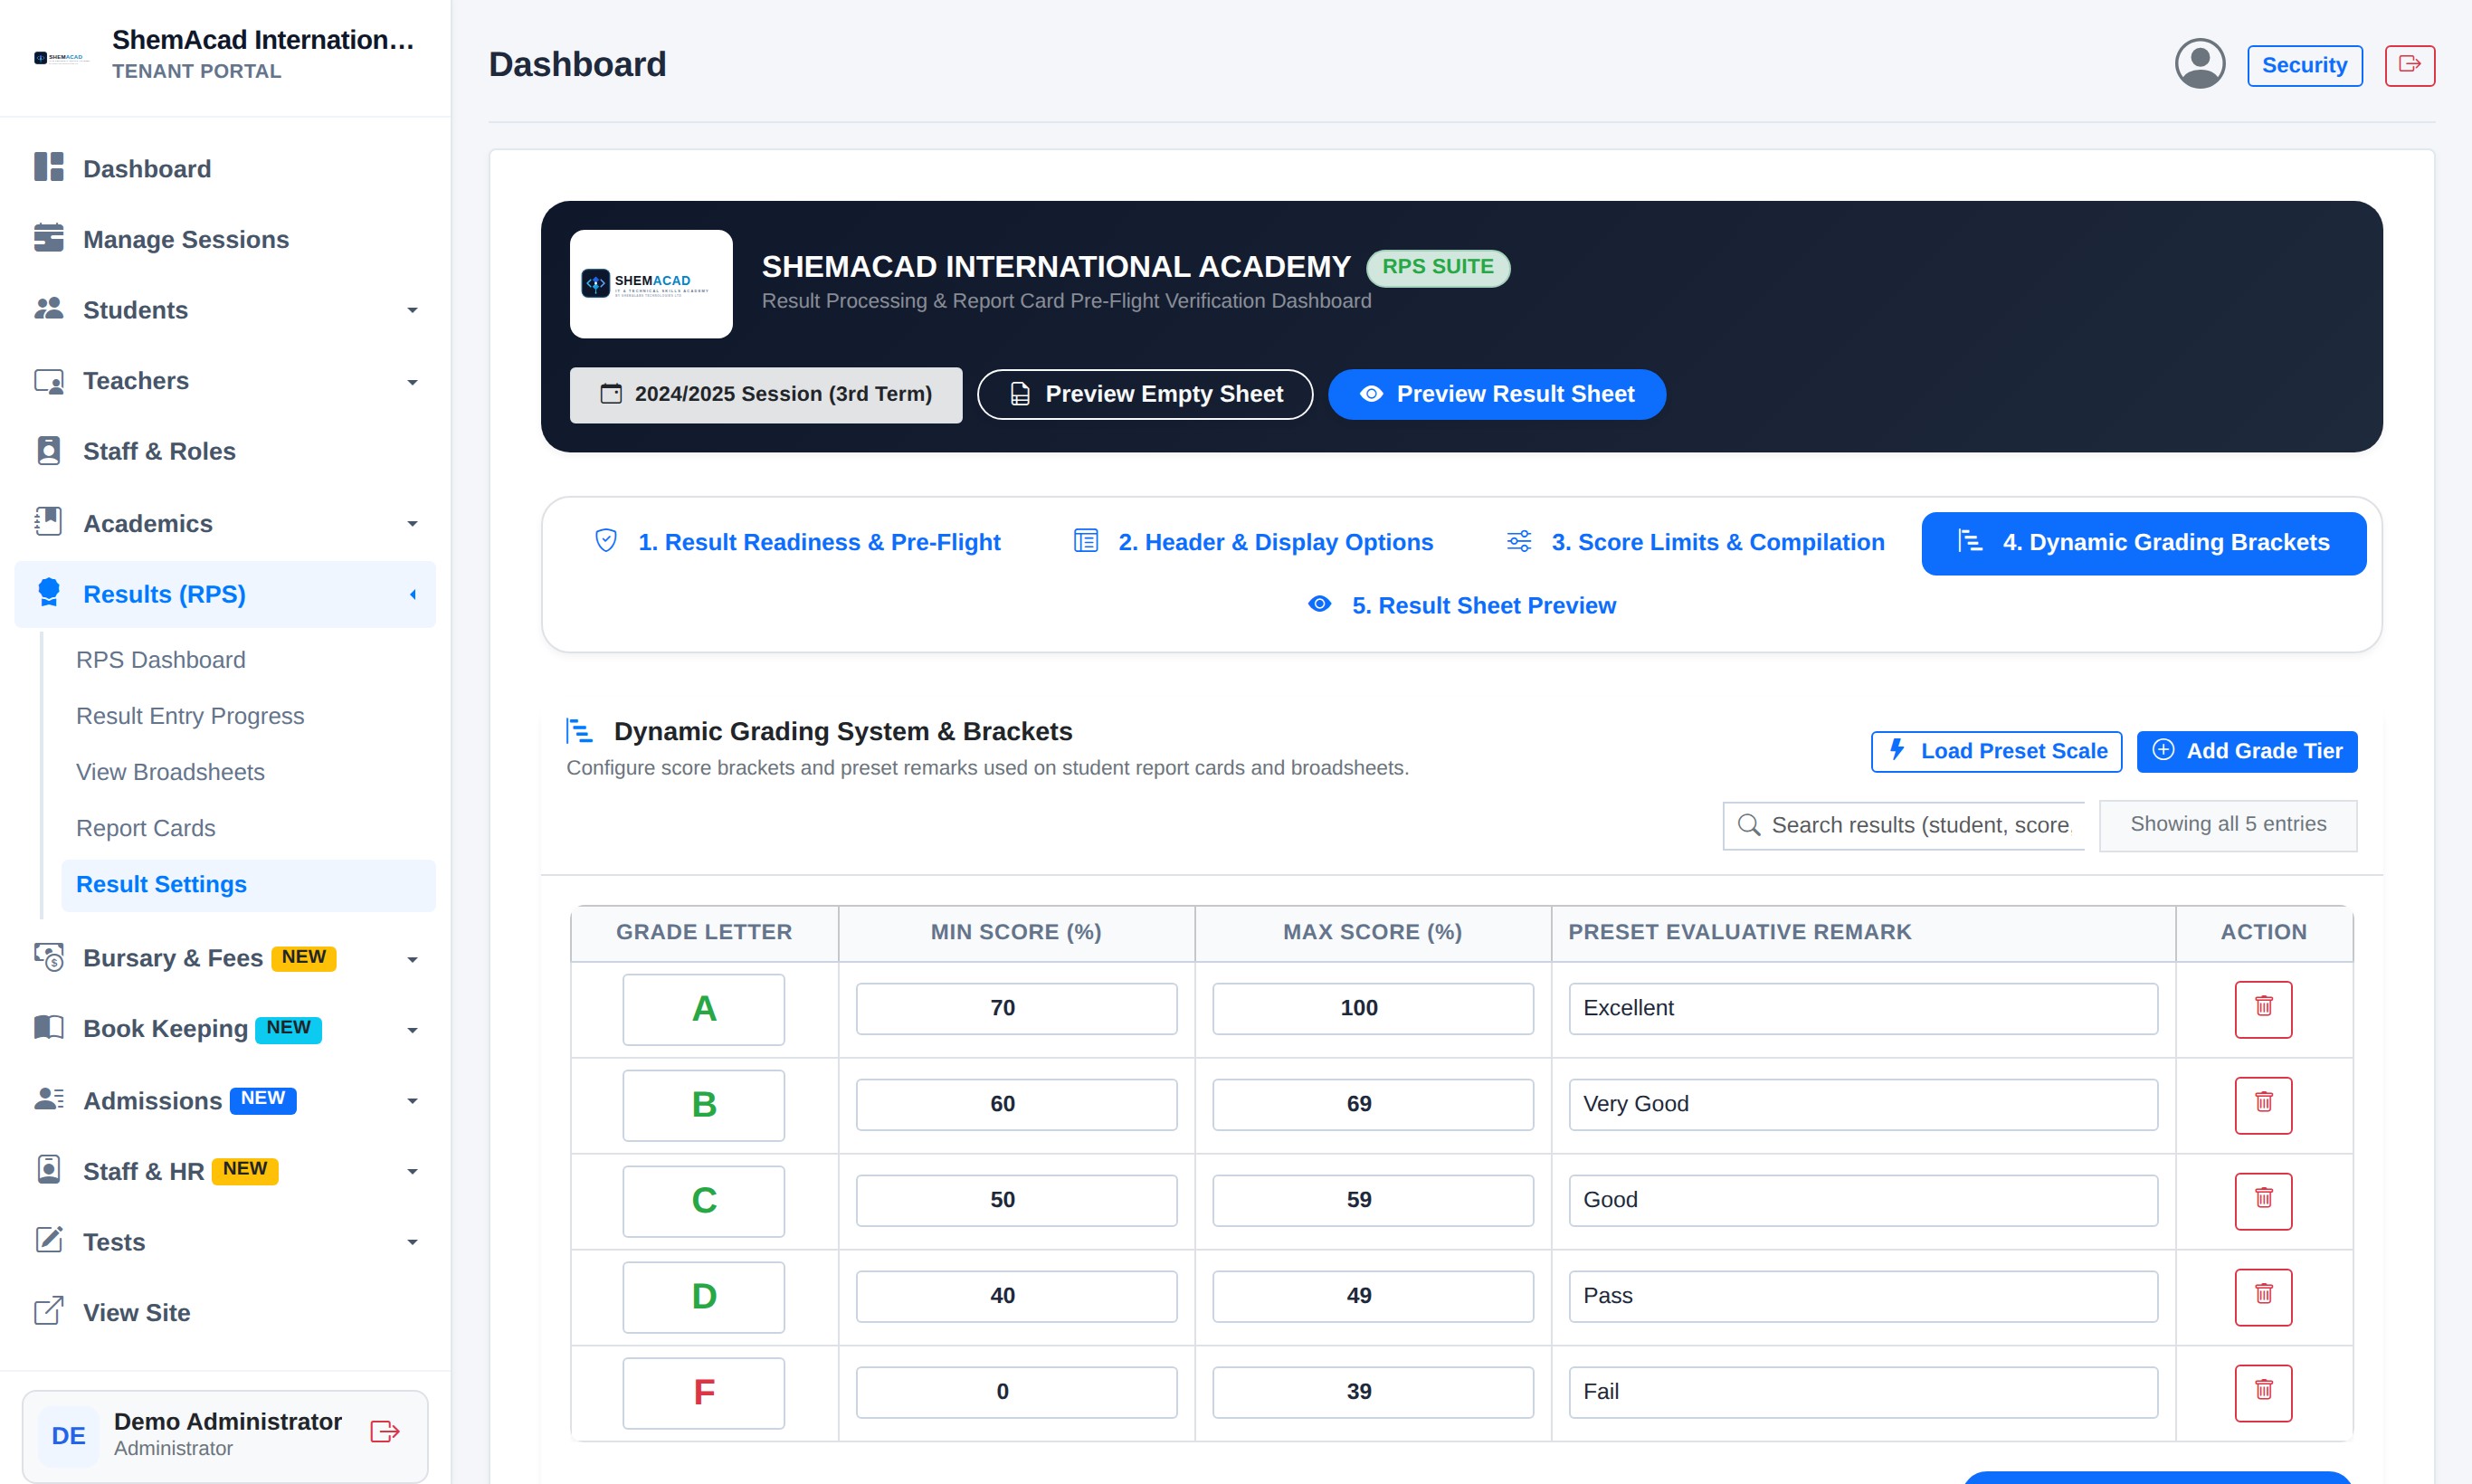
  4. Tab 4 — Dynamic Grading Brackets: Click Load Preset Scale (Standard A–F, Nigerian WAEC A1–F9, or Cambridge) or add custom grade brackets and remarks.
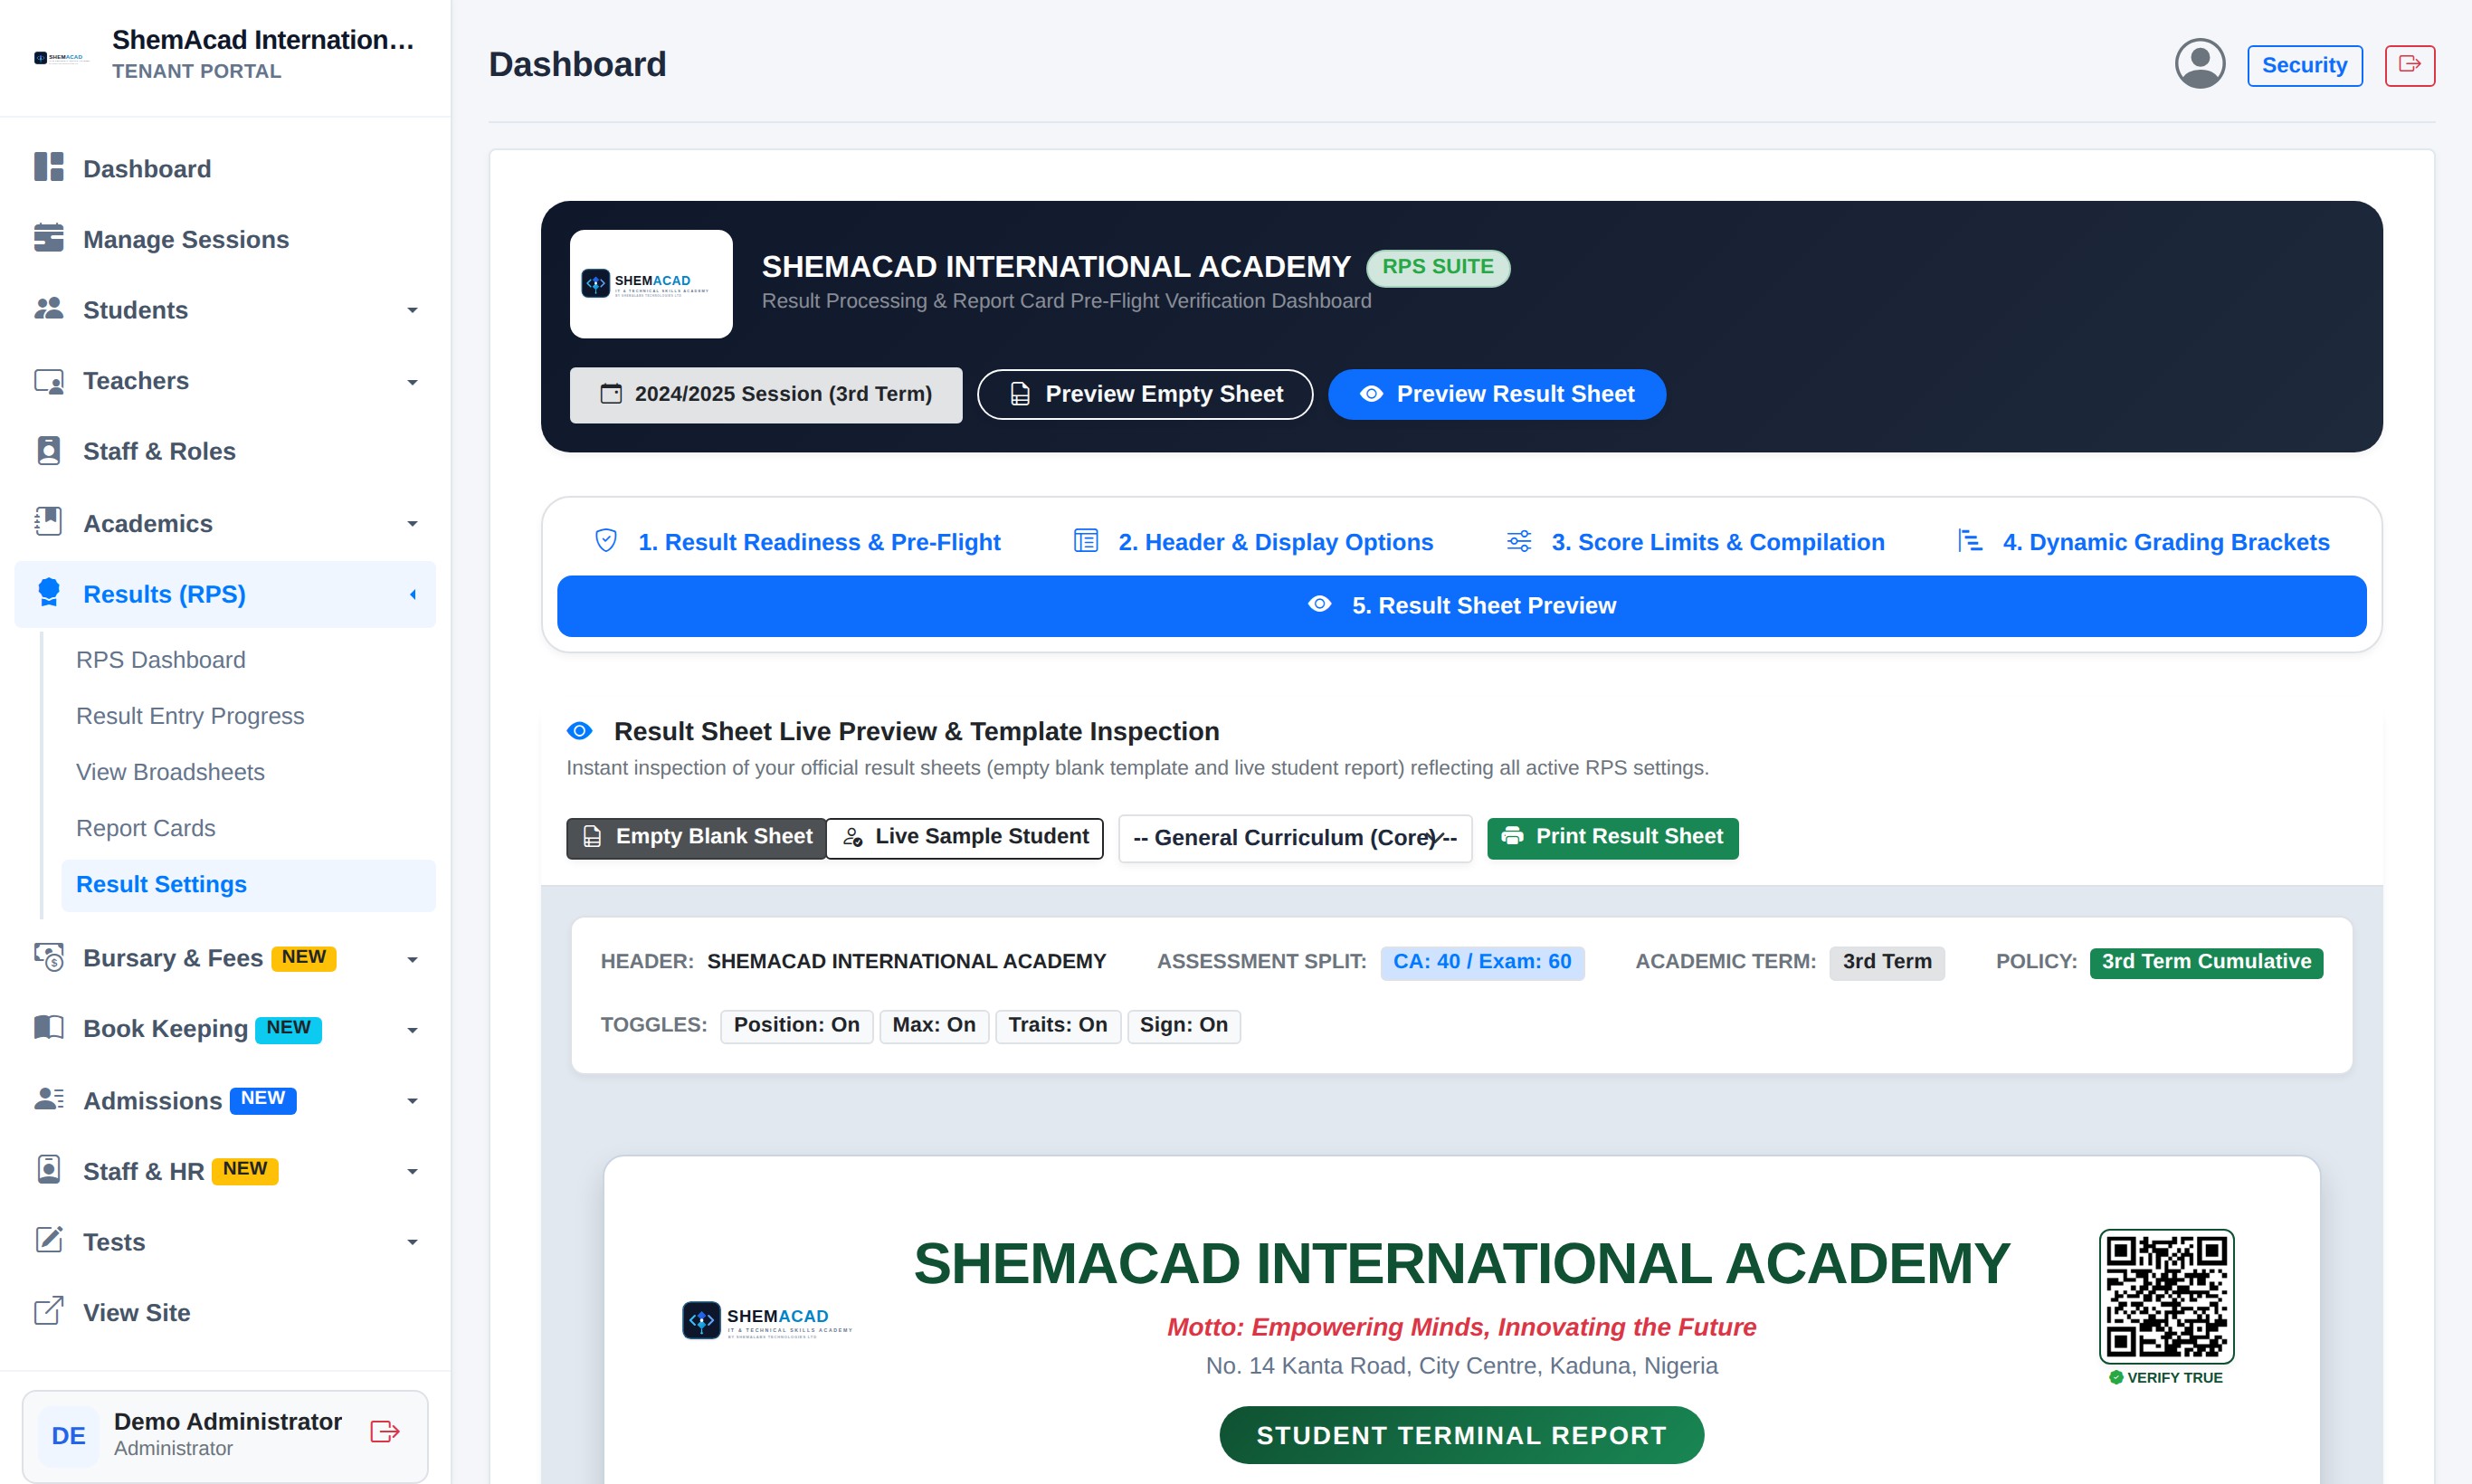
  5. Tab 5 — Result Sheet Preview: Inspect a live preview or print an Empty Blank Result Sheet template.
Helpful Tip
Every change in Result Settings updates all broadsheets and report cards across your school immediately — no developer help required.
Configuring Result Settings & Pre-Flight Inspection
Result Settings Pre-Flight Verification dashboard confirming 100% readiness before processing.
Step 2.9b

Inside Result Settings: Header Branding, Grading Scale & Live Sheet Preview

RPS Customization
Tab 2: Report Card Header & Display Options
Header & Display (Tab 2): Upload crest, motto, address, and next resumption date.
Tab 4: Dynamic Grading Scale
Dynamic Grading (Tab 4): Edit min/max score brackets or load WAEC / Cambridge presets.
Tab 5: Live Report Card Preview
Live Sheet Preview (Tab 5): Inspect Empty Blank Sheet or Sample Student Report before printing.
Step 2.10

Processing Class Results, Viewing Broadsheets & Printing Report Cards

End of Term Processing

Once teachers finish entering scores and Form Teachers finish comments, the Exam Officer or Admin runs final compilation in three quick steps.

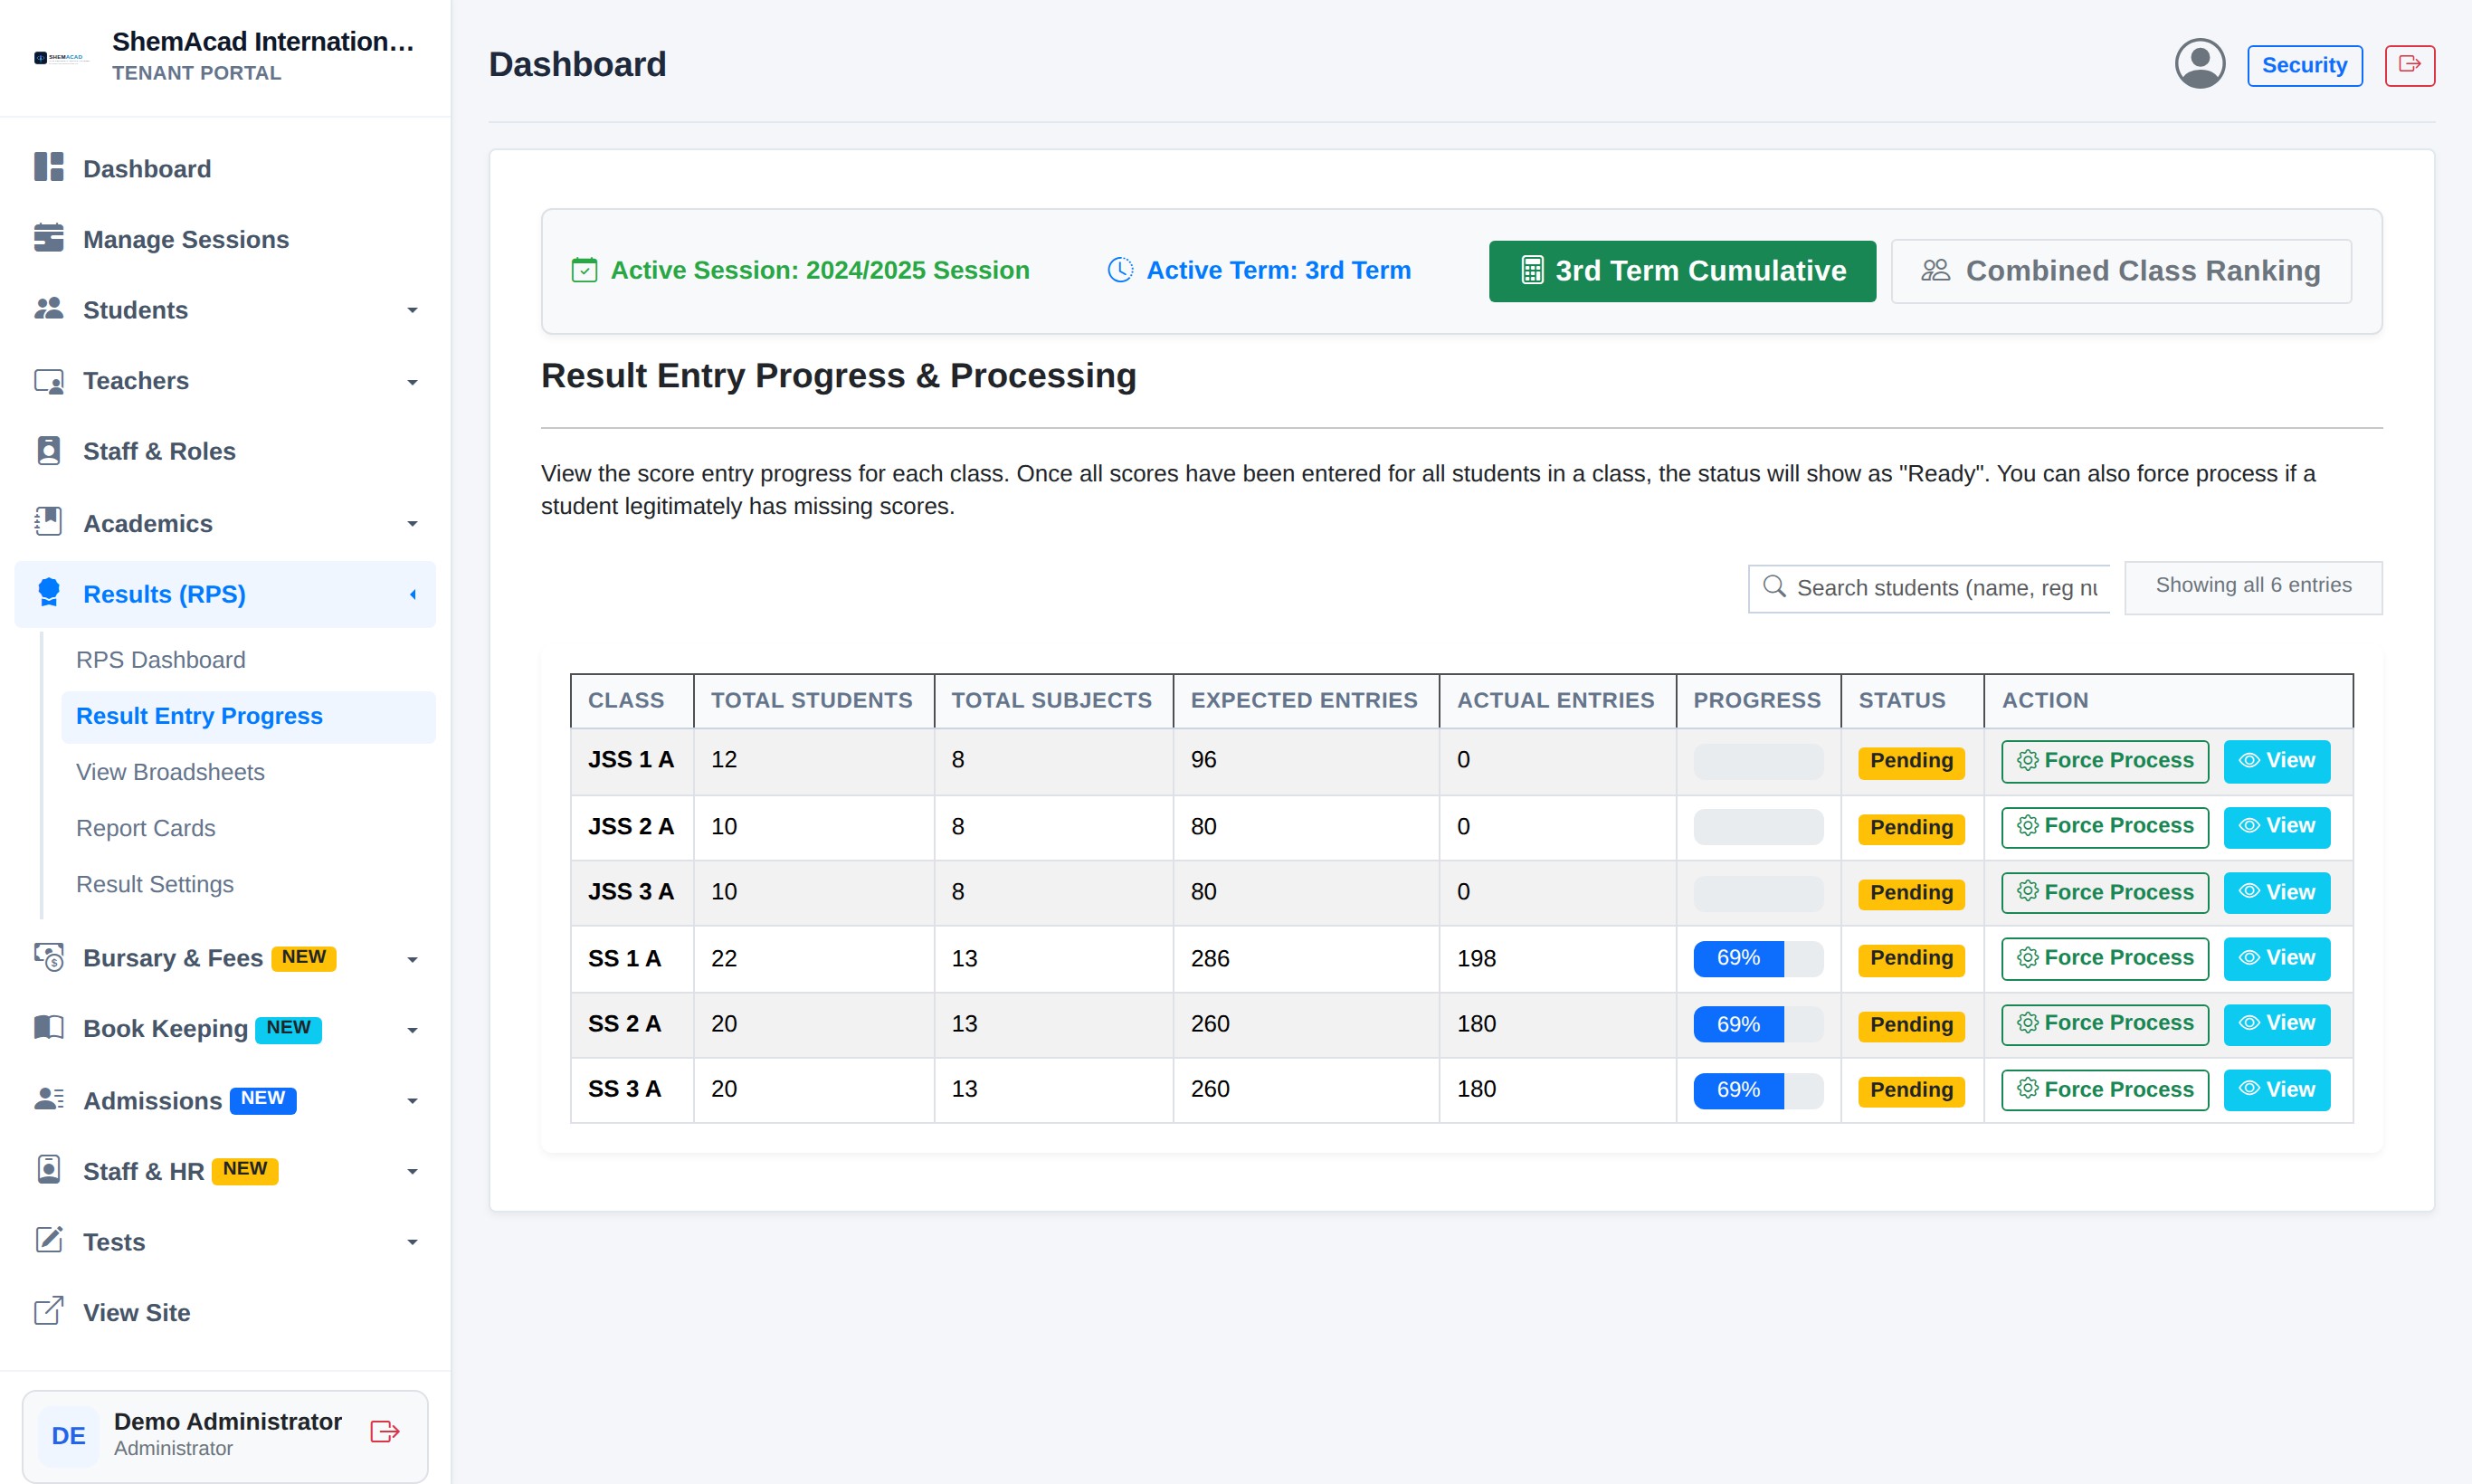
  1. Process Class Results: Open Results (RPS) → Result Entry Progress. Watch each class progress bar reach completion, then click Process (or Force Process if some optional subjects were omitted) so overall averages and 1st, 2nd, 3rd Positions are computed.
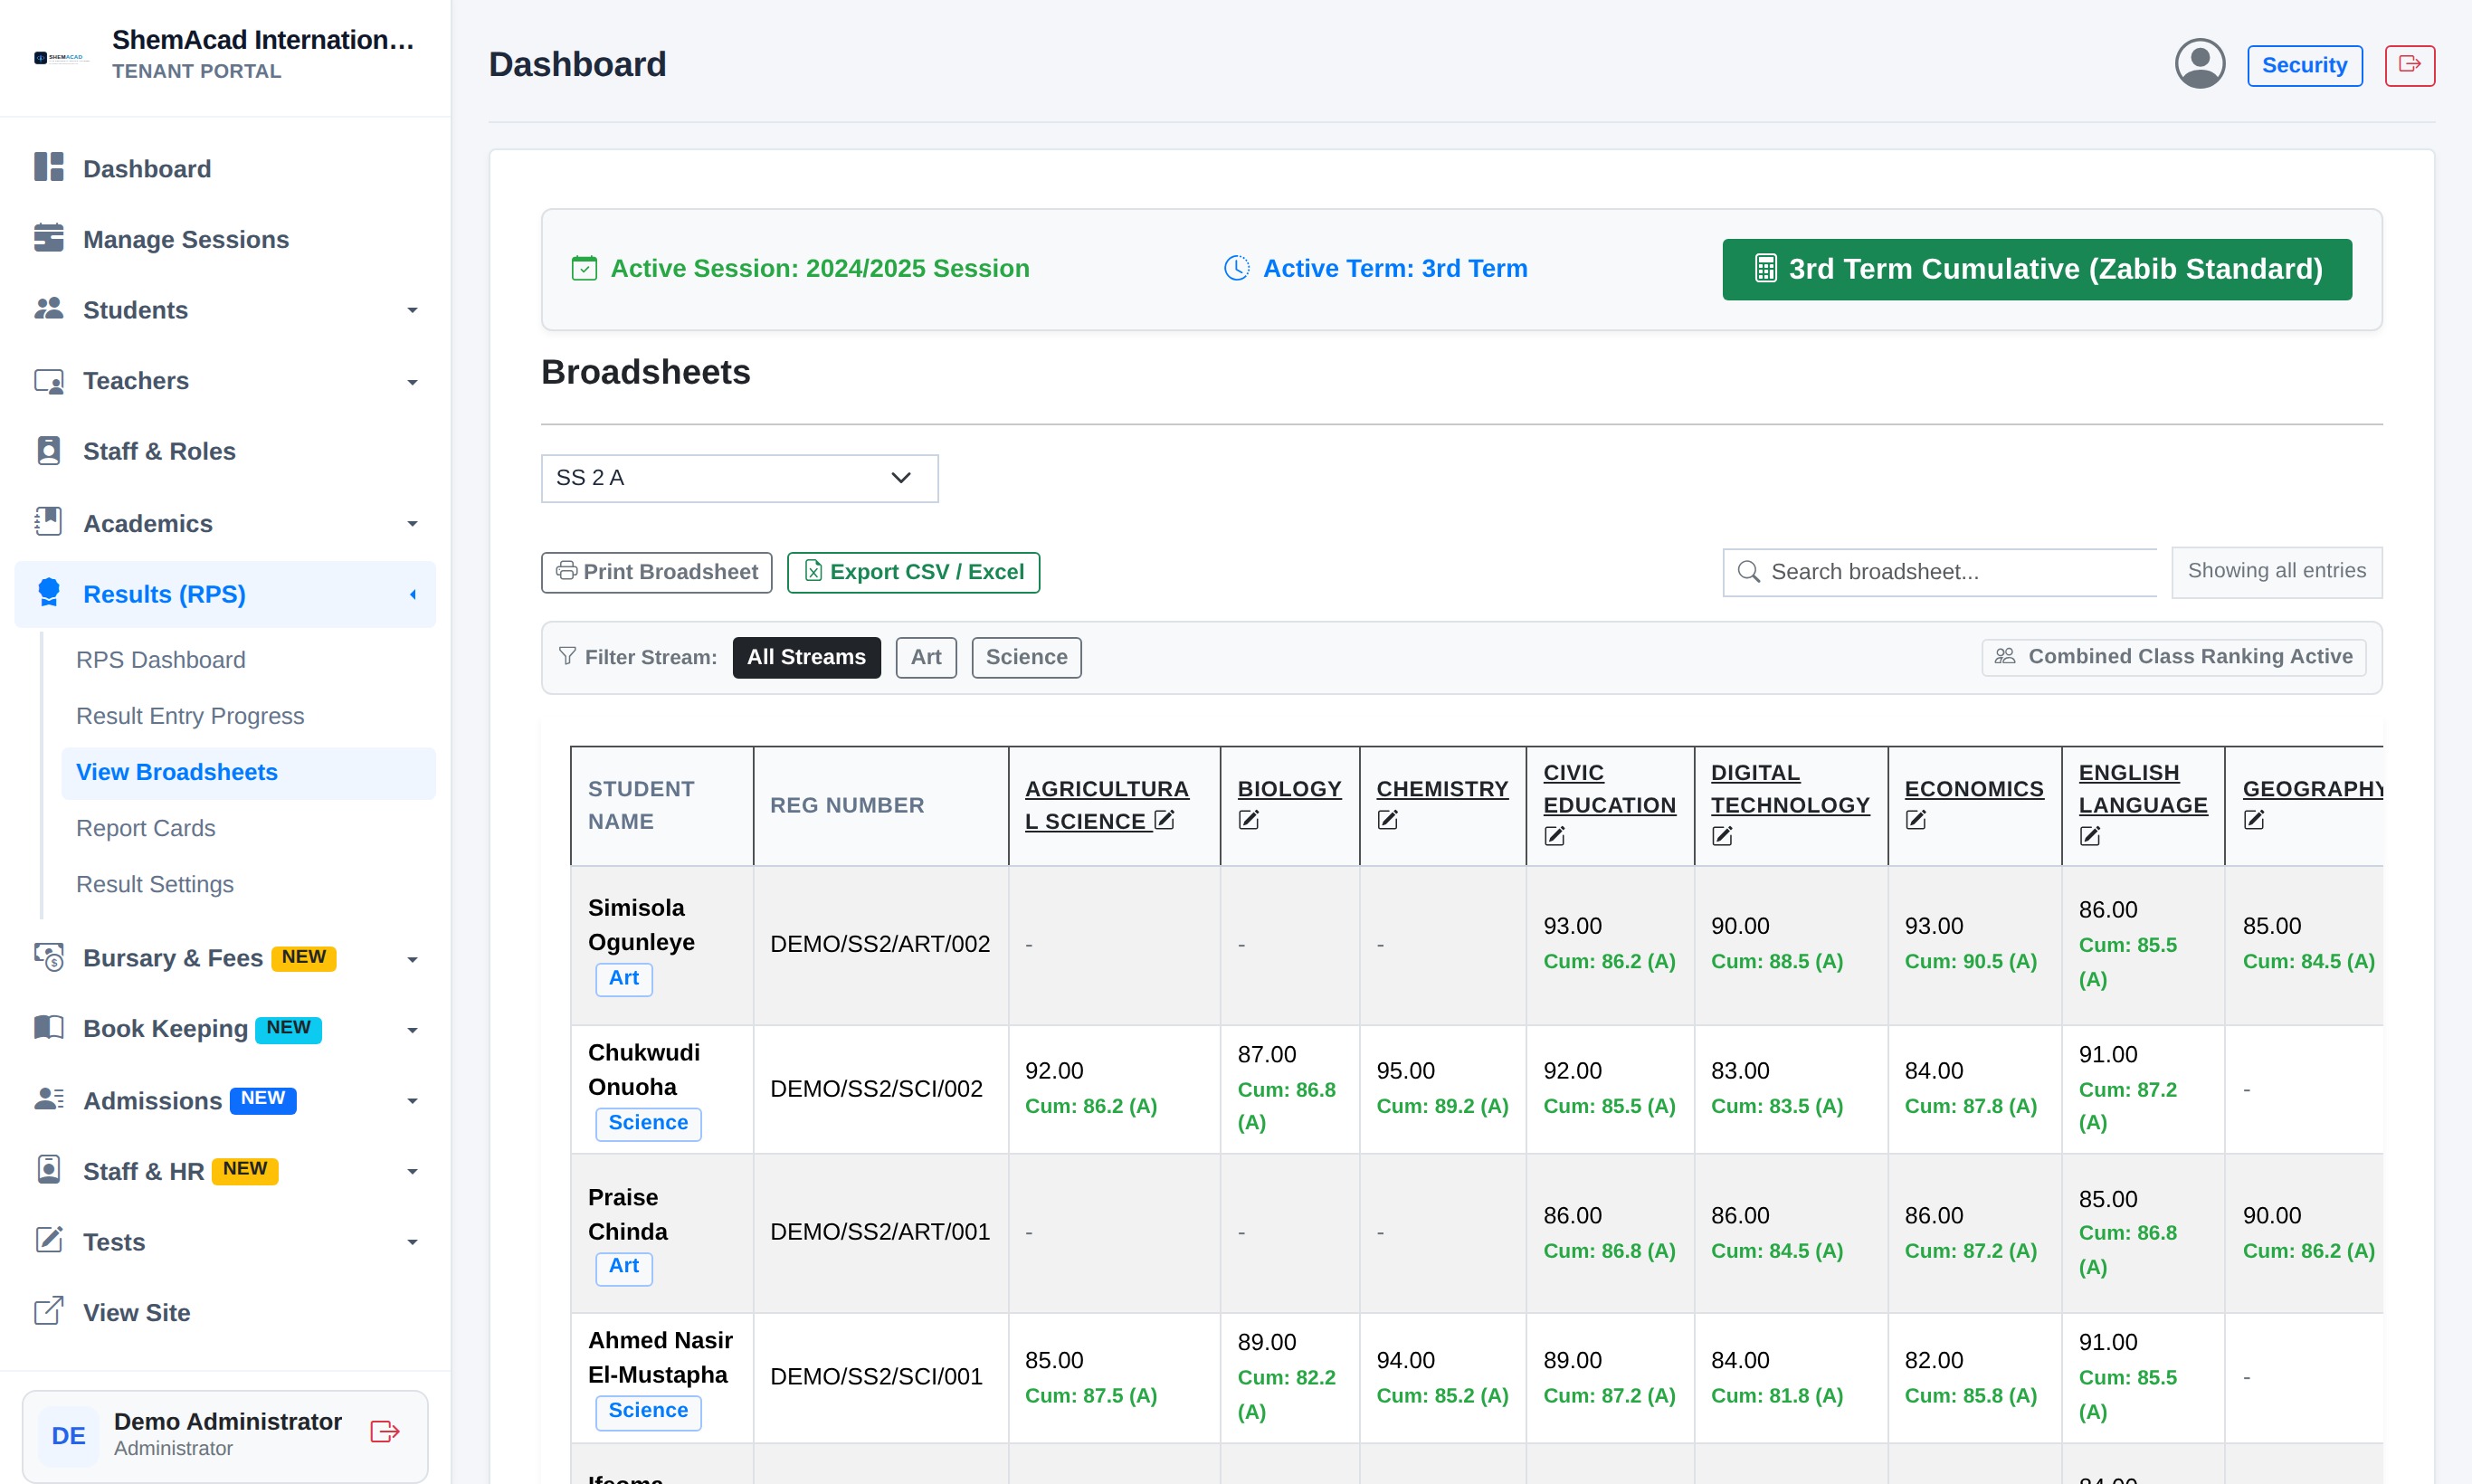
  2. Check Master Broadsheet: Open View Broadsheets, pick a class, optionally filter by stream (Art / Science), review every student's subject scores side-by-side, or click Export CSV / Excel or Print Broadsheet.
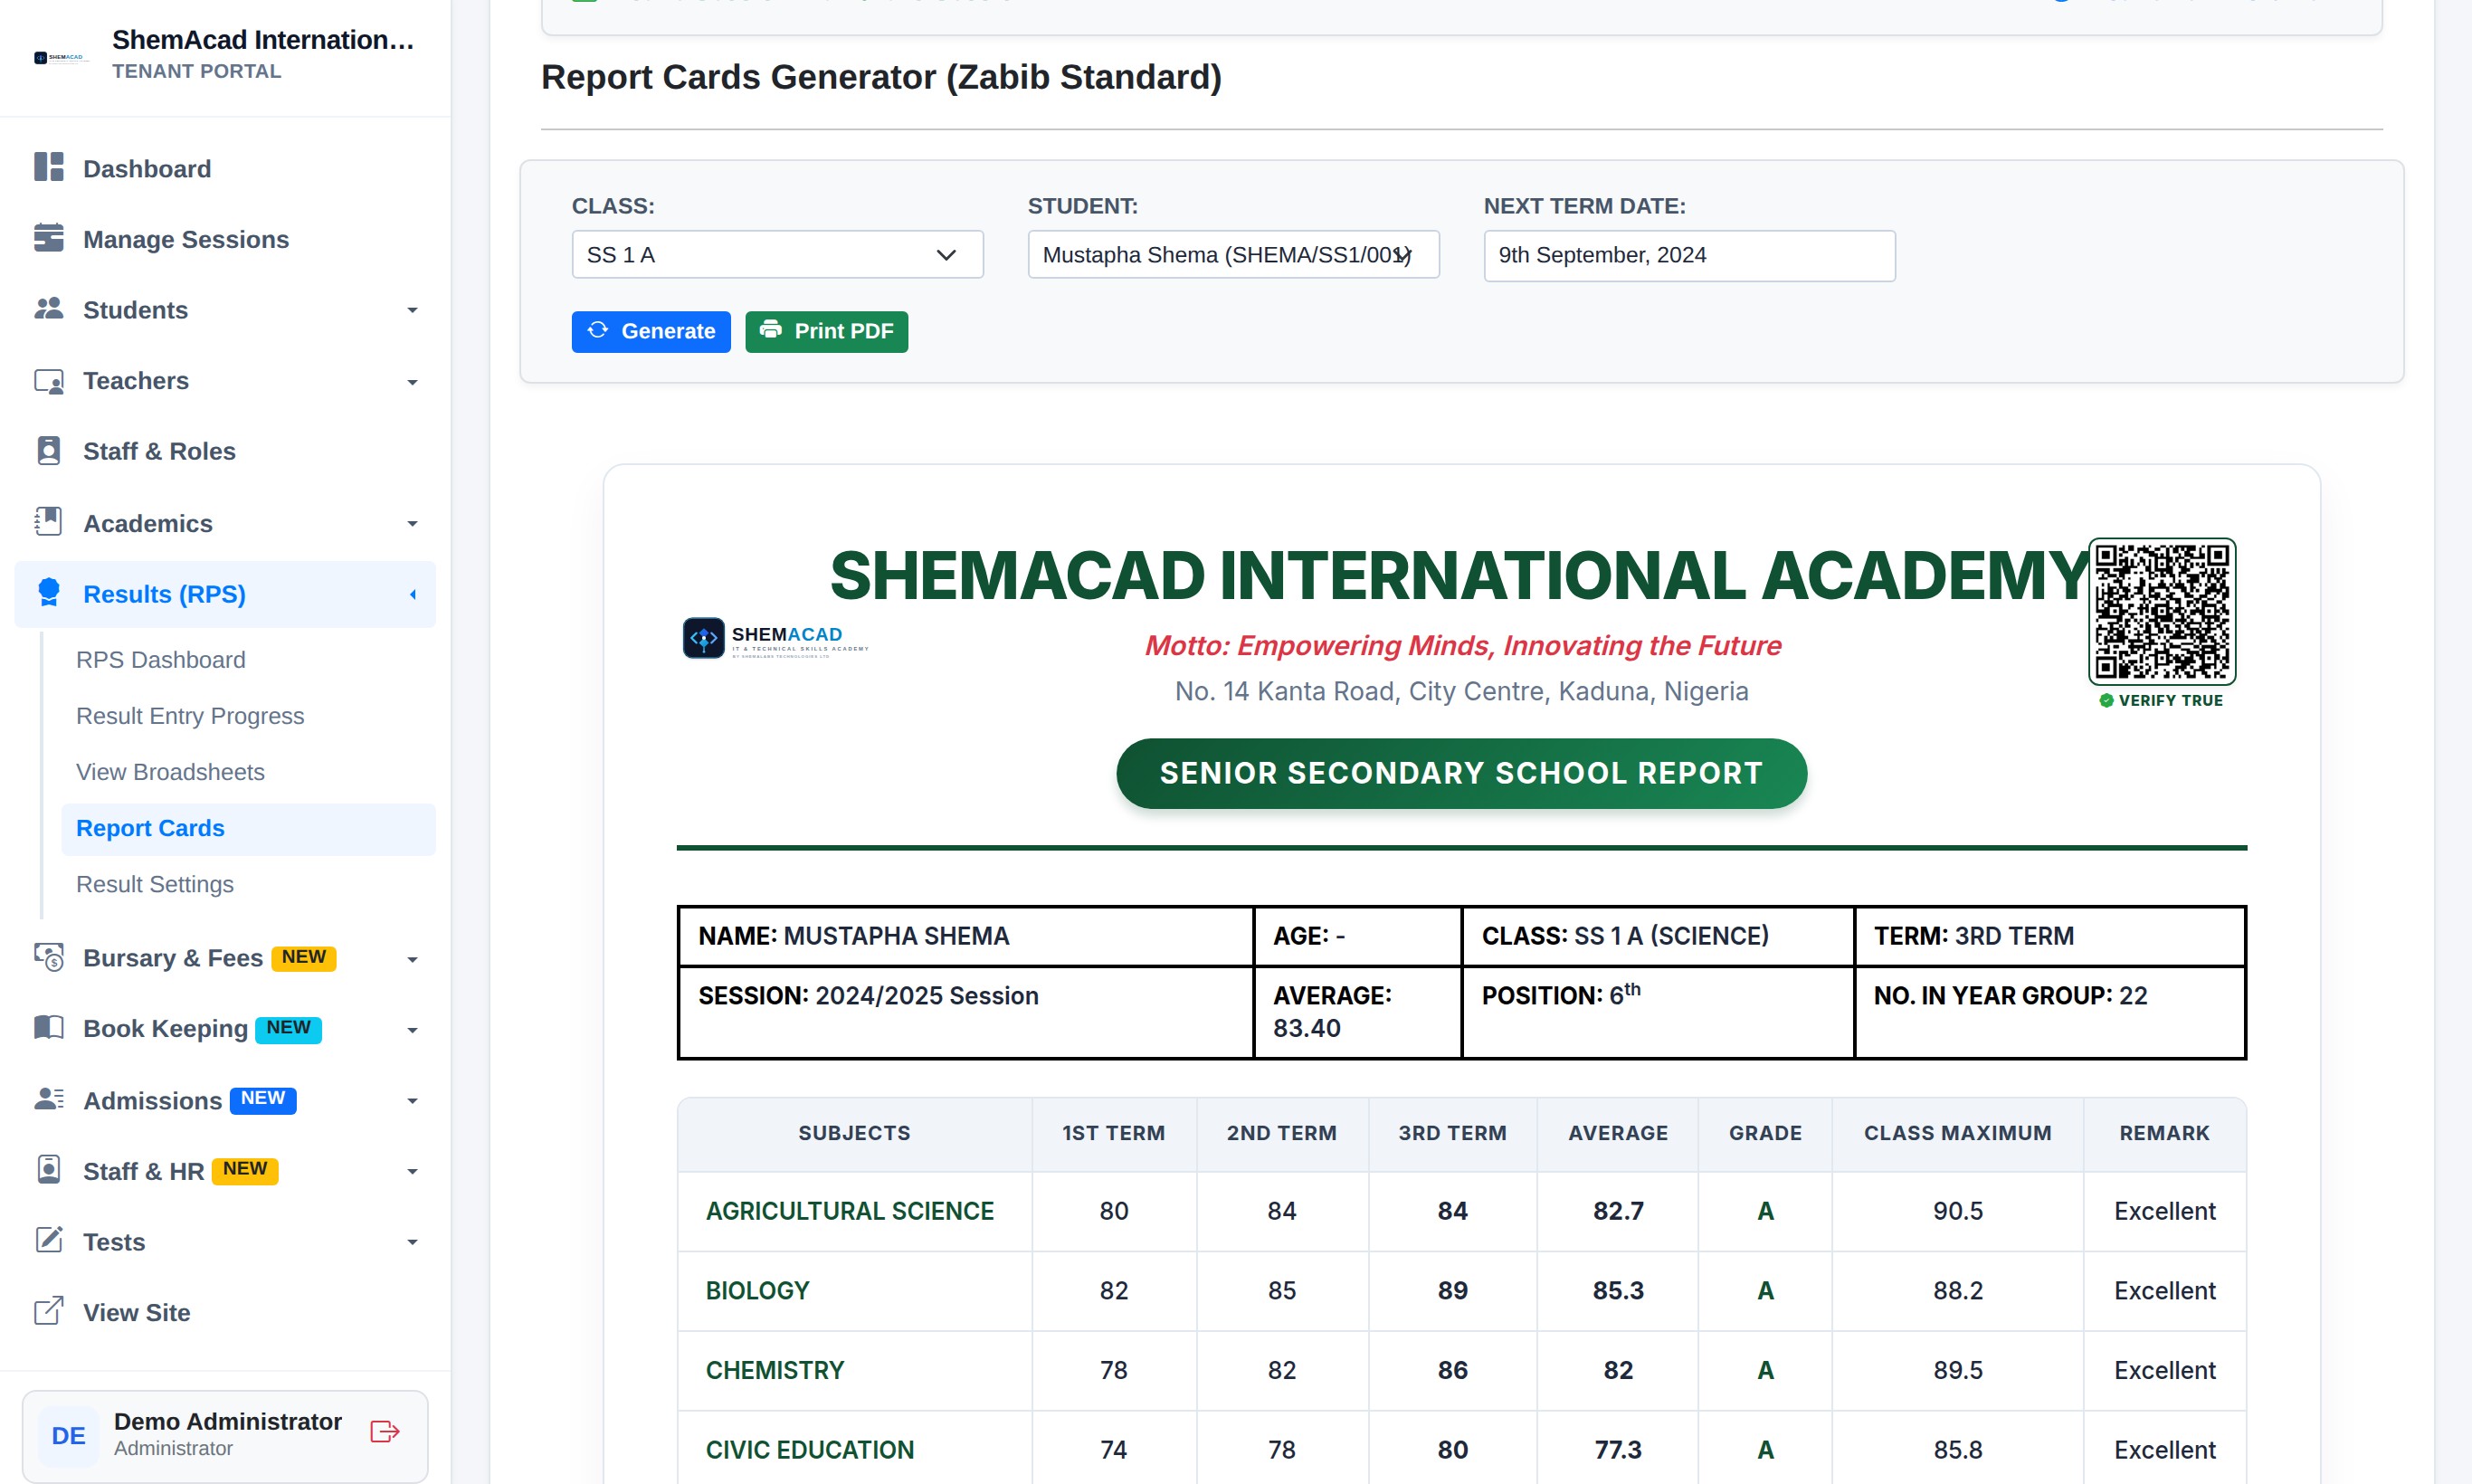
  3. Generate & Print Report Cards: Open Report Cards, select Class and Student (or leave Student on All Students — Batch Print), confirm Next Term Date, click Generate, and click Print PDF.
Helpful Tip
Any time a teacher edits or adds a score after results were already processed, always return to Result Entry Progress and click Process / Force Process again so class averages and positions recalculate.
Processing Class Results, Viewing Broadsheets & Printing Report Cards
Official QR-verified Report Card printout generated directly from the RPS module.
Step 2.10b

Result Entry Progress & Master Class Broadsheet Screens

RPS Compilation
Result Entry Progress & Processing
Result Entry Progress: Track how many subject scores are entered per class and click Process / Force Process.
Master Class Broadsheet
View Broadsheets: Compare all subjects in one table, filter by stream, click any subject header to jump straight to edits, or export Excel.
Section 3 • Subject Teachers & Form Teachers

Teacher & Form Teacher Step-by-Step Guide

How teachers view their classes, create timed CBT tests, enter manual & hybrid scores, and write terminal remarks.

Step 3.1

Teacher Dashboard Overview & Quick Shortcuts

Teacher Portal

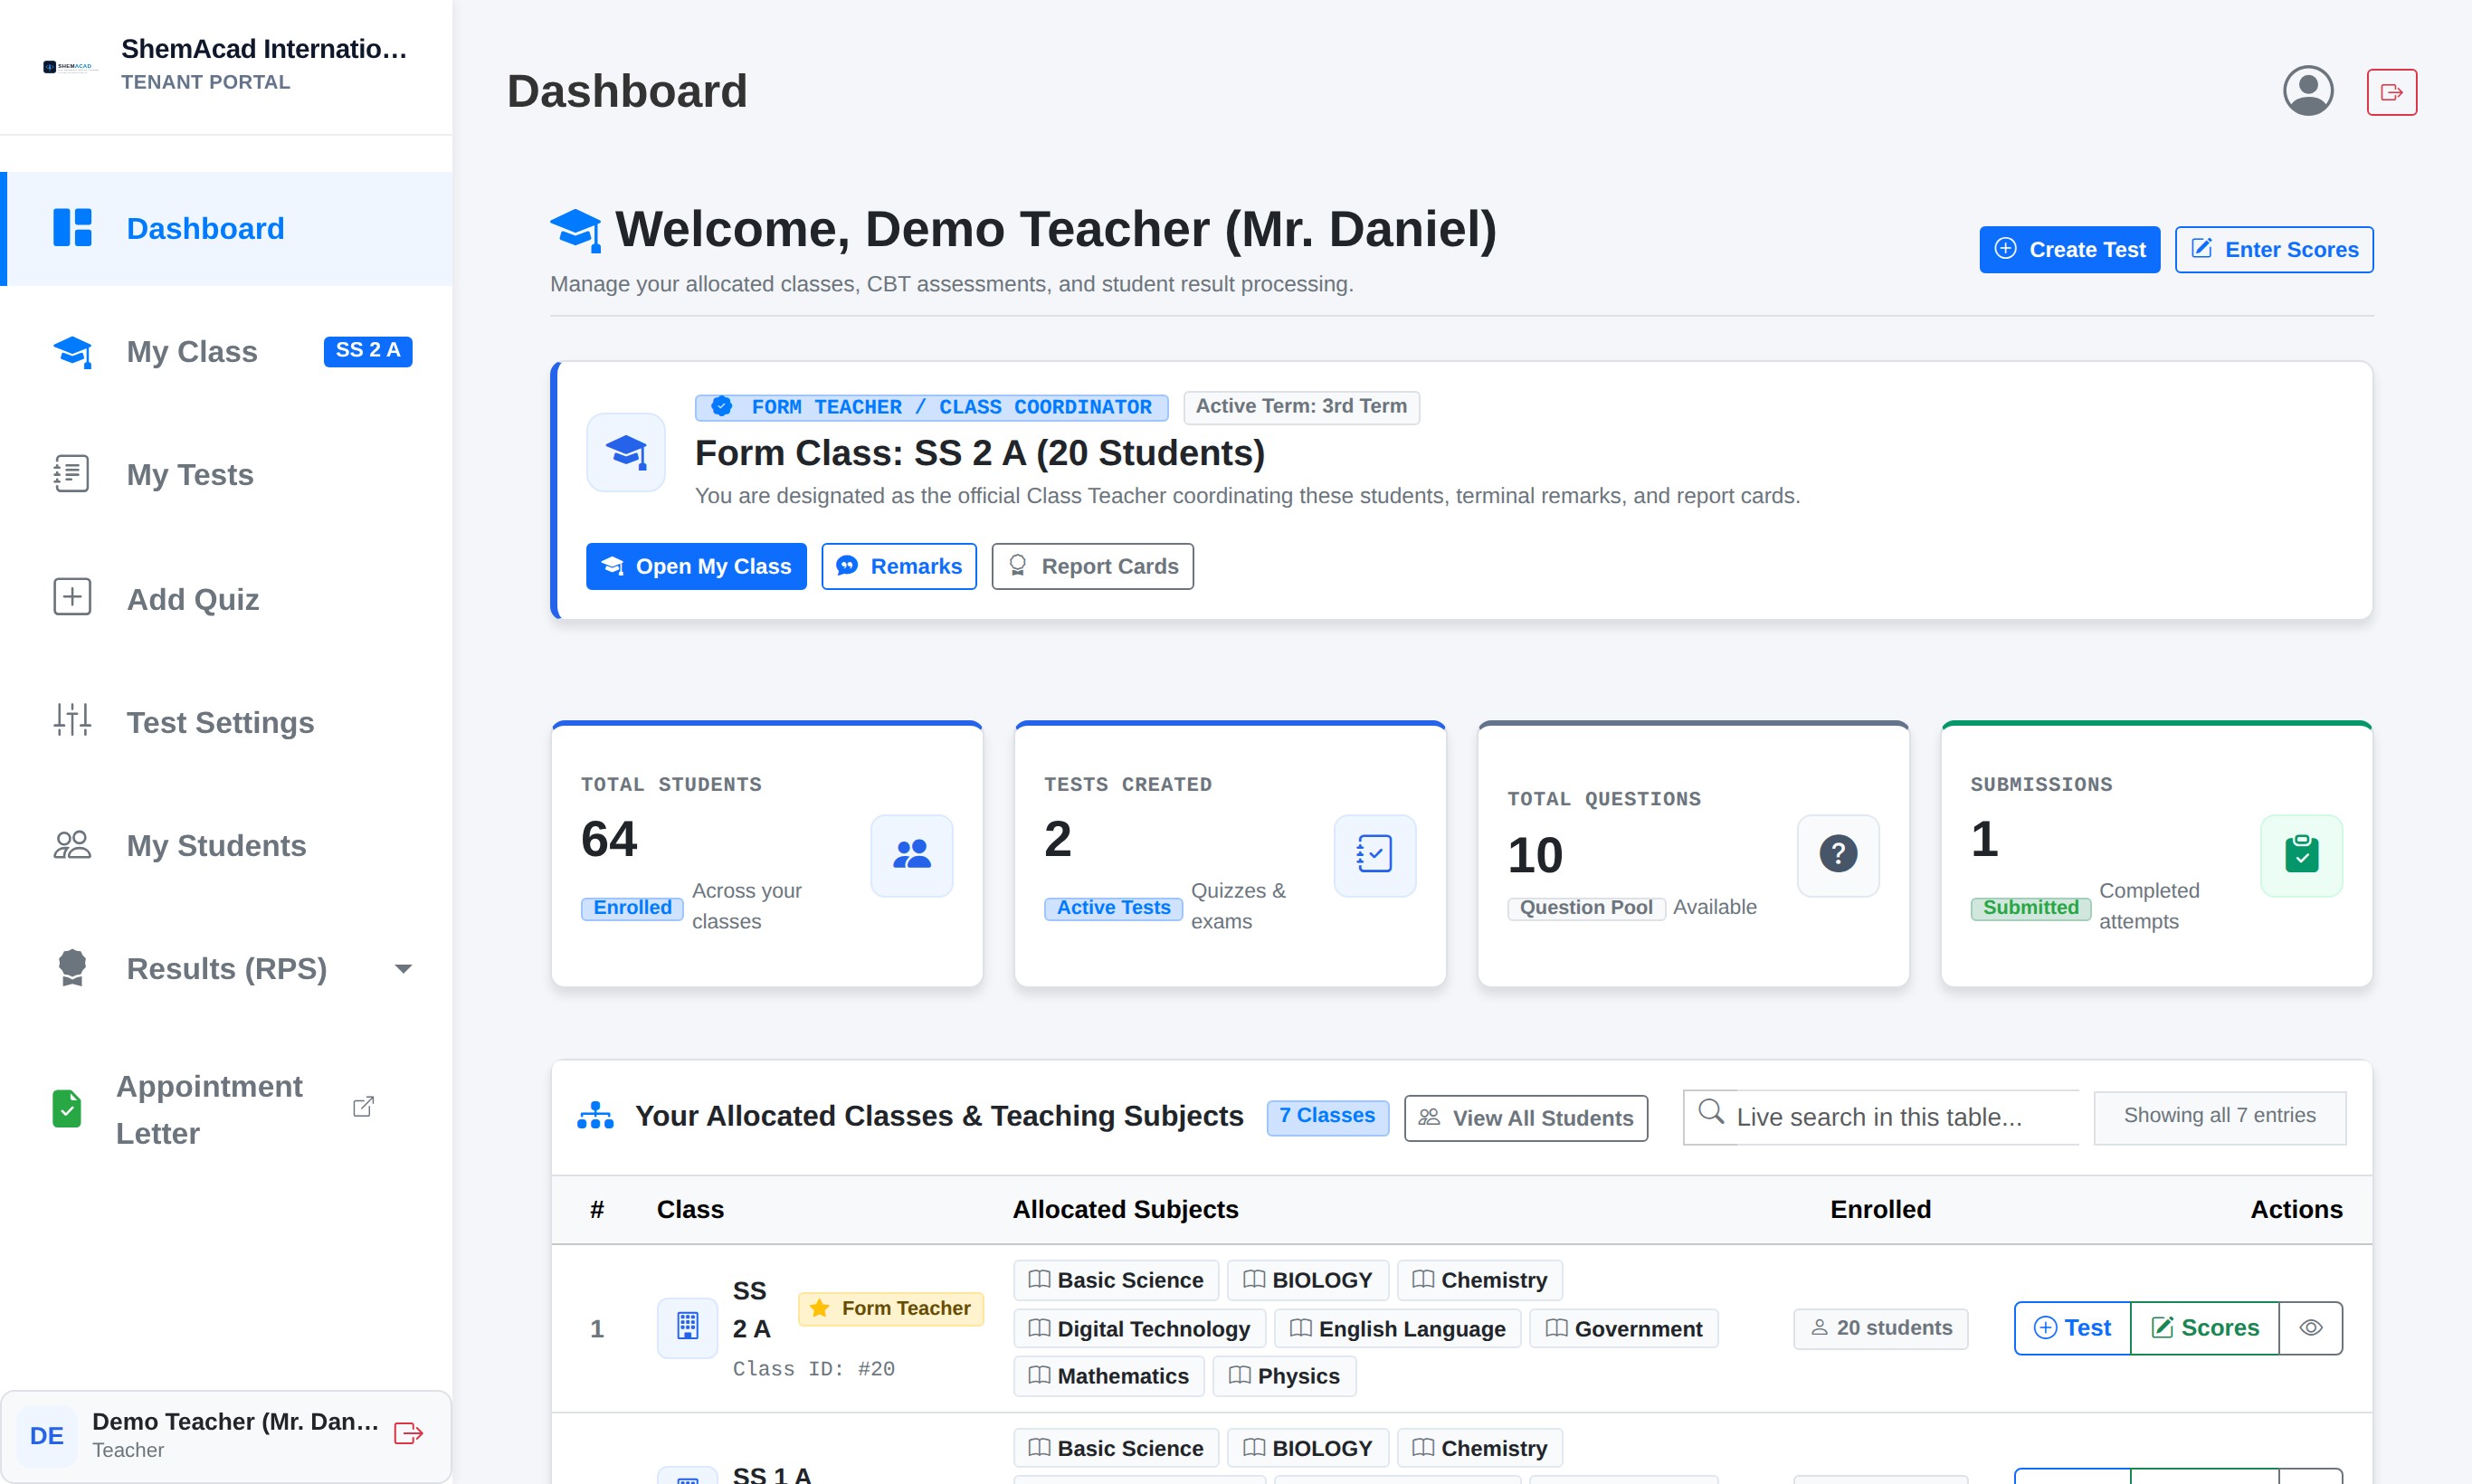
After signing in on Teacher Login with your staff email and password, your dashboard shows every class and subject assigned to you.

  1. At the top, if you have been assigned as a Form Teacher / Class Coordinator, a prominent card shows your Form Class student count with 1-click buttons: Open My Class, Remarks, and Report Cards.
  2. Review your 4 summary tiles: Total Students across your classes, Tests Created, Total Questions, and Student Submissions.
  3. In the Your Allocated Classes & Teaching Subjects table below, click + Test on any class row to create a CBT quiz, or click Scores to enter subject marks directly.
Helpful Tip
If a class or subject you teach is missing from your dashboard, ask your School Admin to tick it under Academics → Subjects to Teachers.
Teacher Dashboard Overview & Quick Shortcuts
Teacher Dashboard showing Form Class coordinator banner, class allocations, and quick action buttons.
Step 3.2

Viewing Your Form Class Roster ("My Class" Tab)

Form Teachers

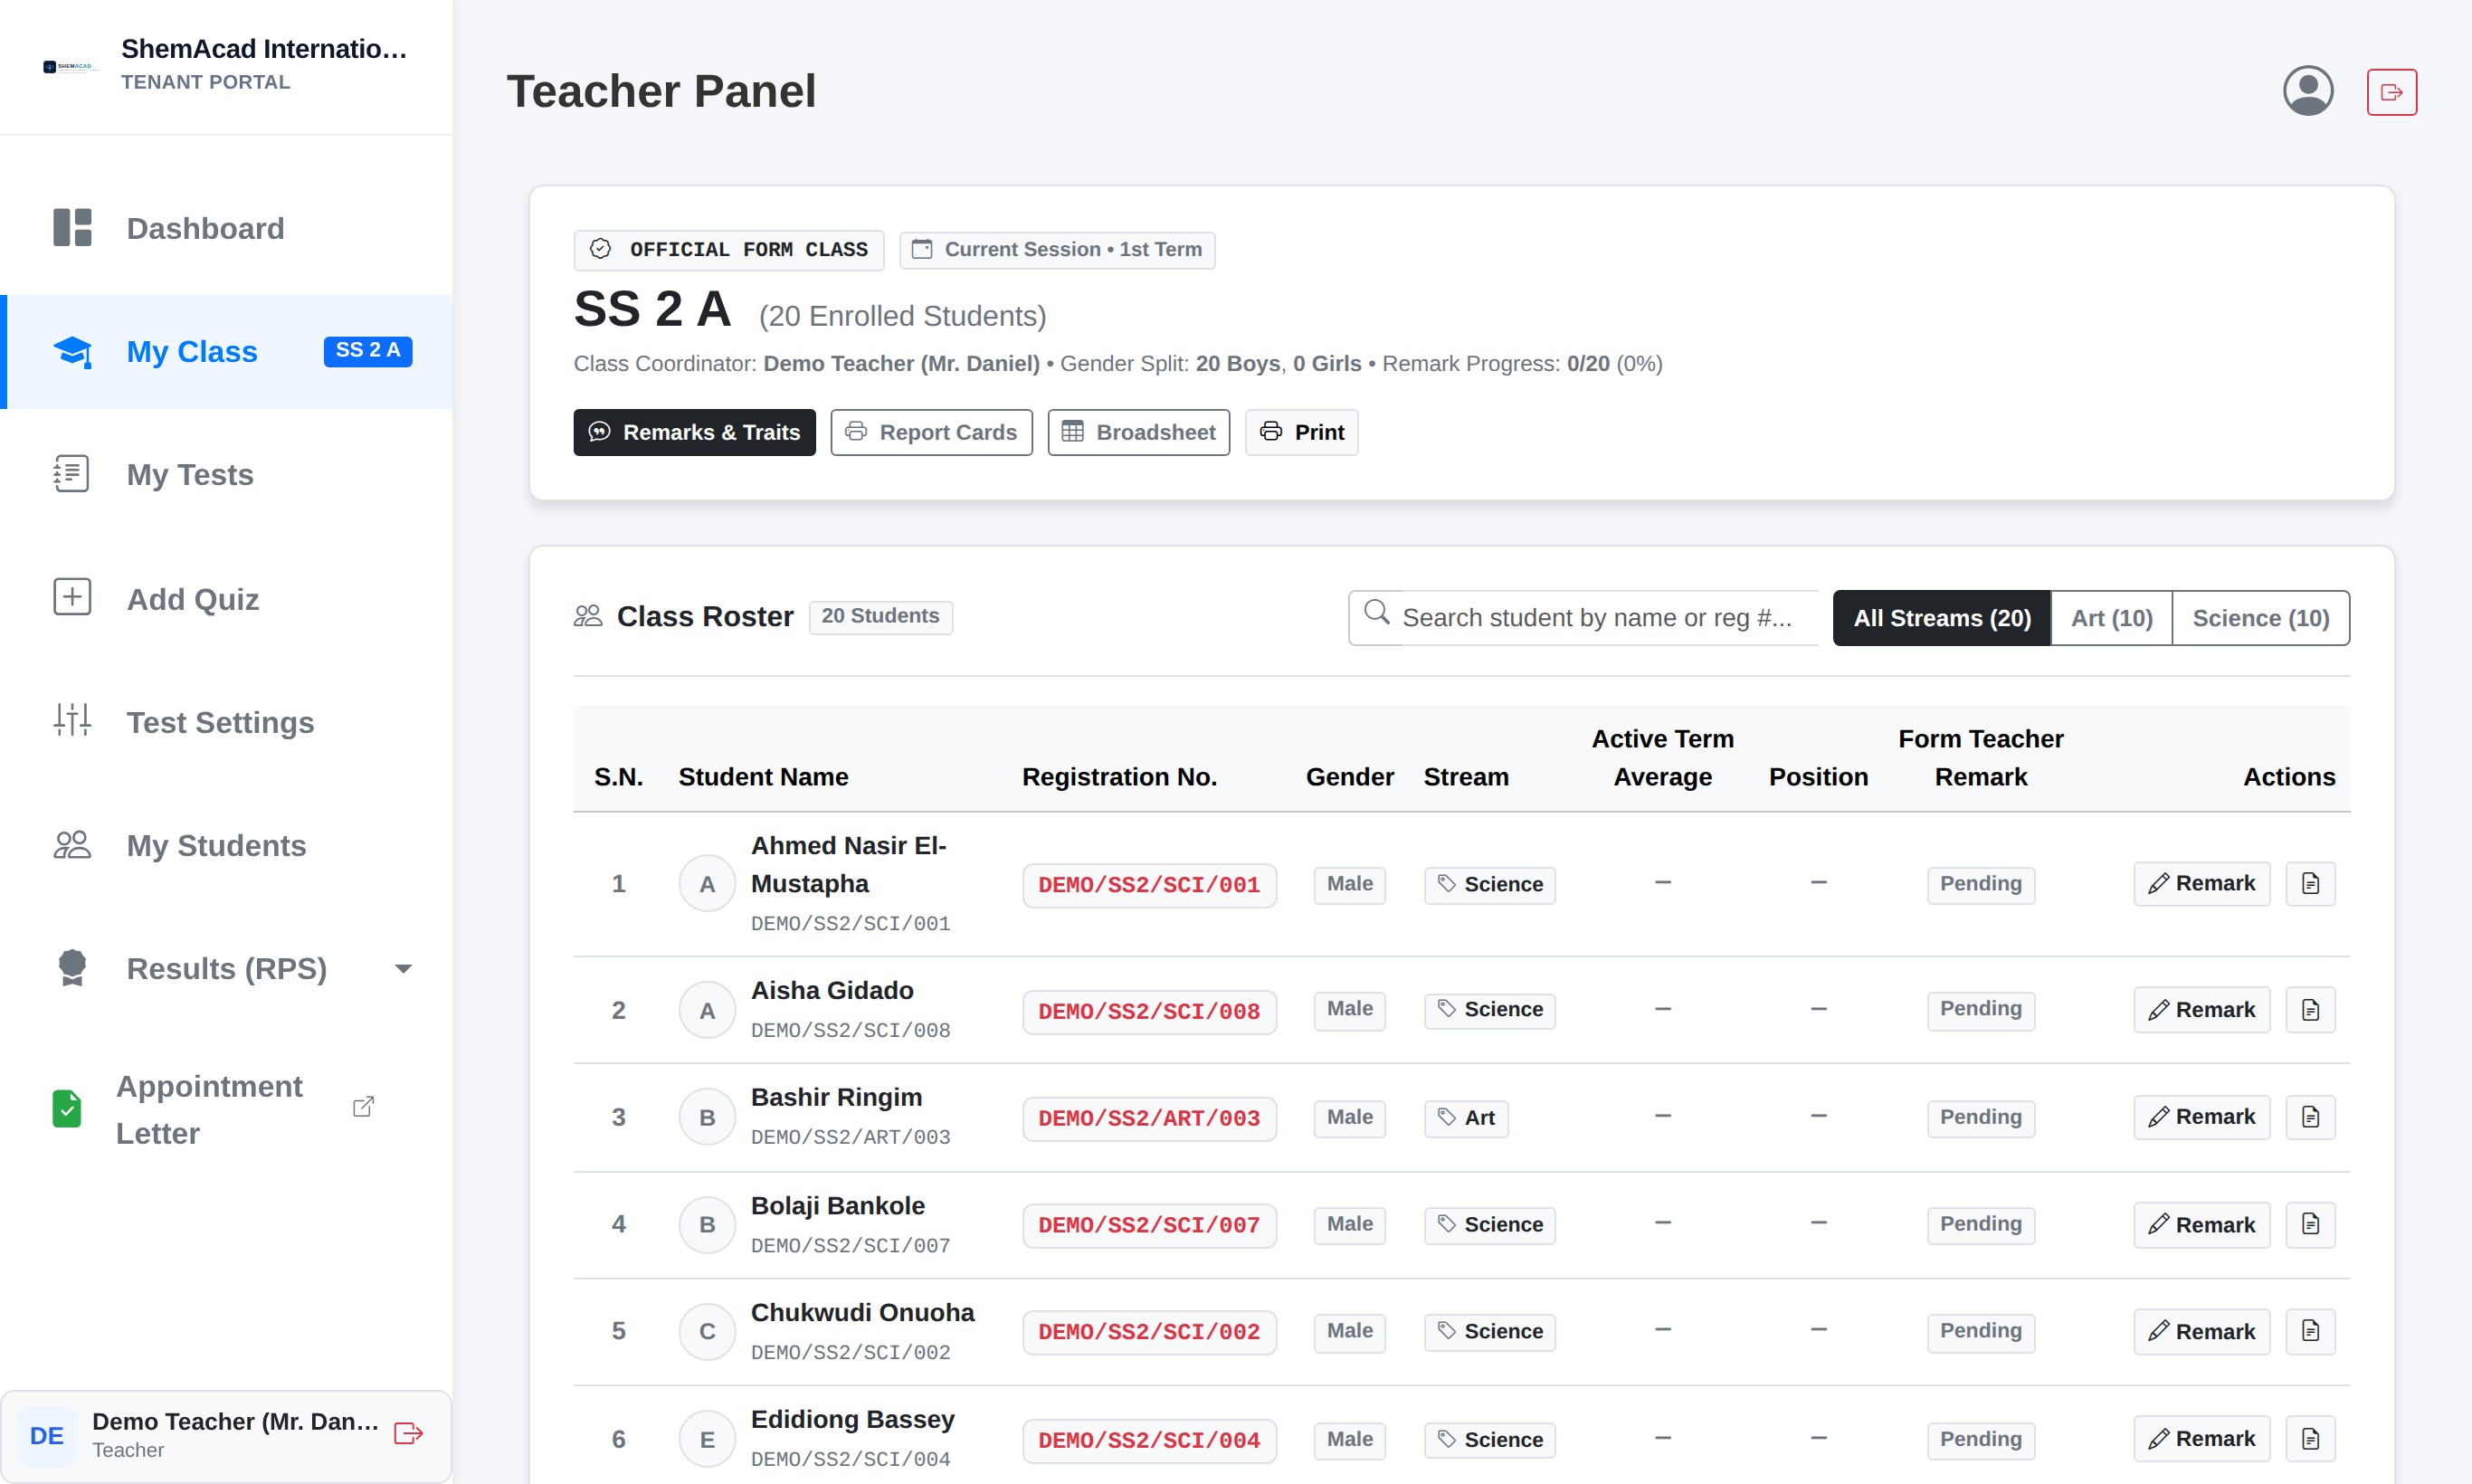
Form Teachers have a dedicated My Class tab in the left sidebar (with their class badge) to inspect all students under their care.

  1. Click My Class in the left sidebar.
  2. See every enrolled student's Full Name, Registration Number, Gender, Stream (e.g., Science / Art), Active Term Average, Class Position, and whether their Form Teacher Remark is saved.
  3. Use the search box or stream buttons (e.g., All Streams, Art, Science) to narrow down the list.
  4. Use the quick buttons at the top (Remarks & Traits, Report Cards, Broadsheet, Print) or click Remark on any student row.
Helpful Tip
Only the teacher assigned as Form Teacher for a class sees this roster under My Class. Subject-only teachers use My Students or Enter Scores.
Viewing Your Form Class Roster ("My Class" Tab)
Form Teacher My Class hub displaying full student list, stream filters, and remark status.
Step 3.3

Creating an Online CBT Test & Adding Questions

CBT Assessments

You can run computerized Continuous Assessments (CA) or full terminal Examinations with automatic grading.

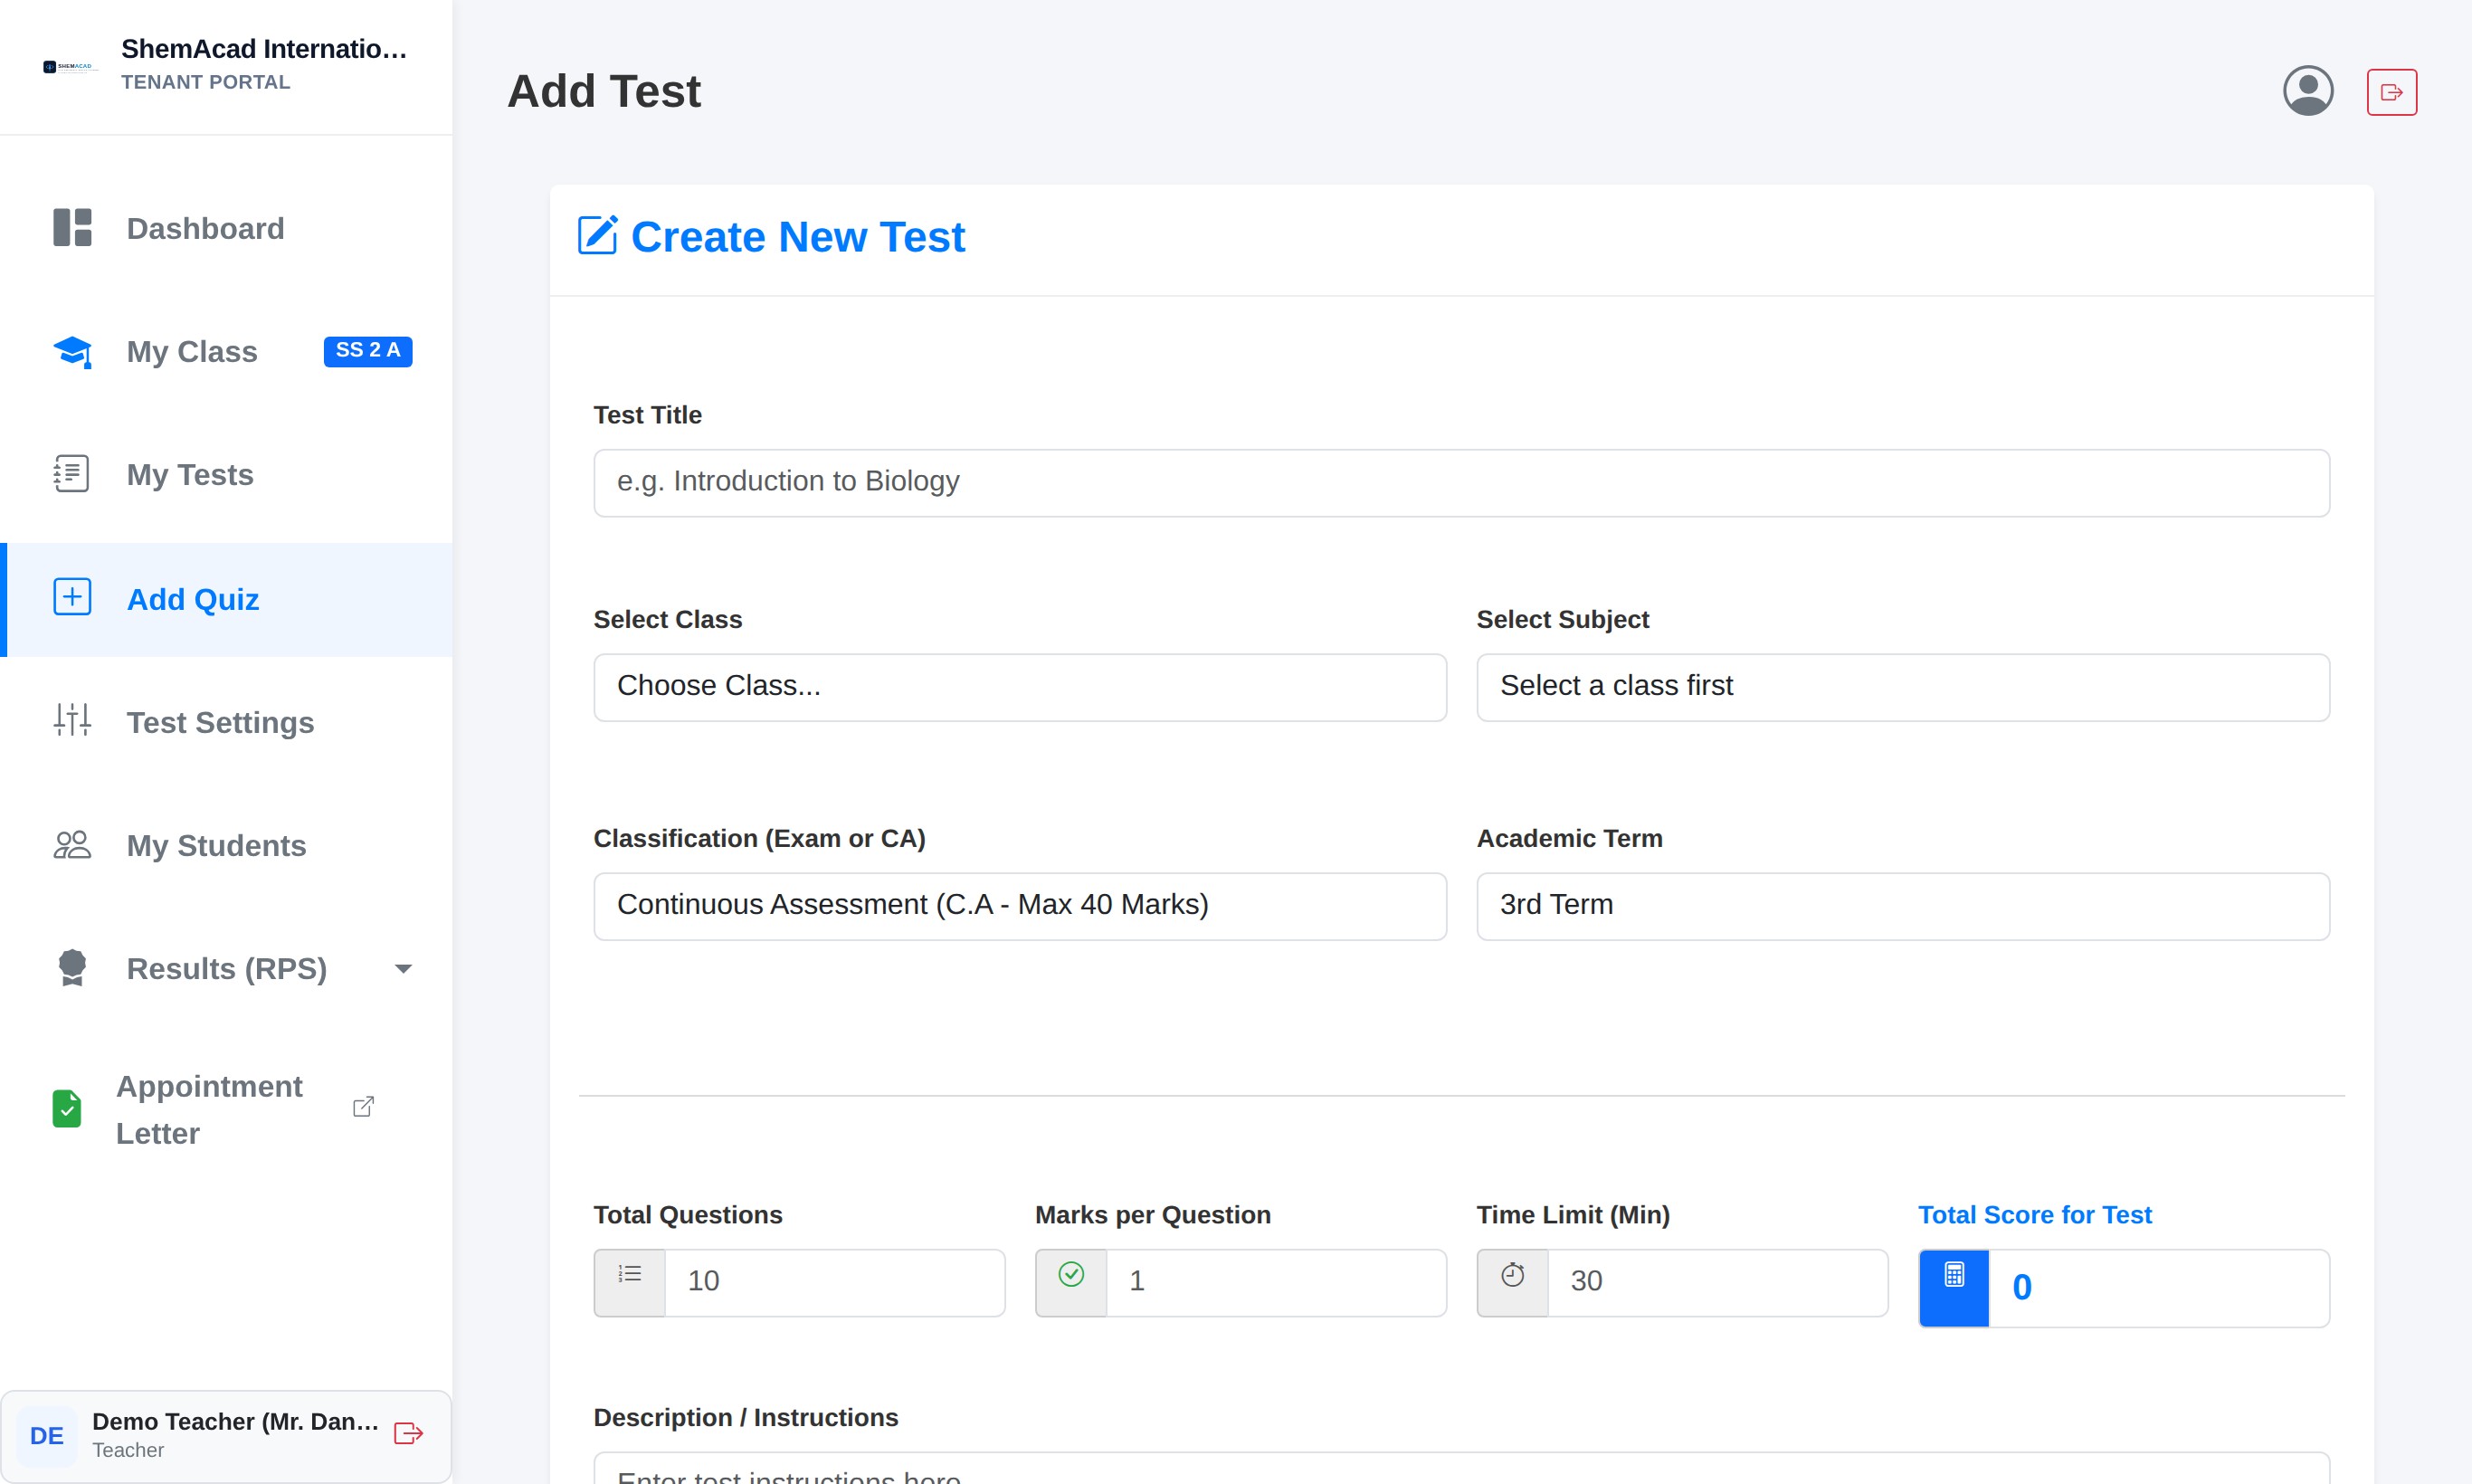
  1. Click Add Quiz in the left sidebar.
  2. Enter a clear Test Title (e.g. Mathematics 3rd Term CA 1), choose Class and Subject.
  3. Choose Classification (Exam or CA) and confirm the Academic Term matches the school's active term. The form automatically checks how many CA or Exam marks remain available for that subject.
  4. Enter Total Questions, Marks per Question (Total Score updates automatically), Time Limit (Min), and instructions, then click submit to move to Question Entry.
  5. In Question Entry, type questions one-by-one (with optional uploaded diagrams/images) OR click Import / Paste Questions to paste a whole list of questions at once, then click Save All Questions.
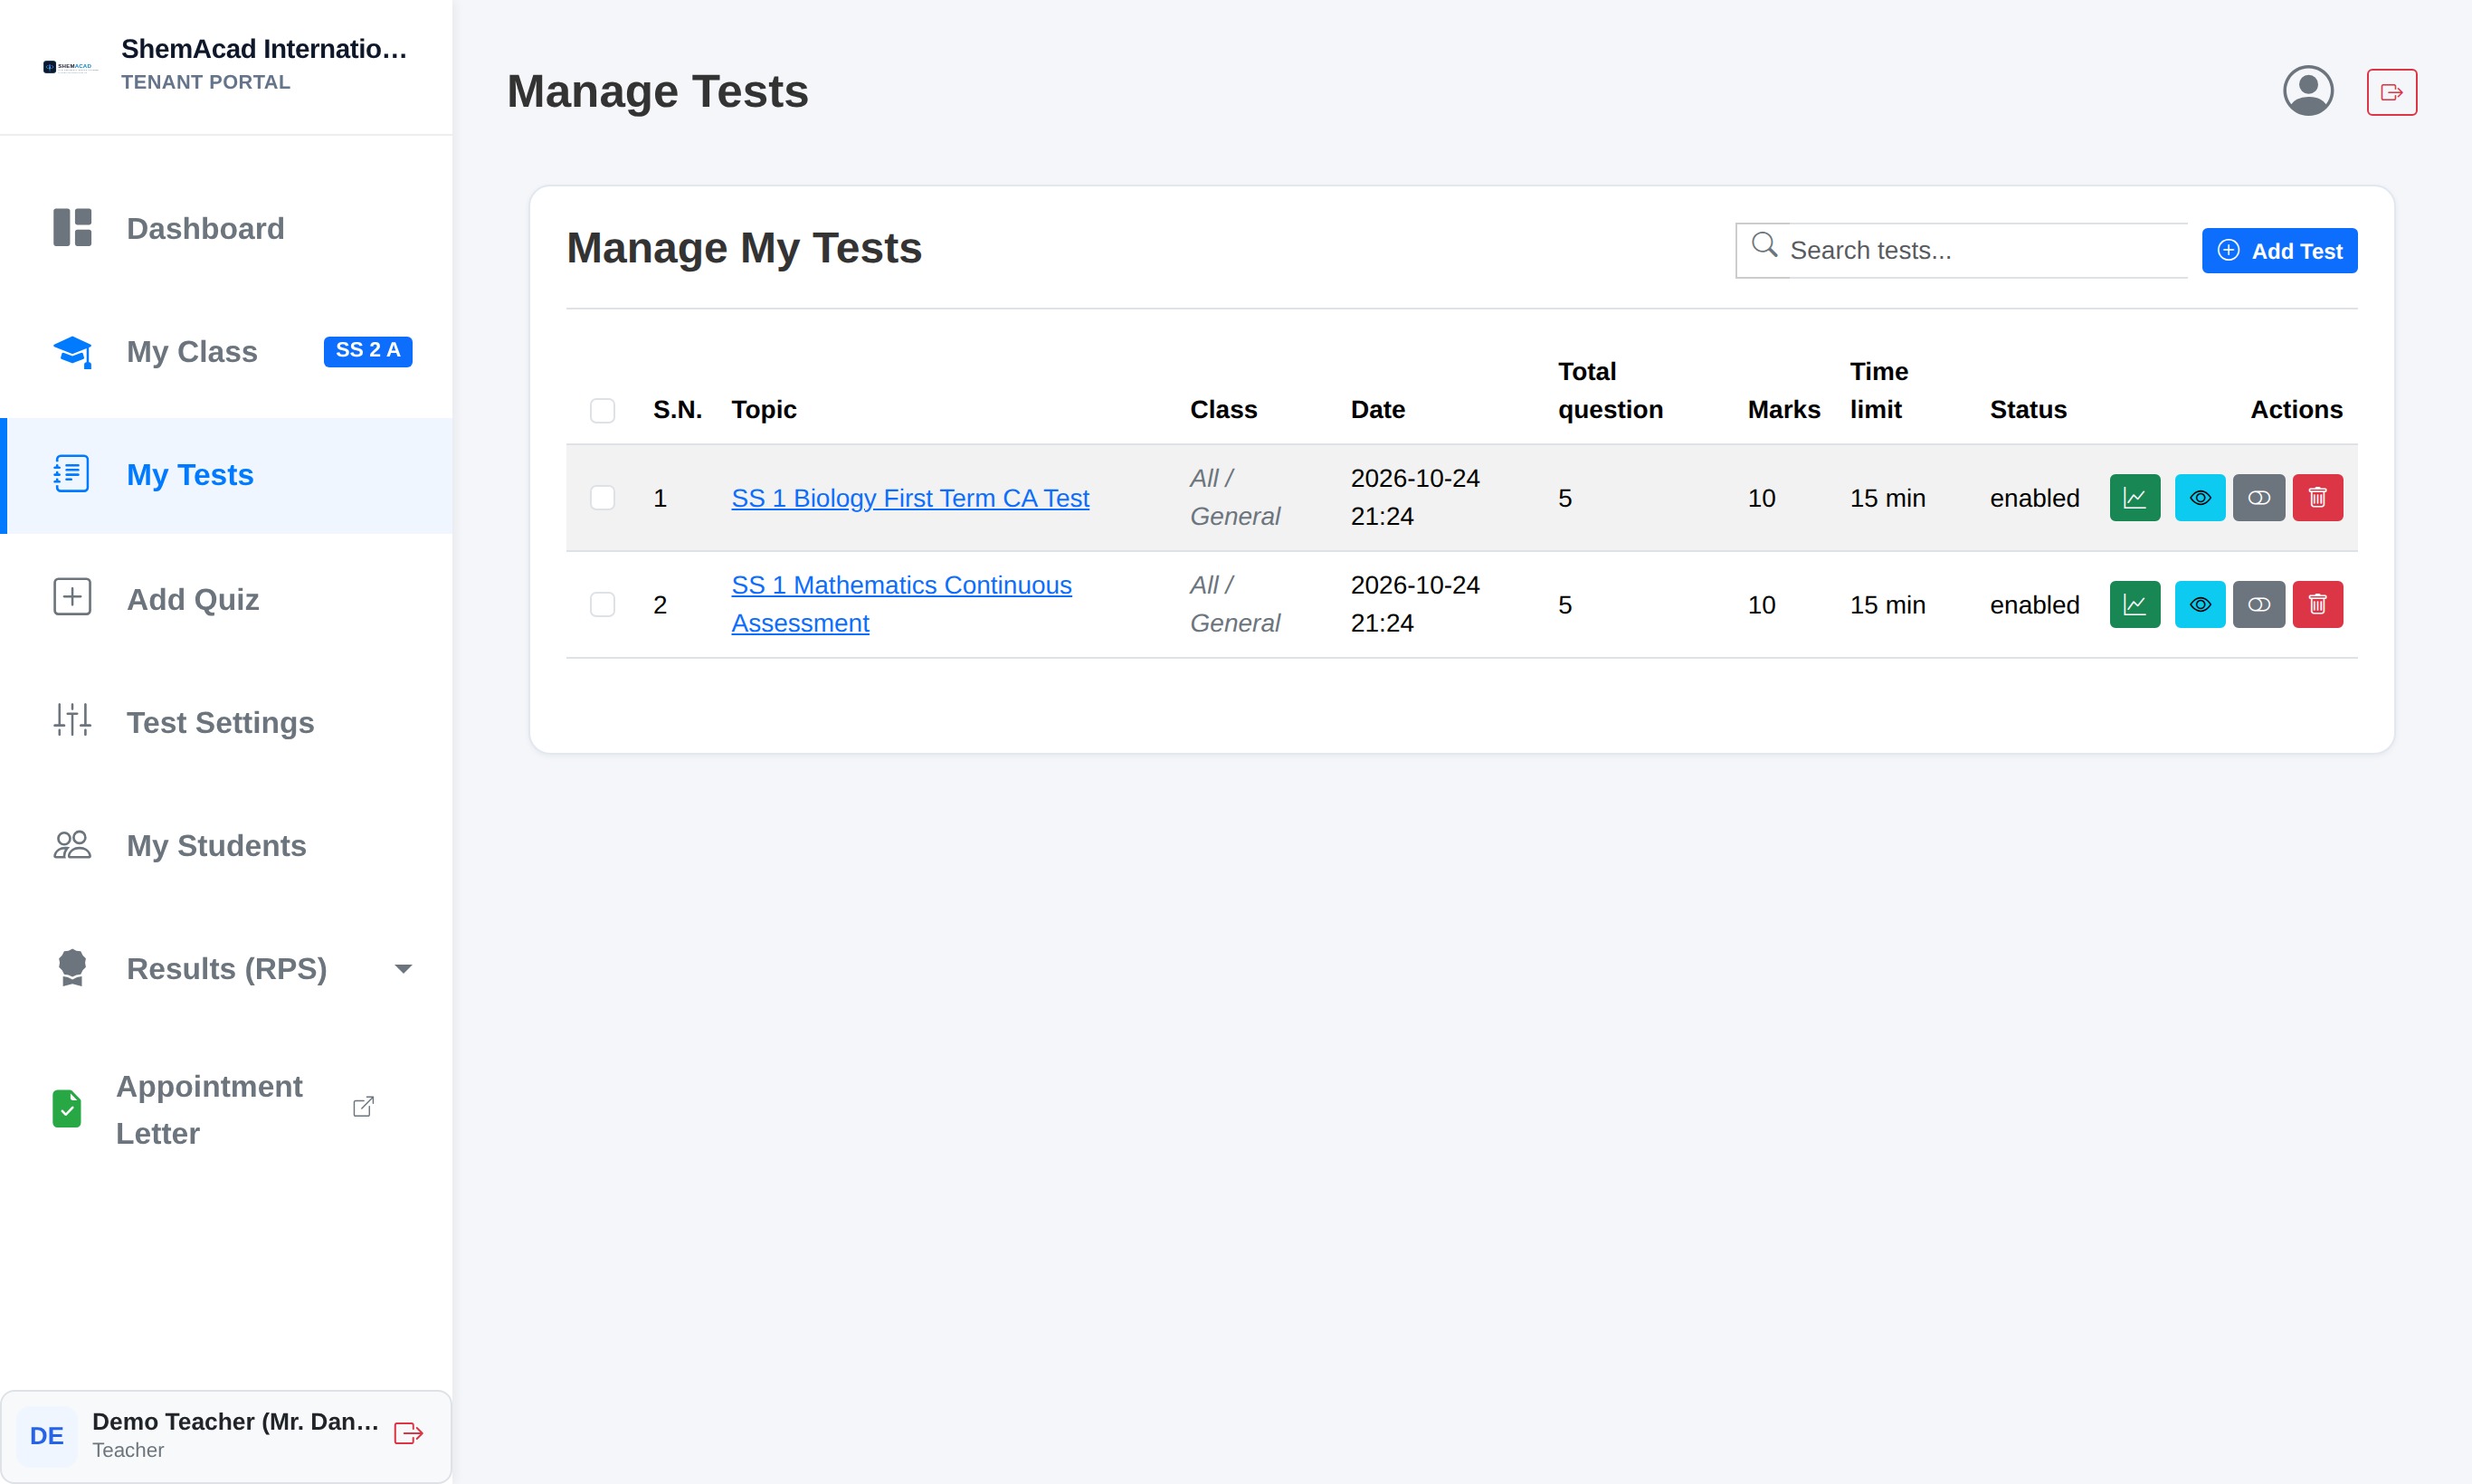
  6. Open My Tests anytime to view scores (green chart icon), preview questions (eye icon), toggle a test Enabled/Disabled, or delete old drafts.
Helpful Tip
Important: Students only see tests whose Status is enabled and whose Term matches the school's current active term.
Creating an Online CBT Test & Adding Questions
Create New Test screen with automatic CA/Exam mark quota enforcement.
Step 3.3b

Managing Existing Tests, Question Banks & Student Attempts

Manage My Tests
  1. Open My Tests from your Teacher sidebar.
  2. Click the Topic title to open test details or print/preview the test paper.
  3. Click the green graph icon to view student scores or grant a retake if a student's computer lost power mid-exam.
  4. Click the grey/green toggle button to hide or publish the test for students immediately.
Teacher Manage My Tests Table
Manage My Tests table showing status controls and action icons.
Step 3.4

Entering Hybrid CA & Exam Subject Scores

Results (RPS)

Whether students took online CBT tests, wrote paper exams, or did both, all scores combine seamlessly on the Enter Scores sheet.

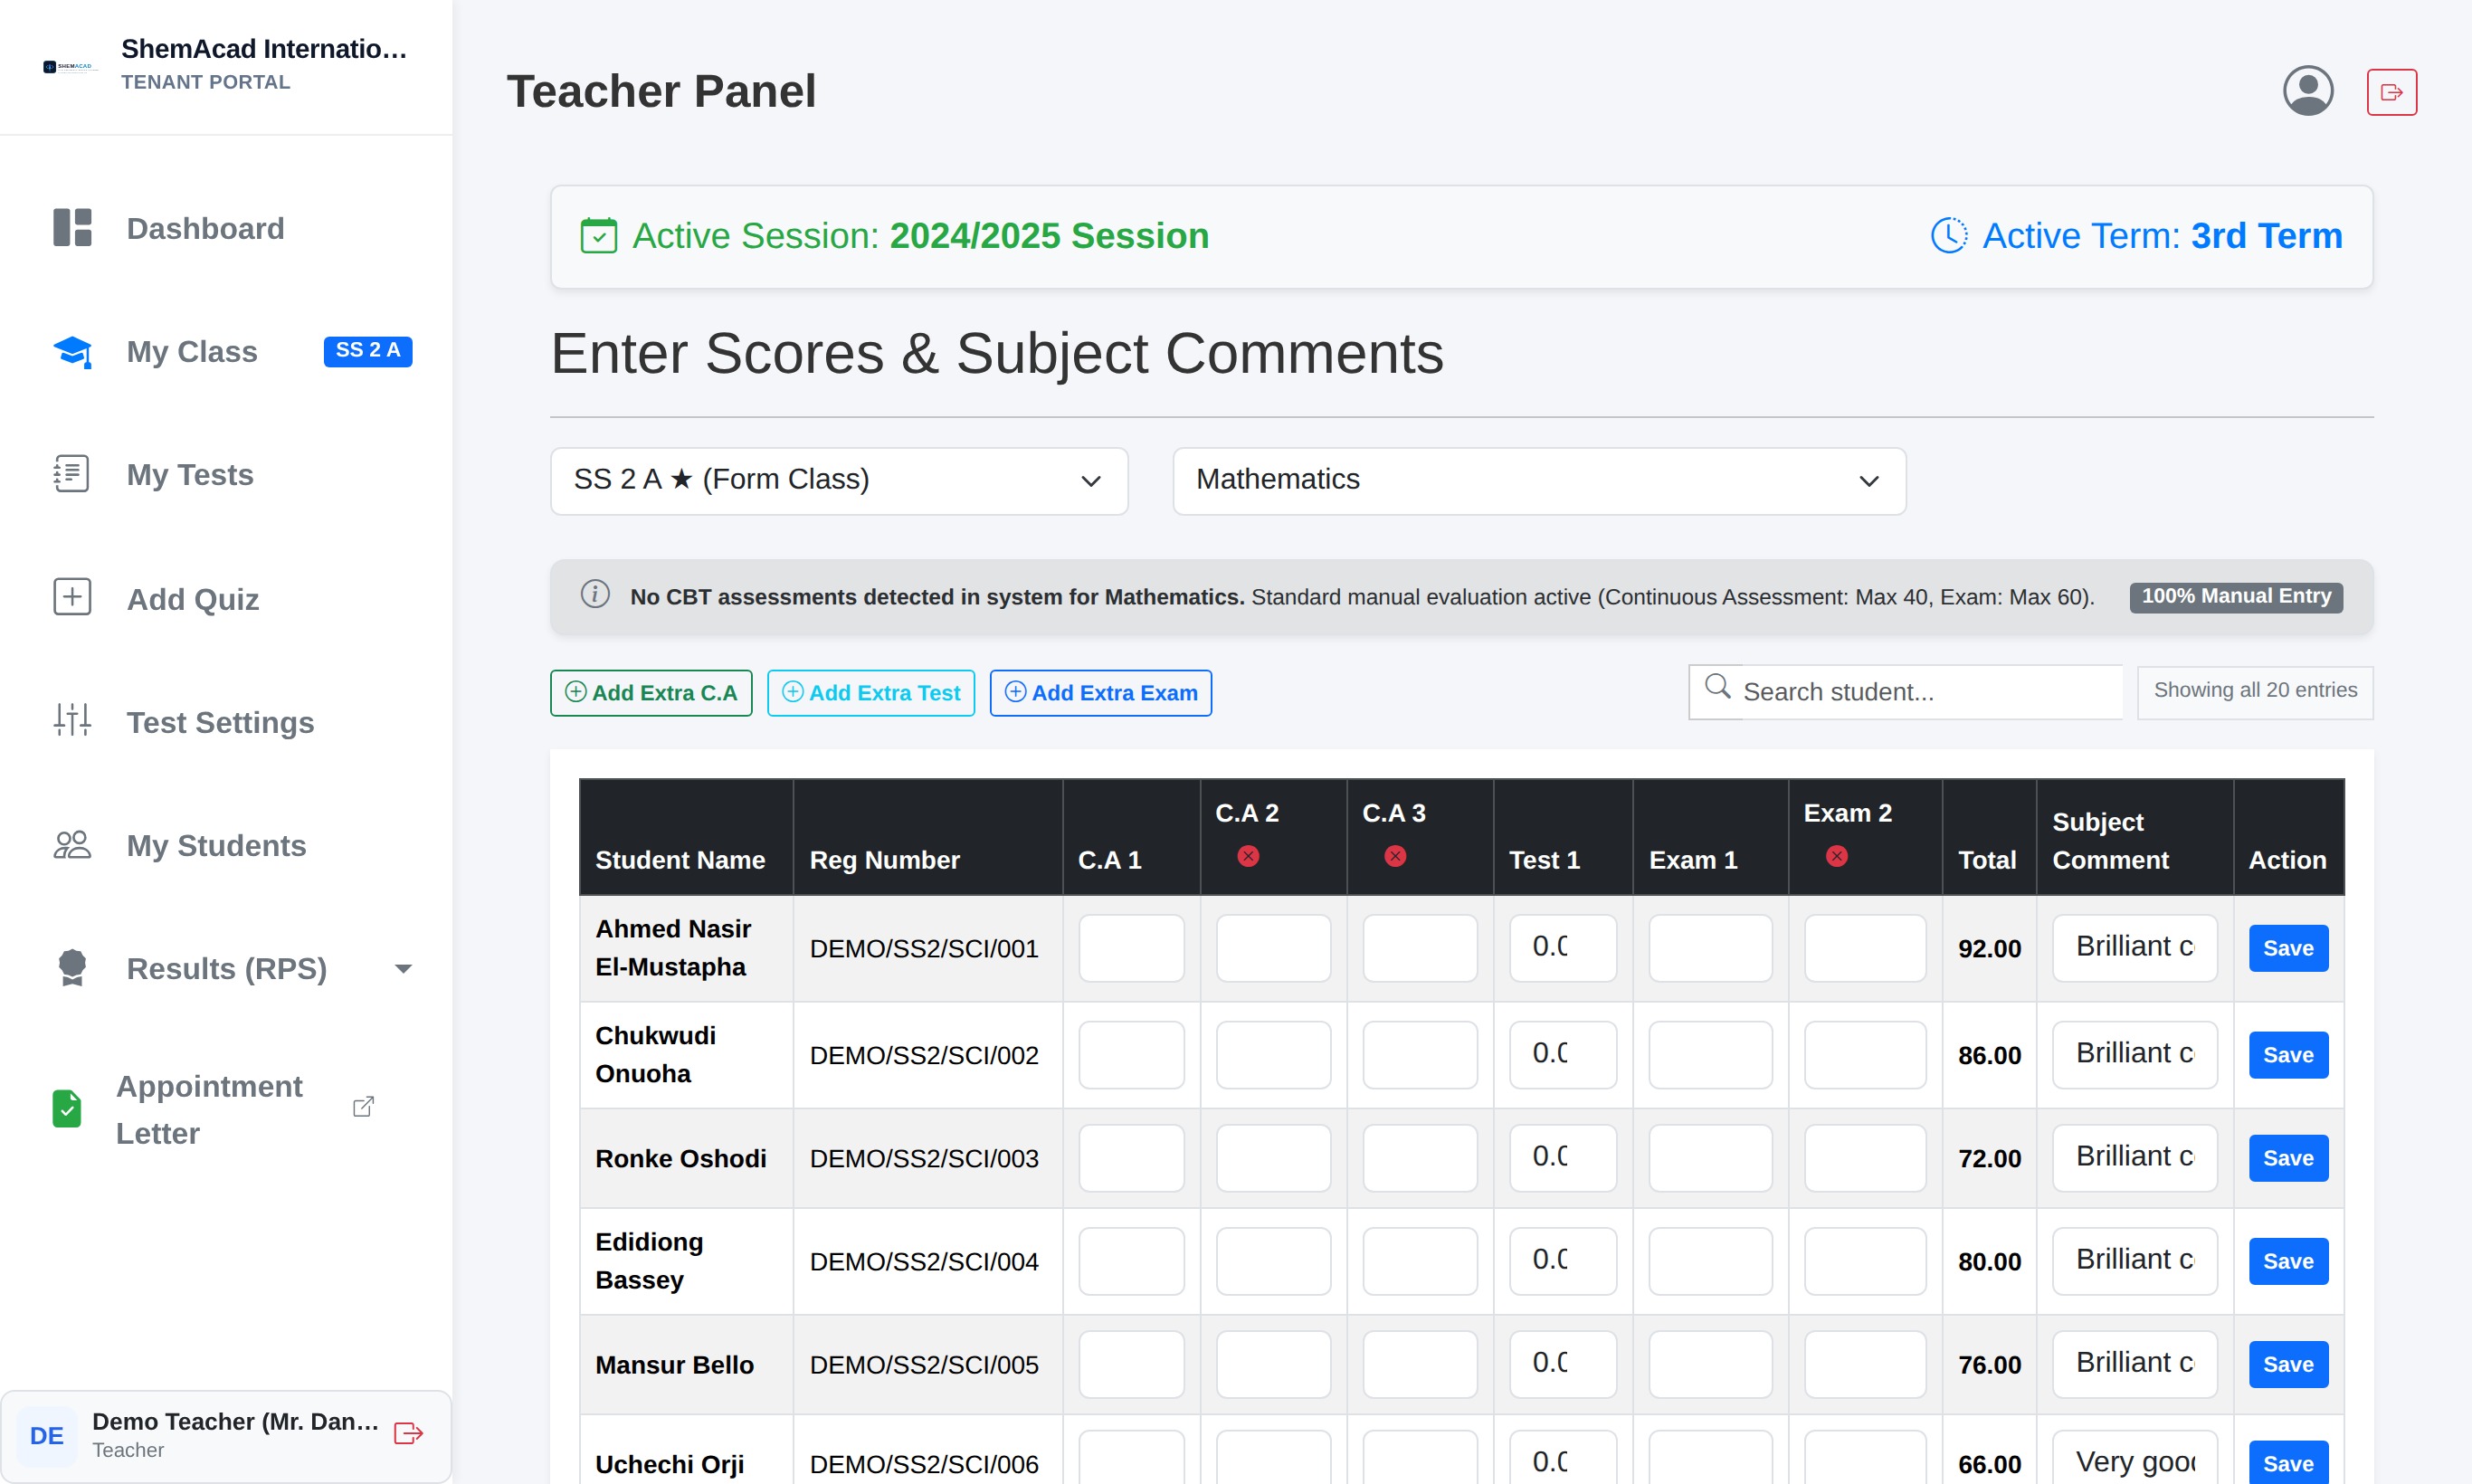
  1. Go to Results (RPS) → Enter Scores.
  2. Select your Class (your Form Class is marked with a star ★) and select your Subject.
  3. If students already took an online CBT quiz or exam for that subject this term, their CBT score appears locked/protected automatically — you do not need to re-type it! Simply type any remaining paper CA or Exam theory marks in the open columns.
  4. Need extra columns (like CA 2, Test 1, Exam 2)? Click + Add Extra C.A, + Add Extra Test, or + Add Extra Exam.
  5. The Total column adds up out of 100 automatically. Type an optional short Subject Comment, then click Save on the row or Save All Scores at the bottom.
Helpful Tip
If a student took a Senior stream subject (like Chemistry for Science only), the screen automatically filters to show only students registered in that stream.
Entering Hybrid CA & Exam Subject Scores
Enter Scores & Subject Comments sheet with dynamic columns, live totals, and per-row Save buttons.
Step 3.5

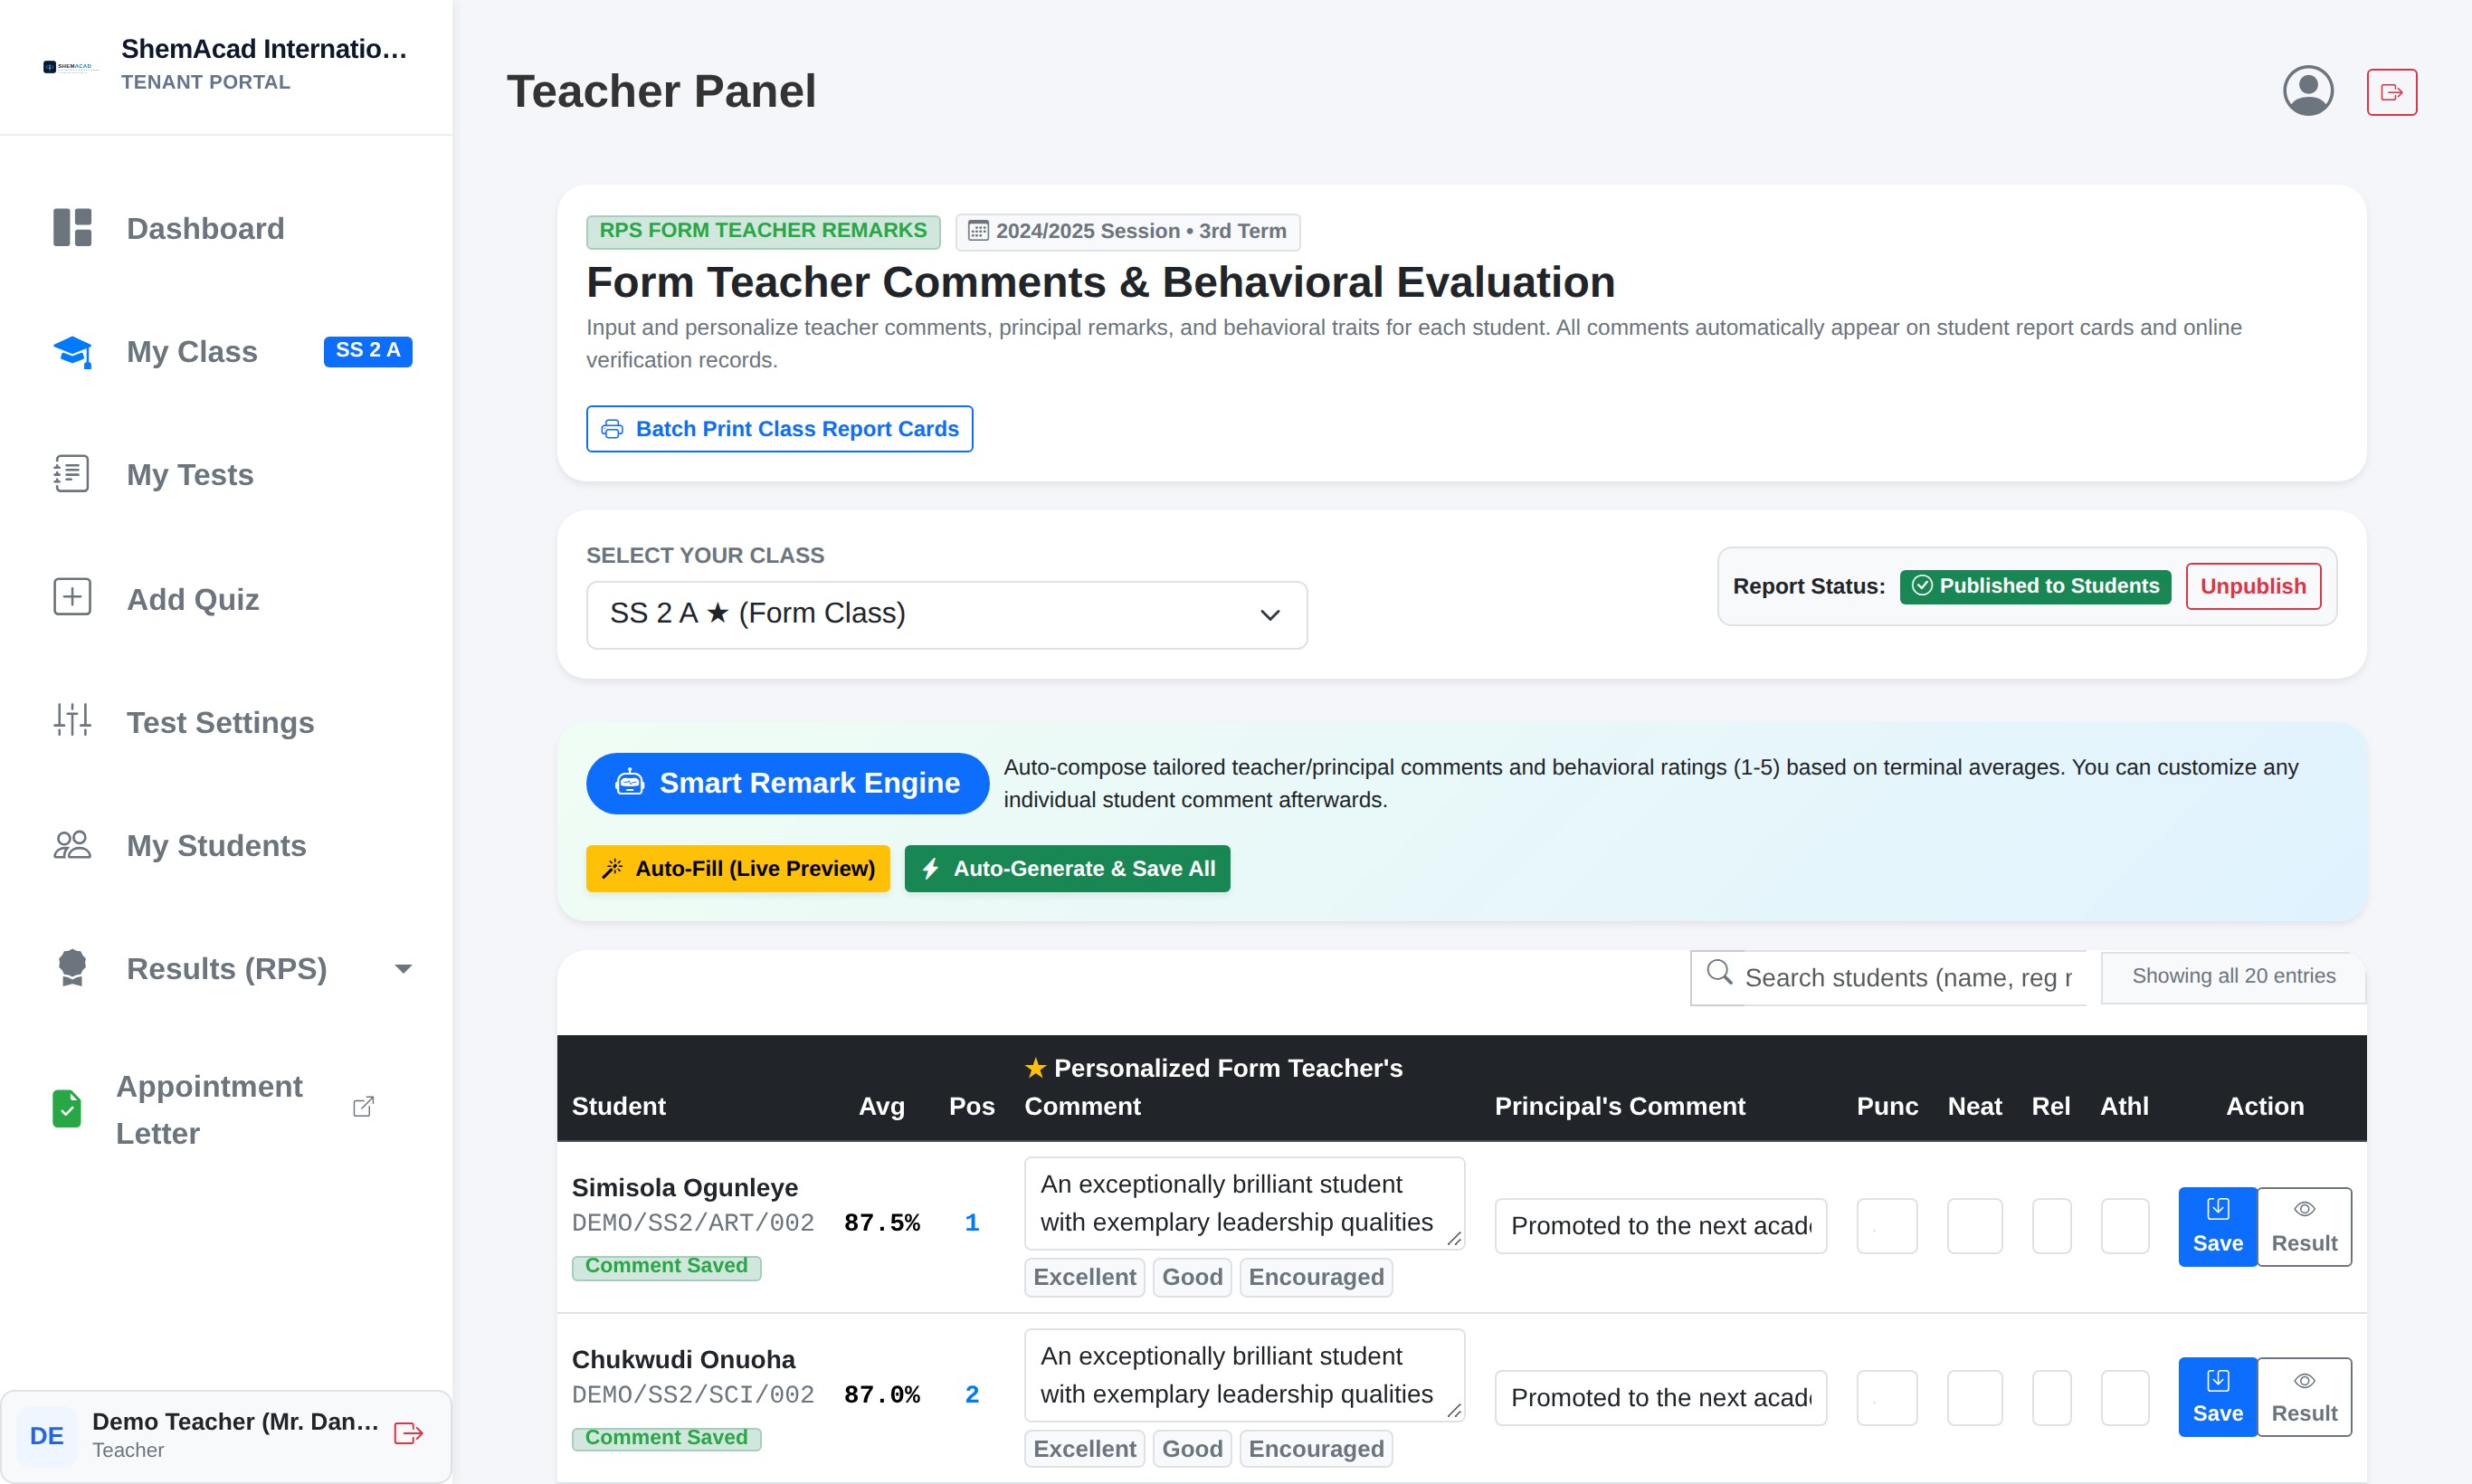
Writing Form Teacher Comments, Traits & Publishing Results

Form Teachers

Before Report Cards are finalized, Form Teachers add conduct ratings, personal remarks, and Principal remarks on the Form Teacher Comments screen.

  1. Go to Results (RPS) → Form Teacher Comments and pick your Form Class.
  2. Use the Smart Remark Engine at the top (Auto-Fill (Live Preview) or Auto-Generate & Save All) to draft smart remarks & behavioral ratings from each student's average, OR click quick tags (Excellent, Good, Encouraged) below any text box and customize freely.
  3. Enter trait scores (1 to 5) under Punc (Punctuality), Neat (Neatness), Rel (Relationship), and Athl (Athletics).
  4. Check the Report Status pill at top-right: ensure it reads Published to Students when management authorizes result release.
Helpful Tip
Always click Save on an individual row or Save All at the bottom after editing remarks manually.
Writing Form Teacher Comments, Traits & Publishing Results
Form Teacher Comments & Behavioral Evaluation screen with Smart Remark Engine and trait inputs.
Section 4 • Students & Exam Candidates

Student Portal & Online CBT Examination Guide

Simple guide for students to sign in, see their Form Teacher and subjects, complete online tests, and review scores.

Step 4.1

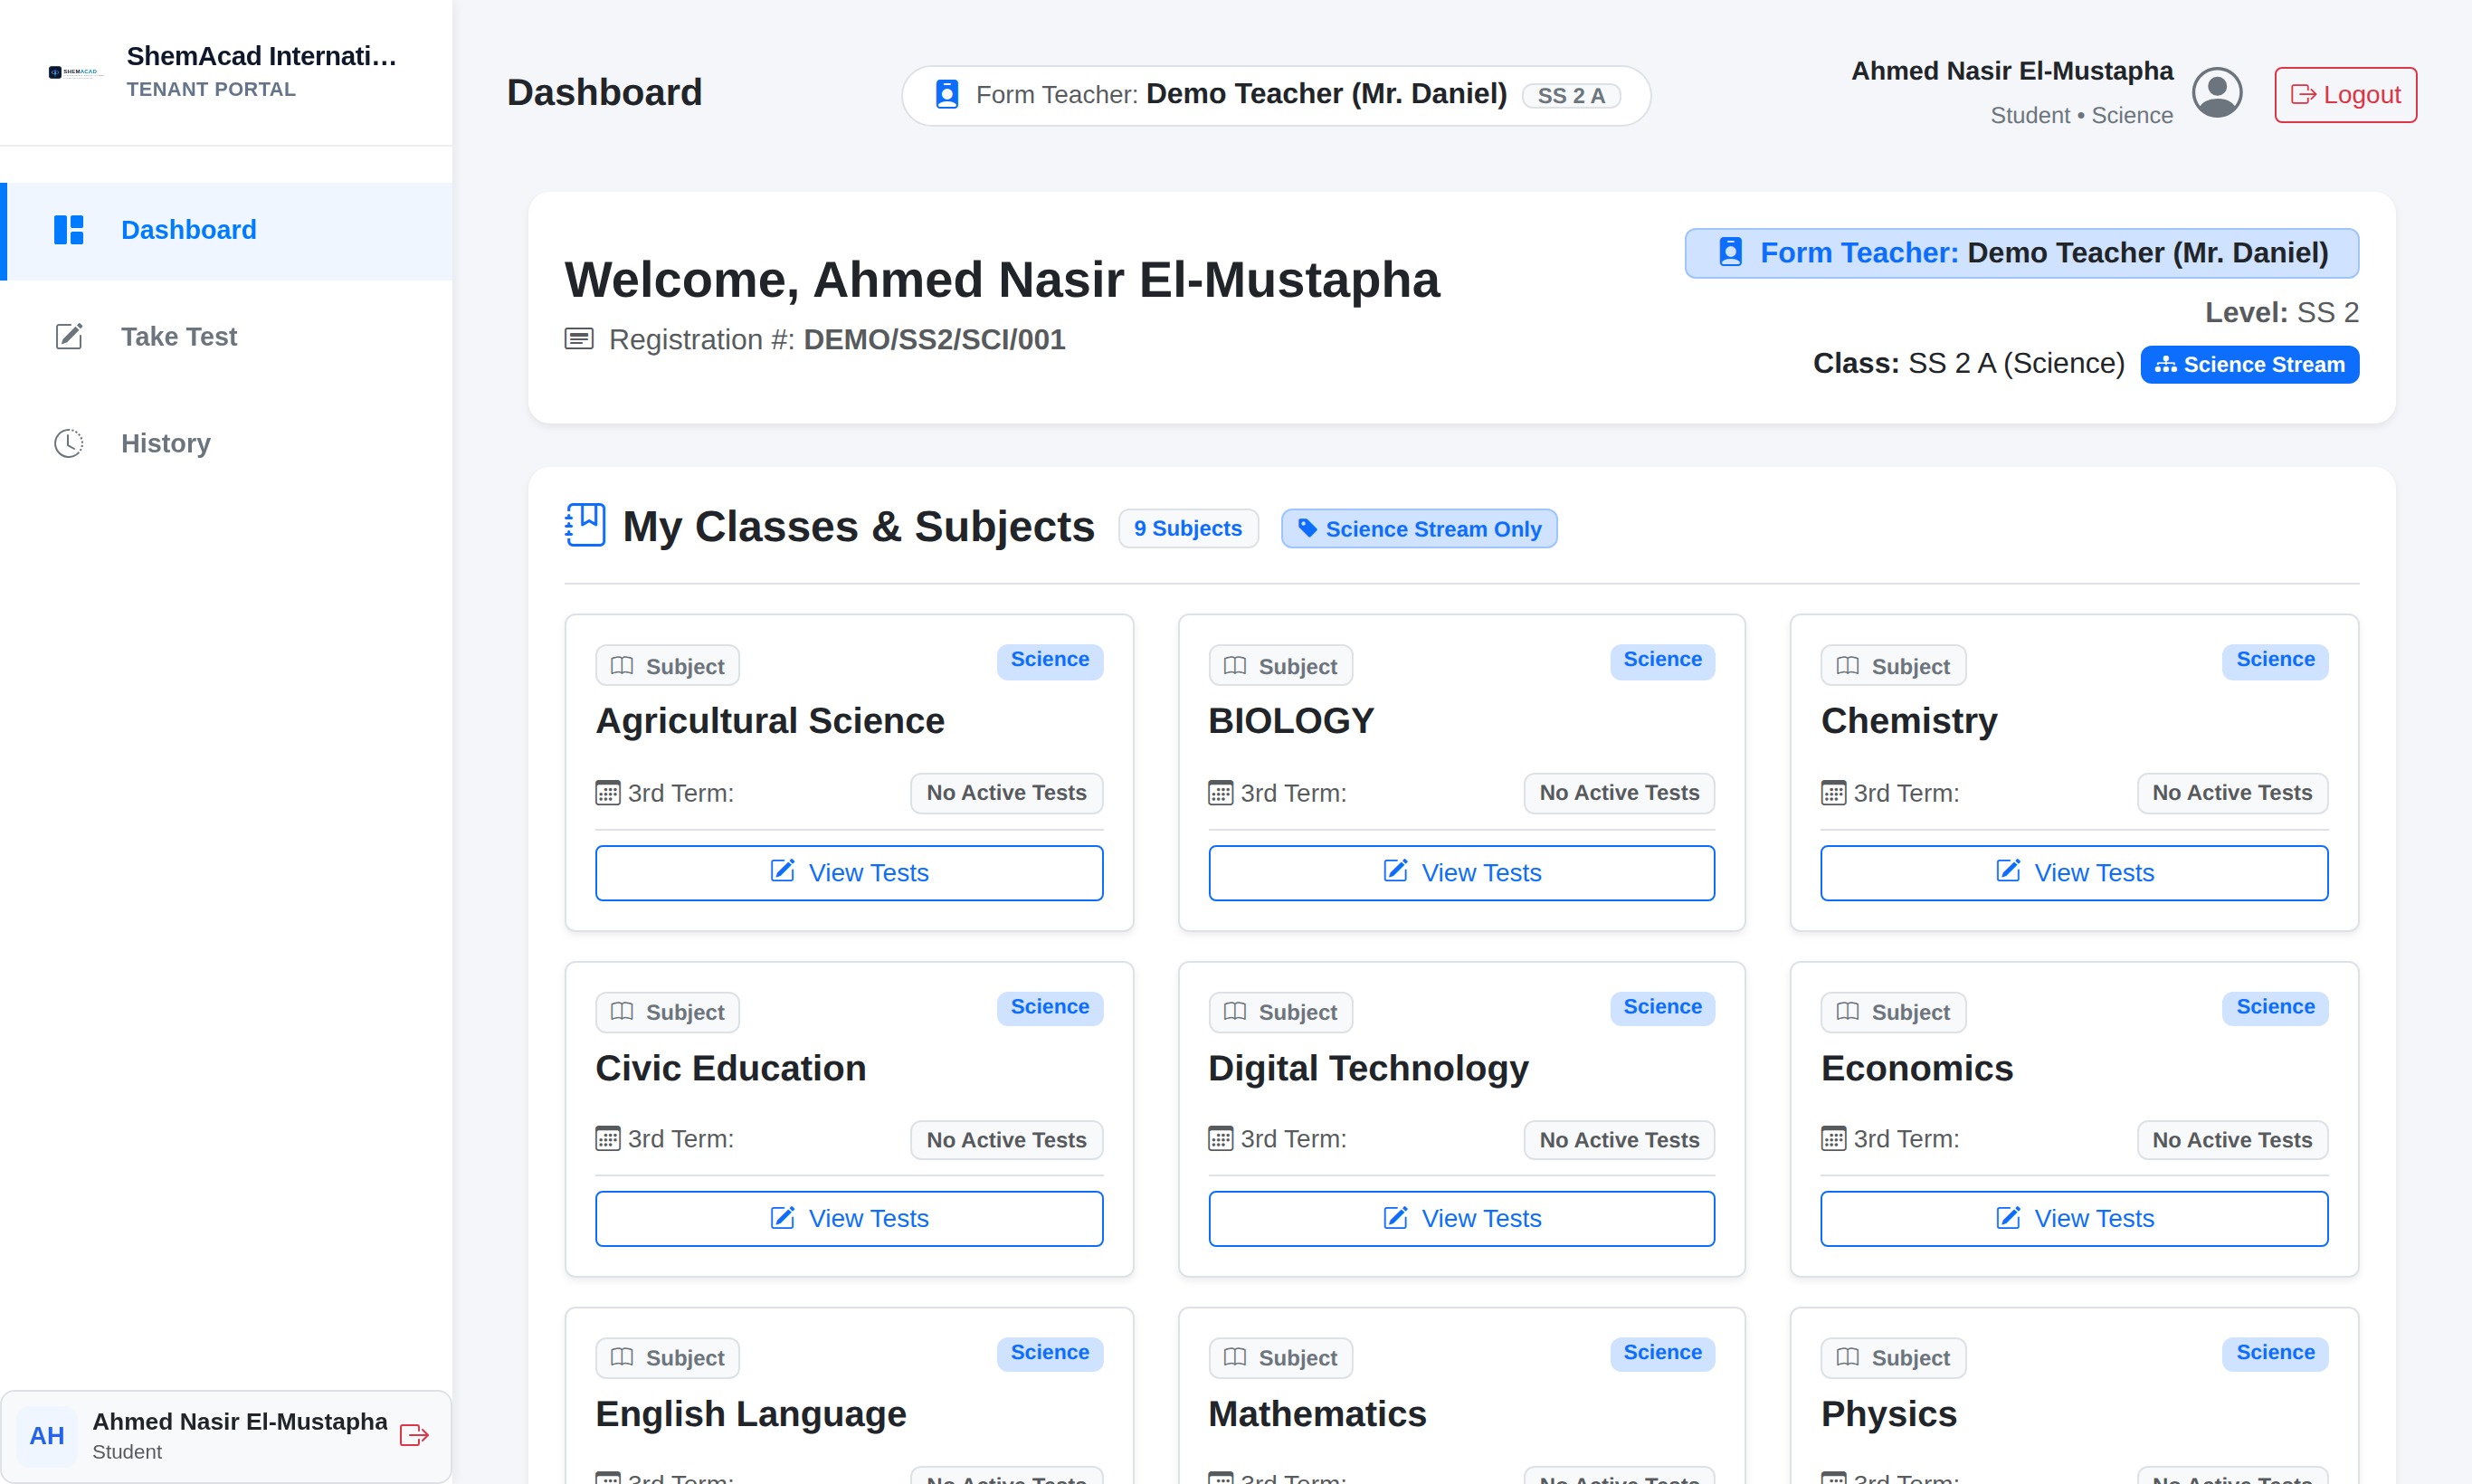
Signing In & Reading Your Student Dashboard

Student Home

When you sign in on Student Login using your Registration Number and Password, you see your personal Dashboard.

  1. At the very top bar (and in your welcome banner), check your Form Teacher's Name printed boldly along with your Class and Stream (for example SS 2 A (Science)).
  2. Verify your Registration Number under the welcome greeting.
  3. Scroll down to My Classes & Subjects to see every subject assigned to your class (and your specific Science/Art/Commercial stream in Senior Secondary).
  4. Each subject card shows whether any online test is active for the current term. Click View Tests on any subject or click Take Test in the left menu.
Helpful Tip
In Senior Secondary, Science students only see Science + general subjects, and Art students only see Art + general subjects — you will never be confused by another department's subjects.
Signing In & Reading Your Student Dashboard
Student Dashboard highlighting Form Teacher name bold at the top, class stream badge, and subject cards.
Step 4.2

Starting a Test & Taking an Online CBT Exam

CBT Exam Mode

Follow these simple rules during an online Computer-Based Test or Examination:

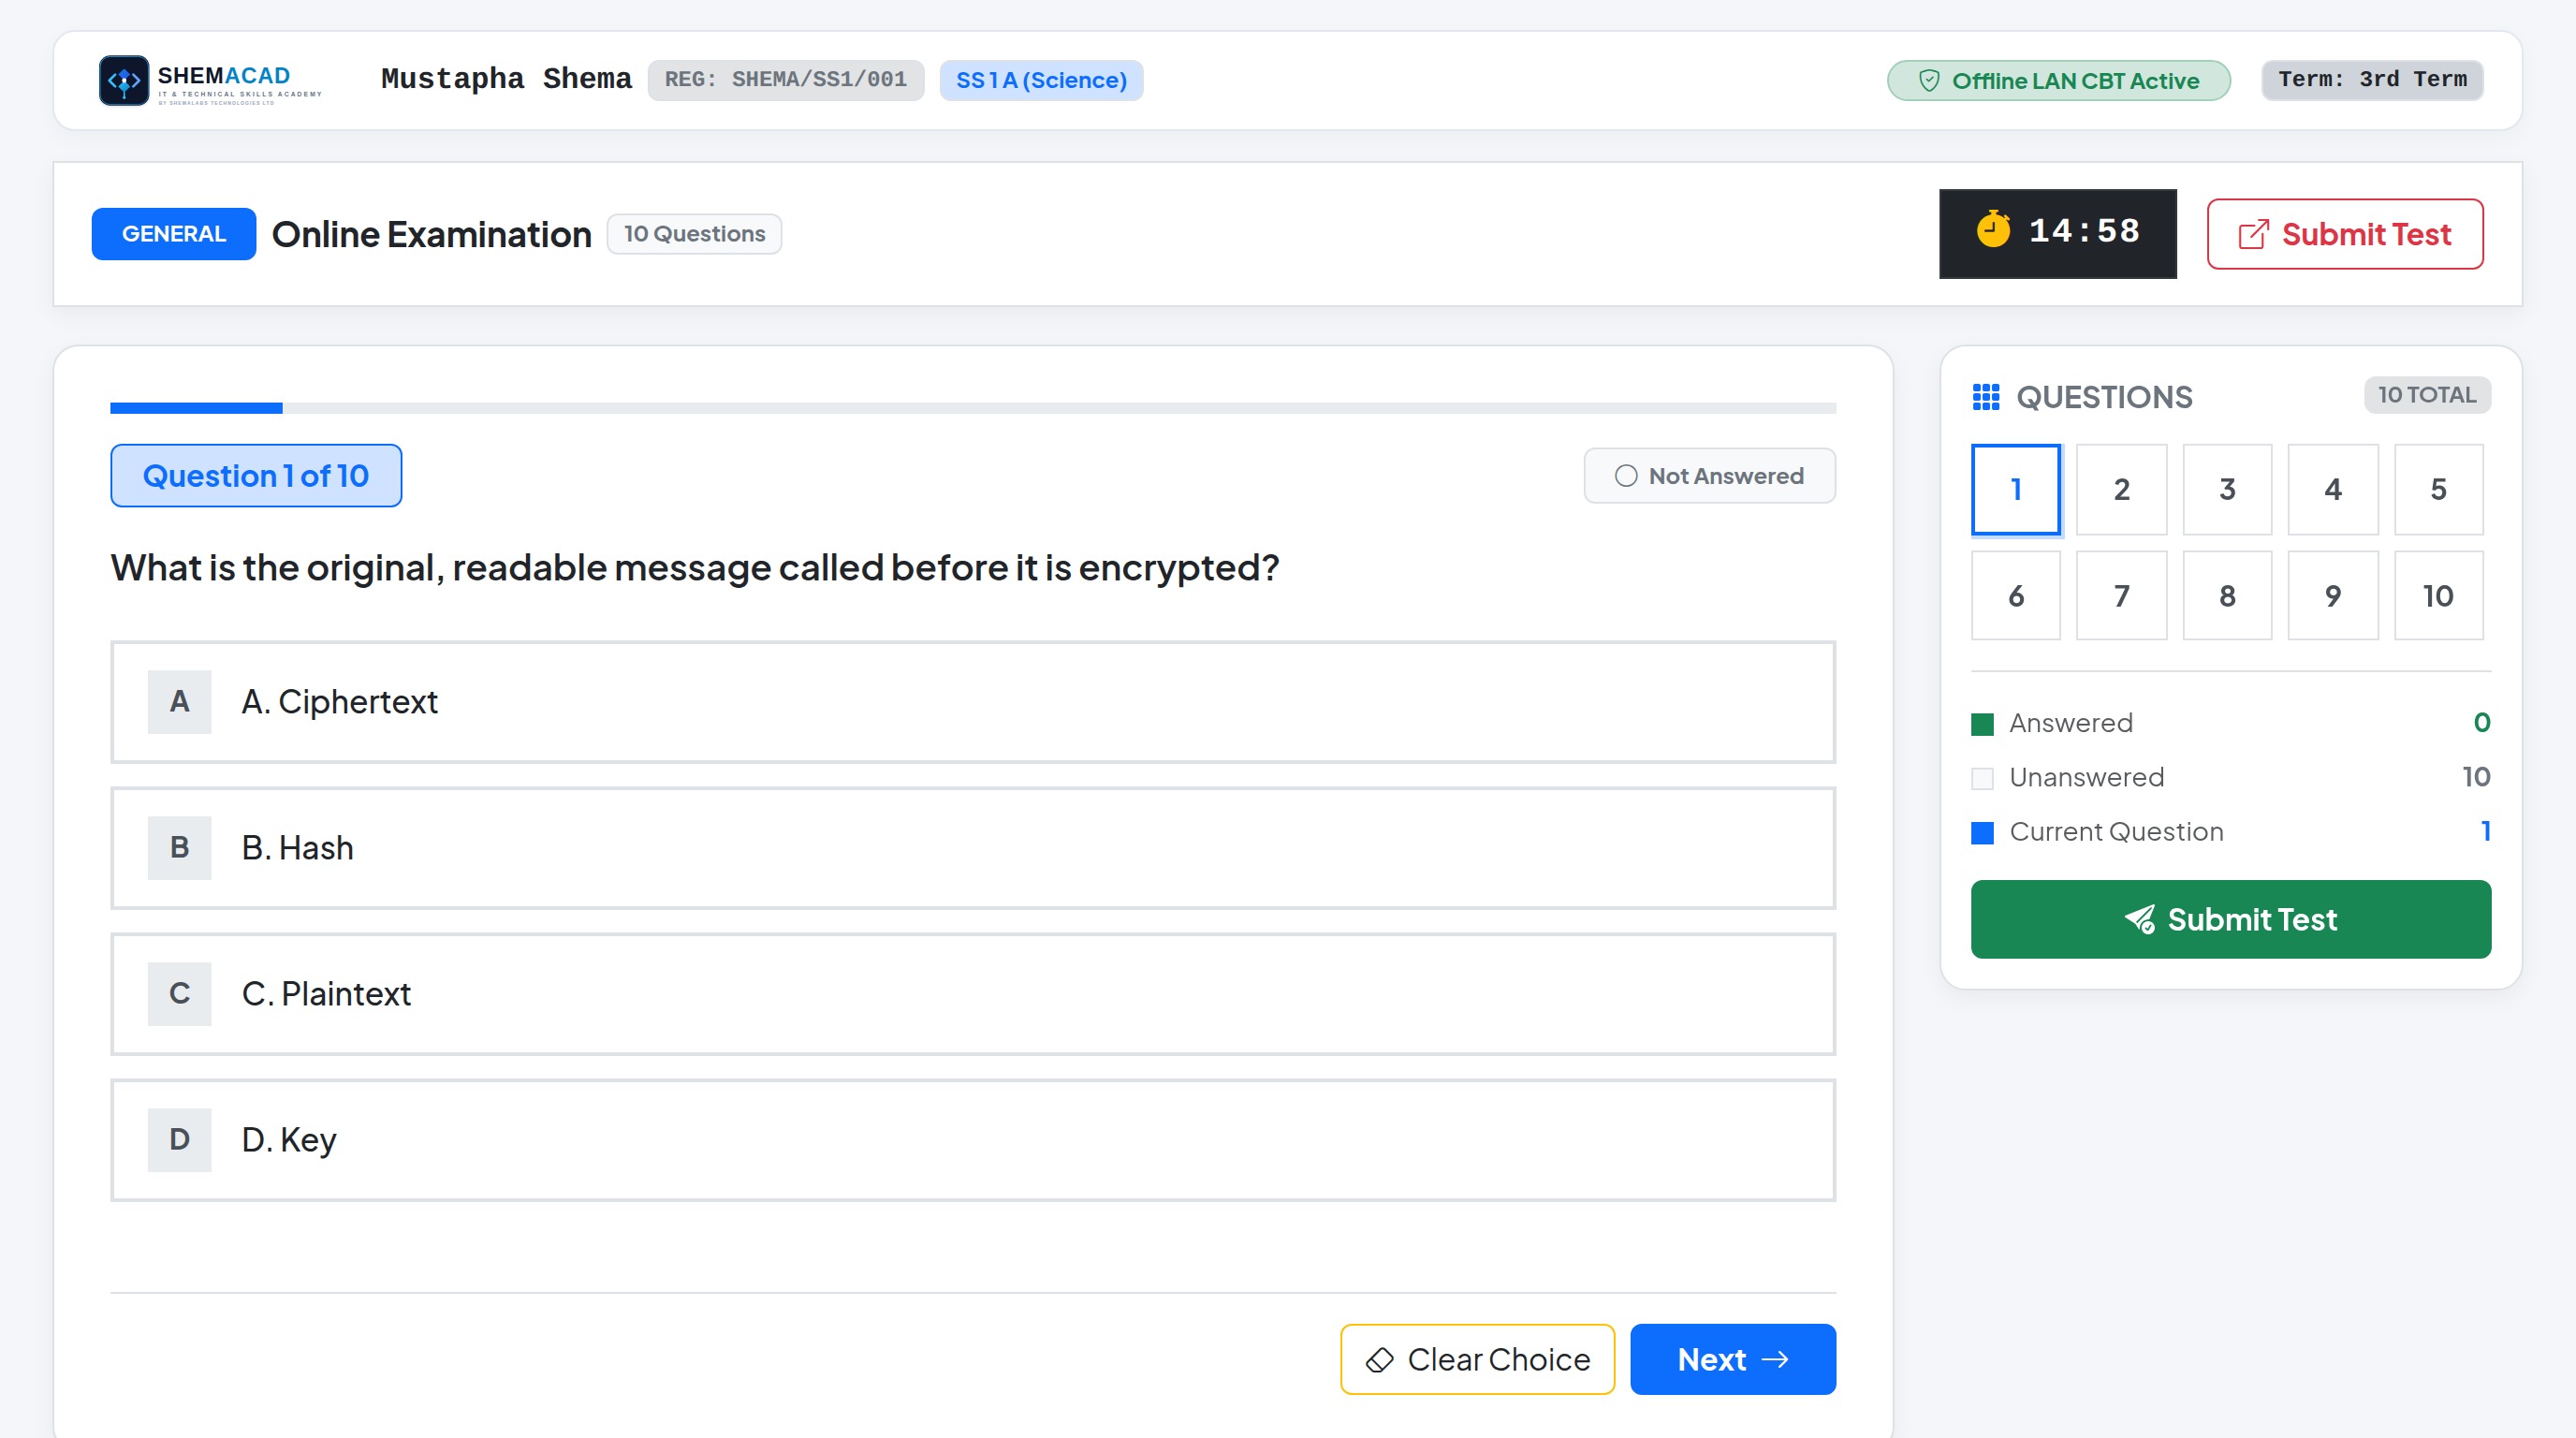
  1. Open Take Test in the left sidebar (or click View Tests on a subject card). Check the test topic, total questions, marks, and time limit, then click Start.
  2. Once the exam opens, look at the black countdown timer at the top-right (for example 14:58). Keep an eye on your remaining time.
  3. Click option A, B, C, or D to choose your answer, then click Next → (or Clear Choice if you want to unselect an option).
  4. Use the QUESTIONS Palette on the right side to jump straight to any question number. Green squares are questions you already answered; white squares still need an answer.
  5. When you finish checking your answers, click the green Submit Test button once. If the timer reaches zero, the portal submits your work automatically.
Helpful Tip
Never refresh or close the browser tab during an active test. You only get one attempt unless your teacher or administrator grants a retake.
Starting a Test & Taking an Online CBT Exam
Live CBT Examination interface with countdown timer, A–D answer cards, and clickable Question Palette.
Step 4.3

Checking Completed Test Scores ("History")

Student History

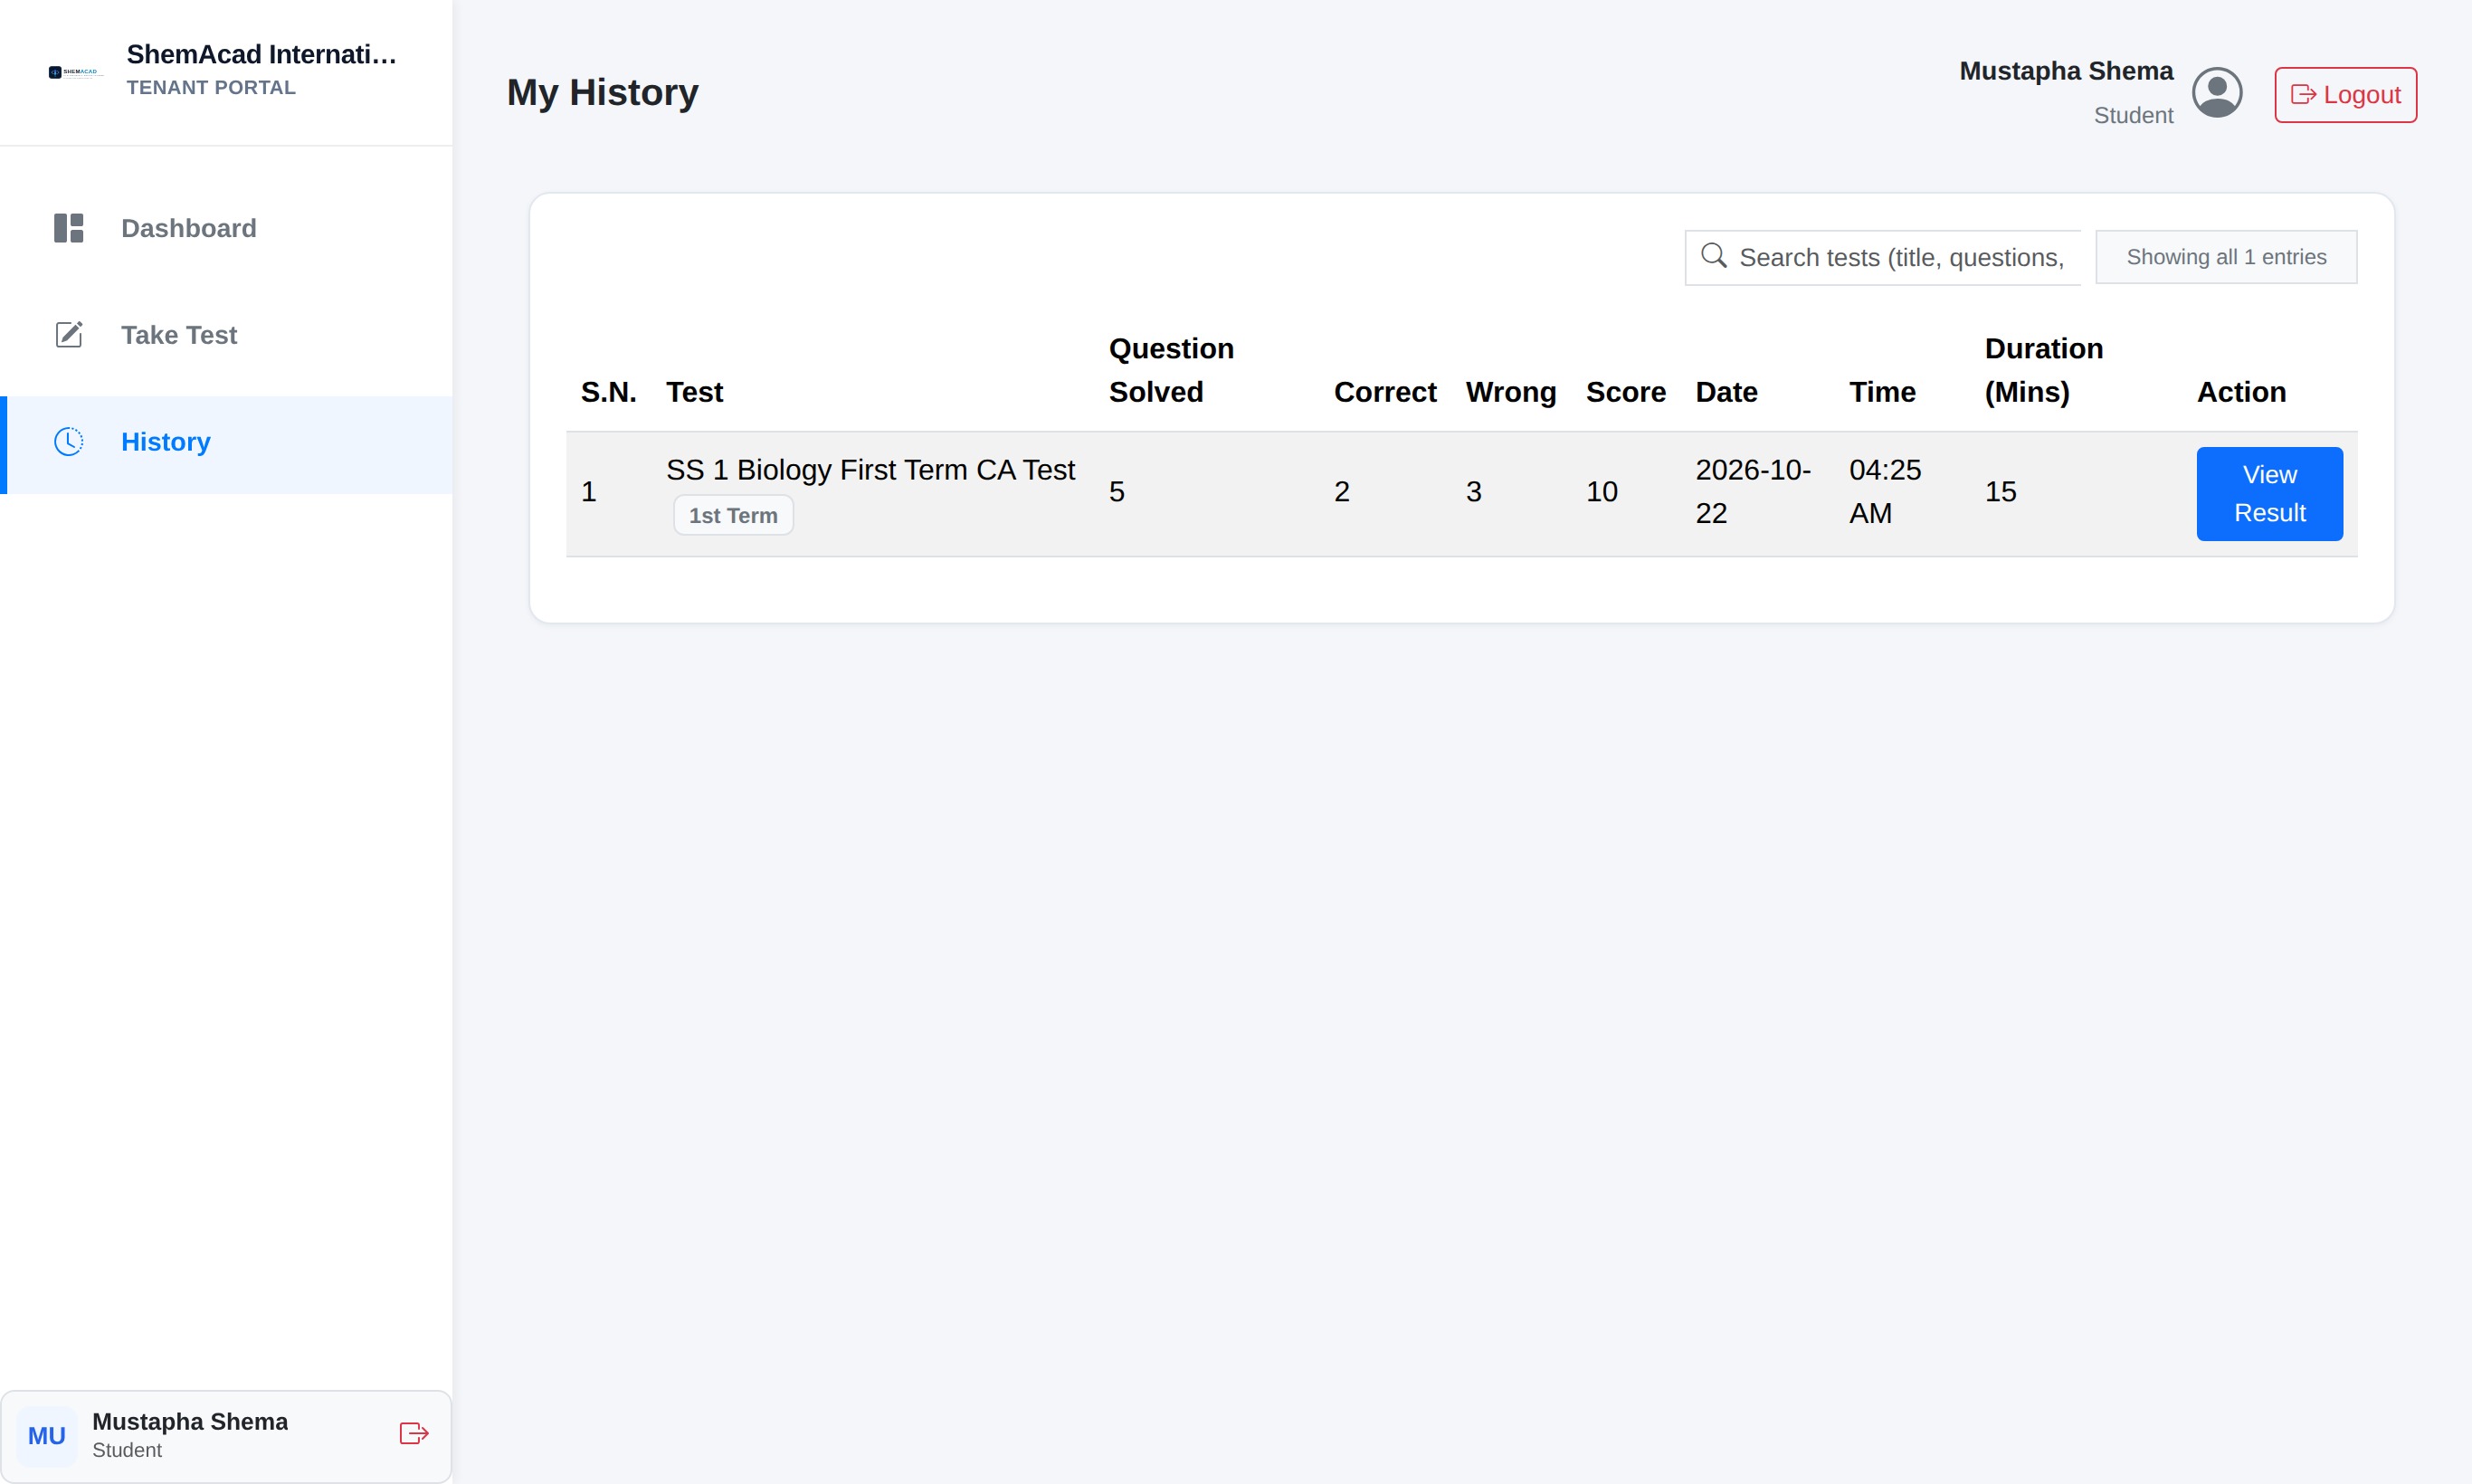
Every CBT test you complete is saved immediately so you can review your performance.

  1. Click History in the left sidebar of your Student Portal.
  2. Find your completed test in the table to see Questions Solved, Correct answers, Wrong answers, Total Score, and submission date/time.
  3. Click the blue View Result button on any row to inspect the breakdown.
Helpful Tip
If your score does not show right after submitting an exam, ask your teacher if instant result viewing was held until the exam session ends.
Checking Completed Test Scores ("History")
Student History table showing completed CBT assessments and View Result button.
Section 5 • Enabled Campus Add-On Modules

Extended Campus Operations Guide

Step-by-step guide for the optional campus management modules enabled on ZBSK INTERNATIONAL.

Staff & HR Management

Teacher Recruitment, Job Applications & Appointment Letters

Staff & HR
  1. Open Staff & HR → Job Vacancies to publish open teaching or staff positions on your portal's Careers card.
  2. Inspect incoming CVs and applicant profiles under Job Applications.
  3. Click Issue Appointment Letter to generate formal signed offer letters; teachers can also download their letter inside their Teacher sidebar.
Faculty & HR Management Roster
Teachers & HR roster connected with appointment letters and staff onboarding.
Section 6 • Quick Troubleshooting Checklist

Common Questions & Instant Solutions

Before calling technical support, check these six most common fixes inside your portal.

Problem / Question Why It Usually Happens Exact Step to Fix It
A student logged in but cannot see a CBT test. Either the test Status is disabled, its Term doesn't match the active term, or the student belongs to a different Senior stream. Teacher opens My Tests & clicks Enable; Admin verifies Manage Sessions active term and checks the student's class/stream in Manage Students.
Student sees "You have already completed this test". The student already submitted once or closed mid-test earlier. Teacher or Admin opens the test results view and clicks Allow Retake for that student if a fresh sitting is approved.
Teacher cannot type a score above a certain number in Enter Scores. An online CBT test already filled part of the CA or Exam quota (e.g., 25 out of 50 CA marks), so the remaining allowance is capped cleanly. Check the blue notice bar at the top of Enter Scores to see locked CBT marks + remaining paper marks allowed, or verify Test Settings.
Report Card says "Results Not Yet Processed" or Position is blank. Scores were saved, but the class results have not been compiled or published yet. Admin opens Results (RPS) → Result Entry Progress and clicks Process / Force Process. Also ensure Form Teacher Comments shows Published to Students.
School Crest, Motto, or Next Term Date is missing on Report Cards. Header details under Result Settings have not been updated for this term yet. Admin opens Results (RPS) → Result Settings → Tab 2 (Header & Display Options), updates fields, and clicks Save.
Student or Teacher forgot their password. Self-service accounts can have passwords reset instantly by the school office. Admin goes to Manage Students or Manage Teachers and clicks the yellow Key button (resets password to 123456).
Section 7 • Computer Lab Server & Hybrid Cloud Sync

Offline CBT Lab Node & Cloud Synchronization Guide

Step-by-step operations manual for ICT officers and administrators running a local offline CBT computer lab connected to the online portal.

Step 7.1

How the Hybrid Online + Offline Exam Lab Works

3-Stage Workflow

Your campus computer lab runs a fast local server (no internet required during exams) that safely exchanges tests, student lists, and scores with zbsk.zabibschools.com.ng whenever internet is briefly connected.

Stage 1: Before Exams (Internet ON)

Connect the Lab Master PC to Wi-Fi/hotspot for 1 minute, open System Settings, and click Get from Online Portal so newly registered students, teachers, and CBT tests copy onto the lab server.

Stage 2: Exam Day (Zero Internet)

Turn off internet completely. Every lab workstation opens the local server over school Wi-Fi or Ethernet cables (e.g. http://localhost/Localtestapp or Lab Server LAN IP). Students log in and submit exams with zero network lag.

Stage 3: After Exams (Internet ON)

Reconnect the Lab Master PC briefly and click Send to Online Portal (or Sync Everything). All completed CBT scores merge straight into online broadsheets, result processing, and parent portals.

Step 7.2

Opening System Settings, Checking Changes & Running Sync Safely

Lab Server Admin
  1. Sign in on the Local Lab Server: Open the Admin Dashboard on the lab server and click System Settings near the bottom of the left sidebar.
  2. Unlock Protected Controls: Enter your Admin Password and click Unlock Settings. Always click Lock Settings when leaving the lab computer unattended.
  3. Review Changes (What's New): Click Check for Changes in the comparison table to compare record counts between This Computer and Online Portal across Student Accounts, Exam Results & Marks, Tests & Question Bank, and Academic Setup.
  4. Run the Right Sync Button:
    • Click Get from Online Portal when preparing tests/students before exams begin.
    • Click Send to Online Portal right after exam sittings end to push all student submissions and CA/Exam scores to the cloud.
    • Click Sync Everything for safe 2-way sync (the system automatically pushes offline exam results first, then pulls new cloud tests & students).
  5. Automatic Safety Backups & Rollback: Before every pull or push, the node captures an automatic database backup under Automatic Safety Backups (Restore Anytime). You can also click Backup Now anytime or Restore any prior timestamp in one click.
Built-in Protection Against Overwriting Unsaved Exam Scores
If students completed exams offline that have not yet been sent online, clicking Get from Online Portal triggers a warning dialog ("Unuploaded Exam Results Found!") reminding you to click Send to Online Portal or Sync Everything first so no student marks are ever lost.
Step 7.3

Software Updates (OTA) & Offline Lab Quick Troubleshooting

Maintenance & Care

Scroll to the System Updates panel at the bottom of System Settings to keep your offline computer lab up to date with new features and bug fixes released from the Mothership.

  1. When internet is connected, click Check for Updates to verify whether a newer software version is available.
  2. If an update appears, click Install Update. Your database, local student records, exam scores, school identity (client_identity.php), and logos remain untouched while code files and schema migrations apply automatically.
  3. If anything ever behaves unexpectedly after an update, use the Rollback button to restore the previous script snapshot safely.
Offline Issue Likely Cause Exact Fix
Lab student PCs cannot open the test page. Apache/MySQL services stopped on the Lab Master PC, or PCs are on the wrong Wi-Fi network. Restart WAMP/XAMPP Apache & MySQL on the server computer, connect student PCs to the lab LAN/Wi-Fi, and browse the server LAN IP (e.g. http://192.168.1.x/Localtestapp).
Sync shows "Connection Issue" or "Unauthorized". Lab PC has no internet during sync, or the school API key was regenerated online. Confirm internet is active temporarily on the Lab PC only for Sync/Updates; if API key was rotated in Mothership, update client_identity.php or re-download the installer.
Newly added online CBT test does not show in the lab. Test was created on the cloud portal after the last Pull Sync, or status is disabled / wrong term. Ensure the test is enabled in the active term, then run Get from Online Portal on the lab server.